Pages

Monday, April 30, 2012

Piri Piri Grilled Chicken

Whole butterflied chicken marinated with homemade piri-piri sauce and grilled to crispy perfection over hot coals is like a taste of southern Portugal and beaches and sunshine.


Years ago, we were driving around the Algarve in southern Portugal, looking for a meal.  Trying to avoid the usual touristy places, we pulled over to a little outdoor grill, with big uncovered barbecue pits, burning natural wood charcoal.  The old grill guy had a cigarette dangling from his lips but most of the smoke was coming from the fire.  He was grilling fresh sardines and butterflied whole chicken, slathered generously with homemade piri piri sauce.  The aroma was heavenly.  

It could have been the long day at a beautiful beach and the fresh sea air or the fact that I was pregnant with younger daughter, but: It was one of the best meals ever.  EVER.  I’ve recreated it a few times in the interim 19 years, tweaking the piri piri sauce or trying different marinades, but last weekend was one of the best yet.  

We sat and ate this, licking our fingers in a most uncivilized fashion and talking about what a great holiday that was and how we had never seen chicken grilled whole but split open before. Such a revelation! (Or perhaps we are easily impressed. Remember, this was way before Nigella.) But seriously, it is so much easier to deal with a whole chicken than to shift lots of pieces around! The Portuguese are brilliant. And so is this chicken.

Ingredients
For the piri piri sauce:
2.5 oz or 70g hot chili peppers
6 cloves garlic
1/4 cup or 60ml fresh lemon juice
1/2 cup or 120ml apple cider vinegar
1/2 teaspoon flakey sea salt, like Maldon  
1 1/2 cups or 355ml extra virgin olive oil

(This is going to make way more than you need for one chicken, but it will keep in the refrigerator for two to three weeks.  Once you have tried it on chicken, you will need to add it to everything you are grilling: prawns, pork ribs, whole fish and who knows what else.  Trust me, you will.)

For the chicken:
1 whole chicken, cleaned and excess fat removed
Sprinkle of flakey sea salt to serve

Method
Cut the stems off of your chili peppers and put everything for the sauce but the olive oil in a blender.  


Blend until the peppers are in tiny, tiny pieces, occasionally scraping the inside of the blender down.


Add in the olive oil and blend again.  Set this aside in a covered bowl and deal with your chicken.


Using a sharp knife or poultry scissors, cut right up the backbone and then turn the chicken over and press down on the breast to flatten the chicken out.  Make a couple of slashes with your knife in the thigh meat.  This will let the piri piri sauce penetrate but will also help the thighs to cook faster so the breast meat doesn’t dry out on the grill.


Pop the chicken in a Ziploc bag and add in about 1/2 cup of the piri piri sauce.  Massage it all around from the outside of the bag.  Let this marinate all day or overnight, but for at least an hour or two.  If it's more than an hour, put the bag in the refrigerator.


When you are ready to grill, light your fire with natural charcoal, if you can get it.  Otherwise, some briquettes with a couple of handfuls of damp smoking wood added as you put the chicken on will have to suffice.  Our barbecue pit is much less deep (and wide) than the traditional Portuguese grills so we had to use the lid to keep the flames from completely consuming the chicken.  On the other hand, using the cover to control the flames also allowed for a whole lot of smoking to go on and that only adds to the flavor.  

Grill your chicken, skin side up for about 10-15 minutes, basting regularly with more of the piri piri sauce. (I think we used about another 1/2 cup during the grilling.)  


Then turn it over and grill the skin side for another 10-15.  Again, baste often.  


Do be careful not to let it burn!  A little charring is a good thing though.  Control your fire by keeping the lid on but just a bit ajar to allow oxygen in or your fire will die.  Depending on the size of your chicken, 30 minutes over very hot coals, with the lid mostly on, might just do it.  

Baking and grilling with the lid mostly closed.  And it is smoking like crazy!
Remember that it is baking as well as being grilled.  If you are concerned, do check the thigh/leg joint and leave it in the barbecue pit, if needed, for a further 10 minutes or until it is just cooked through.

Remove from the grill and cut the chicken into serving pieces.  Give the whole thing a light sprinkling of flakey sea salt.


(As you can see, we were pigs and took a half each, since our only side was a tomato and herb salad and our chicken was so tiny.  But I ended up eating only my breast and wing for dinner.  The leg and thigh were devoured the next morning, straight out of the refrigerator – cold.  Such enormous flavor!  Still brilliant.)

Enjoy!


Saturday, April 28, 2012

Easy Fresh Shrimp Spring Rolls

These easy fresh shrimp spring rolls made with rice paper wrapped around shrimp (or prawns) with glass noodles, fresh cilantro and cucumber are a delightful appetizer or snack.


When I left Asia, I knew I would be homesick. It was hitting me hard yesterday, so I made these spring rolls. Are they authentic? Who the heck knows. Did they make me feel better? You betcha. [With a big nod to the movie, Fargo. If you haven’t seen it (nothing to do with Asia, by the way) it’s a classic. Find a way to see it.]

Ingredients
For the spring rolls: 
12 rice papers or spring roll skins
4 1/2 oz or 125g bean thread noodles (sometimes called glass noodles)
1 cucumber
Big bunch of cilantro or fresh coriander
12 large shrimp or prawns

For the dipping sauce:
1/2 cup or 120ml rice vinegar
1/2 cup or 120ml water
1/3 cup or 75g sugar
3 hot red peppers
Pinch sea salt
 
Method 
Shell and clean your shrimp. Hold them down straight with one hand and then push a satay stick up their hinies. This will keep the shrimp from curling up as they cook.
 

Gently cook them with a little water for just a few minutes, with the lid on, until they are cooked through.


Rinse them in cool water and then remove the stick. Slice them in half lengthwise.
 

Cut your cucumbers into quarters lengthwise and then cut out the seedy part with a sharp knife. Cut the cucumber into skinny lengths. You are looking for 12 skinny bits ideally.


Soak your bean thread noodles in very warm water for about 10 minutes. Rinse them with cold tap water and set aside.


Wash your cilantro thoroughly and spin dry.
 

To make the sauce, chop your peppers finely and then put all the ingredients into a small pot.


Bring to a boil and then simmer, uncovered, until it is reduced by more than half. Turn the fire off. It will thicken even more as it cools. Meanwhile, you can get on with assembling the spring rolls.


Start soaking the rice papers one at a time in a large plate just deep enough to submerge the rice paper.
 
It's hard to see, but it's there!


Once it is soft enough to fold easily (do not oversoak or it will also rip easily) transfer the rice paper – dripping excess water back into the original plate - to another plate.
 
Add one twelfth of your bean thread noodles into the rice paper. Top it with one shrimp (two halves), a thin of cucumber and a goodly bunch of cilantro.


Roll up from the bottom halfway. Fold over the two sides. Then roll up the whole thing. Voila! One fresh healthy spring roll.


How we eat them: Bite off one end of the spring roll, and spoon the sauce into the open end. Repeat with each bite.
 

Enjoy!

Sunday, April 22, 2012

Spring has Sprung Cupcakes


When I arrived here in Cairo and moved into our house, I was wondering what our neighbors would be like.  I should tell you that we live on a little side street with only two houses and an enormous shared parking space.  So good neighbors next door would be an important thing.  Well, we were here for several weeks and never saw them up close.   From a distance, I knew there was a woman, a man and a little boy.  I told dear husband that they must not be American because Americans would have come over to say hello.  And, then.  Then!  I heard them outside talking.  And the lady called to the little boy and he shouted, “Yes, ma’am!”  And I declared, “They are not only American, they are from the South!”  Americans would come over to say hello, but Southerners are duty bound, raised to be polite.  We bring warm cookies or pie!  Yes, we do!  But still no one came to welcome us to the neighborhood.  And I sat in judgment and found them lacking.  Not that I dwelled on it, but it stung a little.  (I have to say that I did go over once and ring the bell, but no one answered, despite the car in the parking space and the gardener telling me they were home.) 

I was in the kitchen last Sunday.  I am fortunate in that my sink looks out on the front garden.  All of a sudden, I caught sight of one of my neighbors, the elder male of the clan, watering his lawn.  About the same time, my doorbell rang and it was the meter reader or someone else that is not important.  Finally, I had a chance to meet my neighbor!  I rushed out and introduced myself.  We chatted.  He is a very nice man.  And he shared with me within those first few minutes that they had lived in Egypt for many, many years and were raising their five-year-old grandson since last August when his mother, their daughter, was murdered by her ex-husband.  In front of that sweet boy.  I maintained composure and I think I said all the right condolencey-type things, even offering to babysit if they ever needed a break, but once I got back into the house, I was so ashamed.  The very last thing on that woman’s mind is surely welcoming a neighbor to the neighborhood!  She is raising her grandson and grieving the loss of her own beloved child.  Dear God, forgive me!  I pray I will remember this lesson forever.

In the face of loss and grief, I do what Southerners do:  I baked them cupcakes.  Does it make up for judging them?  Hell no.  But it made me feel the tiniest bit better.  And I hope the bright cupcakes cheered them up just a little.

Ingredients
For the vanilla cupcakes:
2 ¼ cups or 280g flour
1 ½ cups or 340g sugar
¾ cup or 170g shortening or butter, softened
3 eggs
¾ cup or 80ml milk
2 ½ teaspoons double-acting baking powder
1 teaspoon salt
2 teaspoons vanilla extract

For the butter cream frosting:
16 oz or 450g confectioners sugar
6 tablespoons or 85g butter, softened 
11/2 teaspoons vanilla extract
3-4 tablespoons milk
Food colorings of your choice (I use Wilton gels because a little goes a long way.)

For the decorative flowers:
About 70 mini marshmallows (for 18 cupcakes) 
1/2 cup or 110g fine sugar for each color you make (Store leftovers in a airtight plastic bag - these will keep indefinitely.)
Food colorings of your choice

Preheat oven to 375°F (190°C).  Grease a muffin tin or use cupcake papers.

This is the easiest cake ever.  Into a large bowl, mix ALL the cake ingredients at low speed until smooth, scraping bowl occasionally with a spatula.


Increase speed to medium and beat five minutes, scraping the bowl occasionally with a spatula.


Spoon out the batter into the prepared muffin tins.  I use a small ice cream scoop for this because I find it easier to distribute the batter evenly and get it neatly in the muffin tin.  This batter should make 18 cupcakes.   Drop the muffin pan gently on the cabinet a couple of times to let the air bubbles come to the top and pop.


Bake for 20-30 minutes or until nicely browned and a toothpick poked in them comes out clean.  Remove from pans and let cool completely on rack. 

The ones on the right didn't get quite as brown because they were too close to the right side of the oven, because I had another pan of six in there with them.  If your oven doesn't heat evenly, as mine apparently does not, bake the two trays one after the other instead. 

Meanwhile, make your butter cream icing and decorations.  For the butter cream, mix all the ingredients together with your electric mixer until it is creamy.  


If the mixture is too thick, add just a little more milk.  


Add in your food coloring and mix again.  I chose green but you can make whatever color you like best.


For your decorative flowers, mix your food coloring gel in a few drops of water and stir with a toothpick until it is dissolved.  I tried adding the gel directly to the sugar and that didn’t work out so good since my gel was too thick and sticky.  I ended up with a light color that didn't contrast enough with the white of the marshmallow.  If you have liquid food colors, you might be able to skip this step and put the colors straight into the sugar.


Too light with bits of gel still visible. Don't do it this way!
Add it to the sugar in an airtight container and shake vigorously until the color is even distributed. You will need at least two colors to make a daisy.  Or you could use M&Ms for the center. 

Much better, don't you agree?

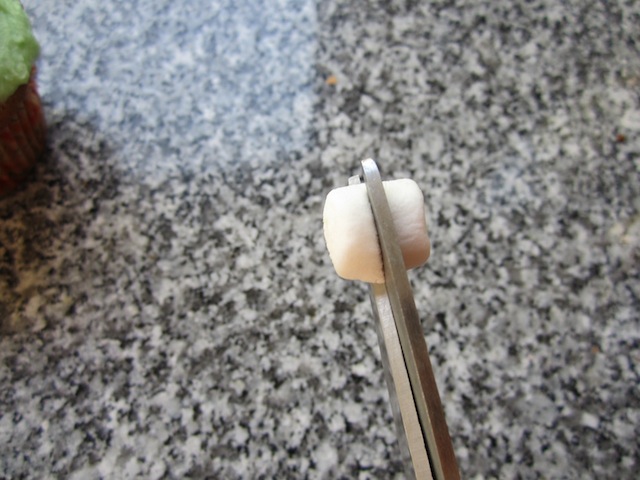
Once your colored sugars are ready, cut the mini marshmallows diagonally for the petals, and straight across the middle for the center of the flower.   

I will be petals!

I will be the center!
Pop them into the airtight sugar containers and give them a shake.  They will plump back up in just a few minutes.


Once your cupcakes are cool, frost them.  


Add the marshmallows to the top, flat, non-cut side down.  Start with the center and then add the petals at 9 and 3 o’clock and then fill in the other two on each side. 


Share them with anyone who might need some springtime sunshine.


Enjoy!


Hey, see that little green Facebook symbol up in the right hand column?  If you click on it and then hit LIKE when Facebook opens, you will never miss a post because they are automatically updated to my Facebook page.  I mean, just if you want to.  Thanks!


Credit for the marshmallow flower idea goes here.  Aren’t hers beautiful?!  

The cake and frosting recipes came originally from the Good Housekeeping Illustrated Cookbook, 1980 edition.