Pages

Monday, July 30, 2018

Apple and Date Muffins #MuffinMonday

Sweet ripe Medjool dates and tart green apple combine in these apple and date muffins to make a deliciously nutritious breakfast or snack.

Food Lust People Love: Sweet ripe Medjool dates and tart green apple combine in these apple and date muffins to make a deliciously nutritious breakfast or snack.


It’s date season in the UAE so palm trees hang heavy with promise everywhere, even in my backyard. I have no idea if mine are any good to eat though, because we neglected the usual practice of bagging the dates with green mesh. The birds always get to them first. And I don’t begrudge them the treat.

Summer time in the UAE is hotter than the hinges of the gates of hell, dry and dusty to boot so I can’t imagine the birds have an easy time getting either water to drink or food to eat. With an irrigation that goes on three times a day and all the dates they could hope to eat, my backyard is pretty popular.

It sounds like I am more generous than I really am. If I’m honest, dates aren’t my favorite fruit to eat - they are sooooo sweet, too sweet for me mostly – but they are lovely to bake with. On those occasions, I leave the birds to their feast and buy a few Medjool dates.

Apple and Date Muffins


I recommend the fully ripened Medjool dates for this recipe as they are the sweetest dates I’ve ever tasted (although my neighbor Sandra’s dates come close!) and they are super sticky with goodness. Perfect for baking.

Ingredients
4 large Mejool dates
1 cup or 240ml milk
1/2 teaspoon baking soda
1 green apple, peeled and chopped finely
2 cups or 250g all-purpose flour
1/4 cup, firmly packed, or 50g dark brown sugar
1 1/2 teaspoons baking powder
1/2 teaspoon salt
2 large eggs
1⁄4 cup or 60g butter, melted and cooled

Optional for topping: 1 Medjool date, chopped

Method
Pit and chop your dates, setting one aside for garnish, if desired


Put the rest in a heatproof bowl. Add in the half teaspoon of baking soda. Scald the milk and pour it over the chopped dates. Stir to help separate the bits of sticky date and set aside till cool. It will cool faster if you stir it occasionally.


Make ahead tip: If you want to bake your muffins first thing in the morning, do the scalded milk step the day before and pop the milk in the refrigerator once it has cooled.

Preheat your oven to 350°F or 180°C and prepare your 12-cup muffin pan by greasing it with non-stick spray or lining it with muffin paper cups.

In a large bowl, whisk your flour and sugar with the baking powder and salt. In another bowl, add the eggs to the cooled date mixture.

Peel, core and finely chop the green apple, adding the bits to the liquid bowl immediately so they don’t turn brown. Pour in the butter and whisk it all together.


Pour your wet ingredients into the dry ingredients and fold until just combined.

A little flour might still show.


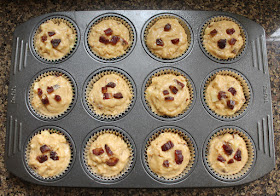
Divide the batter evenly between the 12 cups of your prepared muffin pan and then top each with some of the extra chopped date, if desired.

Sweet ripe Medjool dates and tart green apple combine in these apple and date muffins to make a deliciously nutritious breakfast or snack.


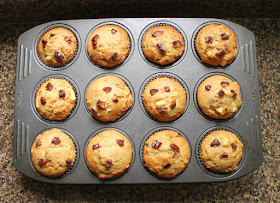
Bake for 20 - 25 minutes in your preheated over or until golden brown.

Sweet ripe Medjool dates and tart green apple combine in these apple and date muffins to make a deliciously nutritious breakfast or snack.


Cool for a few minutes then remove to a wire rack to cool completely.

Enjoy!

Food Lust People Love: Sweet ripe Medjool dates and tart green apple combine in these apple and date muffins to make a deliciously nutritious breakfast or snack.


Check out all the lovely muffins we have for you this month. July is a good month for muffins! 


Muffin Monday
#MuffinMonday is a group of muffin loving bakers who get together once a month to bake muffins. You can see all our of lovely muffins by following our Pinterest board. Updated links for all of our past events and more information about Muffin Monday, can be found on our home page.

Pin it! 

Food Lust People Love: Sweet ripe Medjool dates and tart green apple combine in these apple and date muffins to make a deliciously nutritious breakfast or snack.

.


Thursday, July 19, 2018

Lime Coconut Bundt #BundtBakers

Sweet flaked coconut, coconut milk and the zest and juice of fresh limes give this lime coconut Bundt cake rich flavor and zip. Like a bite of your favorite tropical vacation in every mouthful.

Food Lust People Love: Sweet flaked coconut, coconut milk and the zest and juice of fresh limes give this lime coconut Bundt cake rich flavor and zip. Like a bite of your favorite tropic vacation in every mouthful.


Tropical Bundts is a popular theme for our Bundt baking group. In the five plus years that I’ve participated, this is the fourth tropical cake we’ve shared. Between my Pineapple Kuih Tat Bundt baked in 2013, to 2014’s Mango Ginger Bundt and the super moist Banana Coconut Pineapple Bundt in 2016, I’d be hard pressed to choose a favorite tropical Bundt because I loved them all. Until today. This lime coconut Bundt wins, hands down.

Lime Coconut Bundt

This recipe is adapted from a coconut cake made by my friend Nancy of gotta get baked. Nancy doesn’t blog any more but her site is still available online, and thank goodness, because she has so many gorgeous recipes. She is funny, irreverent and witty, in addition to her skills in the kitchen. I miss her regular posts.

Ingredients
For the cake batter:
1 cup or 226g unsalted butter, room temp, plus extra for greasing pan
1 1/2 cups or 300g sugar
6 large eggs, room temperature
2 1/2 cups or 312g all-purpose flour, plus extra for flouring greased pan
1/2 teaspoon salt
1 teaspoon baking powder
1 teaspoon baking soda
3 tablespoons fresh lime juice
Zest 1/2 lime
1 cup or 240ml canned unsweetened coconut milk
1 cup, lightly packed, or 75g sweetened shredded coconut

For the Lime Coconut Glaze:
1 tablespoon fresh lime juice
1 tablespoon coconut milk
1 cup or 125g powdered sugar

To decorate:
1-2 tablespoons sweetened shredded coconut
Zest 1/2 lime

Method
Preheat the oven to 350°F or 180°C. Butter and flour a 12-cup Bundt pan.

In a small bowl, whisk together the flour, salt, baking powder and baking soda.


In the bowl of your stand mixer or a large bowl with a hand mixer, cream the butter and sugar together until light and fluffy, approximately 5 minutes. Add in the first egg and beat well.


Beat in the rest of the eggs, one at a time, scraping down the sides of the bowl as necessary.


Add the lime juice and zest into the cup of coconut milk and mix to combine.


Slowly add the dry ingredients and mix until the batter is smooth.

Pour in the coconut milk and beat again until well combined.


Fold in the shredded coconut.


Pour the batter into the prepared Bundt pan and bake for 45-50 minutes, or until a wooden skewer comes out clean.


Cool the cake for about 10 minutes, then turn the cake out onto a wire rack. Cool completely before drizzling on the glaze.


To make the glaze, whisk all of the ingredients together in a small bowl. Drizzle over the cooled cake.

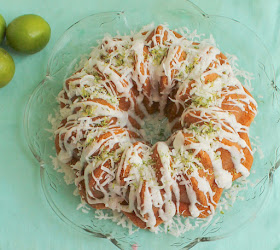
Food Lust People Love: Sweet flaked coconut, coconut milk and the zest and juice of fresh limes give this lime coconut Bundt cake rich flavor and zip. Like a bite of your favorite tropic vacation in every mouthful.
To decorate, sprinkle on the lime zest and extra flaked coconut immediately before the glaze hardens.

Food Lust People Love: Sweet flaked coconut, coconut milk and the zest and juice of fresh limes give this lime coconut Bundt cake rich flavor and zip. Like a bite of your favorite tropic vacation in every mouthful.


Enjoy!

This month my Bundt Bakers group is bringing you tropical cakes just in case you are needing a beach holiday. And, frankly, who isn’t? Many thanks to our host, Sandra from Sweet Sensations for this great theme and her behind-the-scenes work.

BundtBakers

#BundtBakers is a group of Bundt loving bakers who get together once a month to bake Bundts with a common ingredient or theme. Follow our Pinterest board right here. Links are also updated each month on the BundtBakers home page.

Pin it! 

Food Lust People Love: Sweet flaked coconut, coconut milk and the zest and juice of fresh limes give this lime coconut Bundt cake rich flavor and zip. Like a bite of your favorite tropic vacation in every mouthful.
.

Tuesday, July 10, 2018

Pão de Queijo - Brazilian Cheese Bread #BreadBakers

Chewy and cheesy inside with a slightly crunchy outside, Pão de Queijo is a traditional baked snack served in Brazil. They are terribly more-ish. You cannot eat just one!

Food Lust People Love: Chewy and cheesy inside with a slightly crunchy outside, Pão de Queijo is a traditional baked snack served in Brazil. They are terribly more-ish. You cannot eat just one!


Everywhere I’ve lived over the past 55 years (13 countries and counting!) I’ve learned how to make favorite dishes and added them to our family repertoire, from spicy curries to homemade falafels. Brazil was not only one of our favorite places to live but it also introduced us to many of our favorite recipes including zesty caipirinha cocktails, black beans and sausage, bolinhos de bacalhau, garlicky collards greens, chocolatey brigadeiros and these delicious pão de queijo or Brazilian cheese breads.

Pão de queijo made an appearance at the local churrascarias (grilled meat restaurants) as well as lanchonetes (snack counters) across Brazil. When folks baked them at home, even in Brazil, they typically used Yoki package mixes, as did we. If you look online, there are places in the US you can order Yoki, but it’s just as easy, honestly, to make them from scratch. If you have to order something online anyway, go for the tapioca starch.


Pão de Queijo or Brazilian Cheese Bread

Naturally gluten free! I used the Goya brand tapioca starch for these, readily available in many supermarkets for a reasonable cost. Bob’s Red Mill also makes sells it. This recipe is adapted from one on Sonia Portuguese.

Ingredients - makes about 70
1 cup or 240ml water
1 cup or 240ml milk
1/2 cup or 120ml canola or other light oil, plus more for greasing the pans
1 teaspoon salt
3 1/2 cups or 450g tapioca starch
2  large eggs
7 oz or 200g Parmesan cheese, grated finely

Method
Pour the water, milk, oil and salt into a large pot and bring it to the boil.

Remove the pan from the heat and add the tapioca starch.

Mix well with a wooden spoon until all of the tapioca starch is mixed in then set it aside to cool down till just warm.


Preheat your oven to 375°F or 190°C and grease two large baking pans with oil.

Beat the eggs and add them in to the warm dough.

Knead well until the eggs are fully incorporated. This is going to stick to your hands. Keep kneading and scrape the dough off with a spatula from time to time.


Add the grated cheese and keep kneading until the dough is smooth.


Scoop out 1 tablespoon pieces of dough and drop them on your prepared pan.


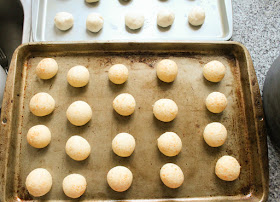
Roll the dough pieces into small balls, dampening your hands with water to stop the dough from sticking to you, dropping the balls back onto the baking pan. Wet your hands again as necessary during the rolling.


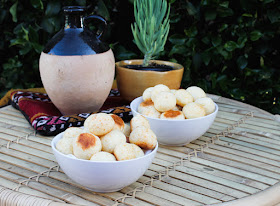
Bake the pão de queijo in your preheated oven for about 20-22 minutes or until golden brown and speckled in places.

Food Lust People Love: Chewy and cheesy inside with a slightly crunchy outside, Pão de Queijo is a traditional baked snack served in Brazil. They are terribly more-ish. You cannot eat just one!


Ideally, serve them warm. (But we'll also eat them the next day at room temperature.) Enjoy!

Food Lust People Love: Chewy and cheesy inside with a slightly crunchy outside, Pão de Queijo is a traditional baked snack served in Brazil. They are terribly more-ish. You cannot eat just one!
Check out that spongy interior! These guys are so chewy and cheesy. 


This month my Bread Bakers are all sharing gluten free recipes and I am taking my turn as host. Check out all of their great recipes!
BreadBakers
#BreadBakers is a group of bread loving bakers who get together once a month to bake bread with a common ingredient or theme. Follow our Pinterest board right here. Links are also updated each month on this home page.

We take turns hosting each month and choosing the theme/ingredient.

Pin it! 


Food Lust People Love: Chewy and cheesy inside with a slightly crunchy outside, Pão de Queijo is a traditional baked snack served in Brazil. They are terribly more-ish. You cannot eat just one!
.

Monday, July 9, 2018

Instant Pot Carrot Snack Cake #BakingBloggers

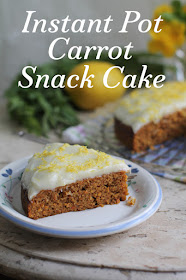
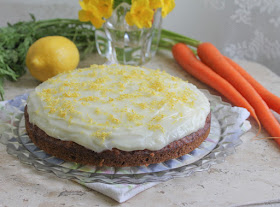
Delightfully rich and full of sweet carrot flavor, this sticky carrot snack cake is baked in an Instant Pot - keeping your kitchen cool during the summer - and then spread with lemony cream cheese frosting.

Food Lust People Love: Delightfully rich and full of sweet carrot flavor, this sticky carrot snack cake is baked in an Instant Pot, keeping your kitchen cool during the summer, and then spread with a delightful cream cheese frosting.


When it’s too hot outside to turn your oven on, an Instant Pot comes in mighty handy, even for baking cake. This carrot snack cake bakes up lovely, light and tender. If you have a sweet tooth, you can top it with cream cheese frosting (recipe below) or sprinkle with some powdered sugar, but it’s also great just on its own.

This month my Baking Blogger group is challenging the notion that everything must be baked in a full size oven by using small appliances instead. Despite owning the Instant Pot since the summer of 2016, I really hadn’t tested its baking abilities. For a one-layer snack cake, I may never turn the oven on again!

If you don’t have an Instant Pot yet, I recommend you wait for Prime Day on July 16th to buy one on Amazon. There are always deals on Instant Pots! The one I have is 6 in 1, in other words, it has six functions. On newer pots you can get up to 10 functions!

I’ve adapted the carrot snack cake batter from my family’s favorite carrot cake recipe, known around these parts as David’s Carrot Cake. But for Instant Pot baking instructions, I looked to my friend Kathy Hester’s great Instant Pot cookbook.

If you haven’t met Kathy, you need to head on over to her blog for a tour. Her recipes are all vegan but don’t let that scare you off. Everything I’ve ever made of hers has been delicious, from her easy avocado lemon pesto to her chickpea vegetable soup, but my all time favorite is her mushroom ginger congee, made not with the traditional rice, but oats! Both my husband and I licked our bowls clean of that gorgeous dish and moaned when the pot was empty.


Instant Pot Carrot Snack Cake

The Instant Pot doesn’t make baking this carrot snack cake any faster than the traditional oven method. The advantage is keeping your kitchen cool in the summer and still getting to enjoy a tasty cake! If you live somewhere hot, trust me, that is a really big deal.

Ingredients
For the cake batter:
8 oz or 225g carrots
1 cup or 125g flour
2/3 cup or 133g sugar
1 teaspoon baking powder
1 teaspoon baking soda
1 teaspoon cinnamon
1/4 teaspoon salt
1 egg, at room temperature
1/2 cup or 120ml canola or another light cooking oil, plus a little extra for the pan

For the cream cheese frosting:
1 cup or 125g powdered sugar
4 oz or 113g cream cheese, at room temperature
1 tablespoon fresh lemon juice

To decorate and add lemon flavor:
Zest 1 lemon

Method
Peel and cut the ends off of your carrots and cut them into short lengths.


Cover them with water in a medium sized pot and cook until very fork tender, about 10-15 minutes. Drain the water off and mash them with a potato masher until there aren’t any lumps. Set aside to cool.

Prepare your 8 in or 20cm round cake pan by greasing it with a little oil.  In a medium mixing bowl, whisk together the flour, sugar, baking powder, baking soda and salt.


Prepare your Instant Pot by adding 1 1/2 cups of water to the pot. Put the wire rack inside the pot. Fold a long length of foil to create a two-sided handle that will go under your baking pan, enabling you to remove it from the Instant Pot when the cake is done.

When the carrots are cool, add in the egg and oil and whisk till they are well combined.


Pour the wet ingredients into the bowl with the dry ingredients. Stir gently until they are well mixed and no dry flour is showing.


Spoon the batter into the prepared pan and even out the top with knife.

Cover the pan with foil, making sure to keep it flat against the sides so the pan will still fit in the Instant Pot.

Using the folded foil handle, lower the covered pan carefully into the Instant Pot, all the way down till it is sitting on the wire rack. Follow the manufacturer’s instructions to set it to cook for 35 minutes, with the steam release sealed.

When the cooking time is up, leave the Instant Pot to depressurize naturally. The Instant Pot automatically goes into Keep Warm mode, so I thought it would be necessary to turn that off. In fact, it doesn’t make any difference if you do or don’t.  It will depressurize regardless. Mine took about 30 minutes.

When it’s safe to take the lid off, do so and carefully remove it. Use the foil handles to take the cake pan out of the Instant pot, remove the foil lid and set the carrot snack cake on a wire rack to cool for about 10 minutes.


Turn the cake out of the pan and leave to cool completely on the wire rack.

Meanwhile, make the cream cheese frosting by mixing all of the ingredients together until they are smooth and all the lumps are gone. I start with a fork then end with a spatula.


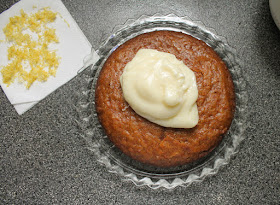
When the cake has cooled completely, top it with the cream cheese frosting and spread it out to the edges of the cake.

Food Lust People Love: Delightfully rich and full of sweet carrot flavor, this sticky carrot snack cake is baked in an Instant Pot, keeping your kitchen cool during the summer, and then spread with a delightful cream cheese frosting.
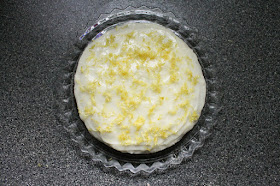
Sprinkle on the lemon zest.

Food Lust People Love: Delightfully rich and full of sweet carrot flavor, this sticky carrot snack cake is baked in an Instant Pot, keeping your kitchen cool during the summer, and then spread with a delightful cream cheese frosting.


Cut into wedges to serve. Enjoy!

Food Lust People Love: Delightfully rich and full of sweet carrot flavor, this sticky carrot snack cake is baked in an Instant Pot, keeping your kitchen cool during the summer, and then spread with a delightful cream cheese frosting.


Because of the cream cheese frosting, it's best to refrigerate any leftovers. I popped my clean cake pan over the top of mine to keep it from drying out in the fridge. You can cover the cake with cling film but know that the cream cheese frosting is going to stick to it.
Many thanks to Wendy of A Day in the Life on the Farm for handling all the behind the scenes work this month. Check out the other small appliances bakes we have for you today!

Baking Bloggers is a friendly group of food bloggers who vote on a shared theme and then post recipes to fit that theme one the second Monday of each month. If you are a food blogger interesting in joining in, inquire at our Baking Bloggers Facebook group. We'd be honored if you would join us in our baking adventures.

Pin it! 

Food Lust People Love: Delightfully rich and full of sweet carrot flavor, this sticky carrot snack cake is baked in an Instant Pot, keeping your kitchen cool during the summer, and then spread with a delightful cream cheese frosting.
.