Pages

Monday, March 30, 2020

Flourless Banana Peanut Butter Muffins #MuffinMonday

If you are looking for a tasty gluten-free snack that that can be made in ONE BOWL, these flourless banana peanut butter muffins fit the bill perfectly. They are surprisingly fluffy inside and just the right amount of sweet.

Food Lust People Love: If you are looking for a tasty gluten-free snack that that can be made in ONE BOWL, these flourless banana peanut butter muffins fit the bill perfectly. They are surprisingly fluffy inside and just the right amount of sweet.


When the coronavirus pandemic reached US shores, I wasn’t surprised when paper goods and staples disappeared off of grocery store shelves. What I didn’t expect was the run on flour and sugar! Last week I managed to score a bag of all-purpose flour, one of the last on the shelf, but bread flour is still AWOL.

Bread flour tip: While bread flour is hard to come by, even online, if you have all-purpose flour, you can order vital wheat gluten to add in for bread. I just got mine delivered yesterday and almost high-fived the Amazon delivery guy. Instead, I offer him a sparkling water, wrapped in a disinfectant wipe. And I thanked him copiously for being out there and doing his job. So grateful!

If you’ve been reading this space for the last couple of weeks, you know that I have ripe bananas in my freezer that were originally earmarked for banana cream pie. If you do too, then you have all the ingredients to make these muffins with staples like peanut butter, eggs, honey and spices.

Even better, this recipe requires only one bowl! Baking muffins could not be easier.

Flourless Peanut Butter Banana Muffins 

This recipe is adapted from one on detoxinista.com. The original author used all natural peanut butter with no added sugar or oil. I buy Jif peanut butter – extra crunchy and reduced fat smooth, both of which have added sugar and/or corn syrup – so my muffins are probably a little sweeter than the originals, which was just sweet enough for us.

Ingredients
1 cup or 250g peanut butter (crunchy or smooth – I used a combo)
2 very ripe bananas, mashed (about 1 cup mashed)
3 whole eggs
1/4 cup or 60ml honey
1 teaspoon vanilla extract
1 teaspoon cinnamon
1 teaspoon baking soda
1/2 teaspoon double acting baking powder
1/2 teaspoon fine sea salt

Method
Preheat your oven to 350ºF or 180°C and prepare a 12-cup muffin pan by lining it with paper muffin liners.

In a medium bowl, combine the peanut butter, mashed banana, baking soda, vanilla, eggs, honey, cinnamon and salt.

Beat well with a balloon whisk until smooth and glossy.  This is going to be a very runny batter but don’t stress. It’s all good.

Divide the batter between the 12 muffin cups.


Bake in your preheated oven for about 20-25 minutes. They puff right up into rounded tops and then will sink a bit. This is normal. Deep breathes. The muffins are done when they are well-colored and springy to the touch.


Remove the muffin pan to a wire rack and leave them to cool for about 10 minutes. Remove the muffins from the pan and cool completely on the wire rack. It's amazing how light they are.

Food Lust People Love: If you are looking for a tasty gluten-free snack that that can be made in ONE BOWL, these flourless banana peanut butter muffins fit the bill perfectly. They are surprisingly fluffy inside and just the right amount of sweet.


Enjoy!

Food Lust People Love: If you are looking for a tasty gluten-free snack that that can be made in ONE BOWL, these flourless banana peanut butter muffins fit the bill perfectly. They are surprisingly fluffy inside and just the right amount of sweet.


Check out all of the other great Muffin Monday recipes my friends are sharing today!
Muffin Monday

#MuffinMonday is a group of muffin loving bakers who get together once a month to bake muffins. You can see all of our lovely muffins by following our Pinterest board. Updated links for all of our past events and more information about Muffin Monday can be found on our home page.


Pin these flourless banana peanut butter muffins! 

Food Lust People Love: If you are looking for a tasty gluten-free snack that that can be made in ONE BOWL, these flourless banana peanut butter muffins fit the bill perfectly. They are surprisingly fluffy inside and just the right amount of sweet.
 .

Friday, March 20, 2020

Ginger Sesame Tuna Tartare #FishFridayFoodies

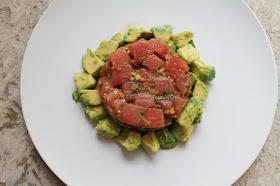
Ginger Sesame Tuna Tartare is a light and flavorful starter made with good quality tuna, marinated briefly in ginger, soy, sesame oil, rice vinegar and honey. Sprinkle on some black sesame seeds for color and crunch.

Food Lust People Love: Ginger Sesame Tuna Tartare is a light and flavorful starter made with good quality tuna, marinated briefly in ginger, soy, sesame oil, rice vinegar and honey. Sprinkle on some black sesame seeds for color and crunch.


This month I am hosting Fish Friday Foodies. As you can probably guess from the list of recipes we are sharing, I picked tuna as our main ingredient. I love the wide variety of tuna available from frozen to fresh, canned to jarred, in water or oil. It's a simple ingredient that can be made into comfort food or something fancy.

Unfortunately, all tuna is not responsibly sourced so it’s a good idea to check with an organization like the Monterey Bay Aquarium to make sure yours is in the recommended list before you buy. Mine actually said "responsibly sourced" so I'm feeling pretty good about it.


We enjoyed this for lunch but you could divide the tuna into four smaller ramekins as a starter or indeed, you could serve this ginger sesame tuna tartare scooped onto individual rice crackers to pass around on a tray.

Ginger Sesame Tuna Tartare

To make it easier to cut into small cubes, I recommend popping your tuna, wrapped in cling film, into the freezer for about 15-20 minutes before starting. It cuts much more evenly when it’s firmer. Or use frozen tuna to start with, like I did, leaving it to thaw briefly before cubing. 

Ingredients to generously serve two
2 cloves garlic
3 spring onions, minced, ends of greens not so fine for garnish
1 in or 2.5cm piece ginger, peeled
2 tablespoons soy sauce
1 tablespoon toasted sesame oil
1 tablespoon rice vinegar
1 teaspoon honey
12 oz or 340g quality tuna steaks

To garnish:
1 tablespoon black sesame seeds

To serve:
1 ripe avocado, peeled and chopped
1 tablespoon fresh lime juice
Fine sea salt
Freshly ground black pepper
Rice crackers – store bought or make your own homemade. It's easy!

Method
Mince the cloves of garlic and chop a couple of tablespoons of the spring onions in rounds and set them aside for garnish. Chop the rest of the spring onions finely.


Add the garlic to a large bowl with the rice vinegar then grate in the ginger. Leave to marinate for a few minutes.


Add the spring onions, soy sauce, sesame oil and honey. Mix well and set aside.


Cut your tuna into small cubes. See note above about freezing it slightly first, if time allows. A sharp knife is also key. Discard any fibrous parts.


Add the tuna directly to the bowl of sauce and mix until combined.

Line two small bowls or round ramekins with cling film. Pile half of the tuna tartare into each vessel and push it down gently to compact.


Turn the tuna out onto serving plates.


Peel and cut your avocado into pieces, adding them to another mixing bowl. Sprinkle lightly with the lime juice, salt, pepper. Stir gently.


Spoon the avocado around the tuna.

Food Lust People Love: Ginger Sesame Tuna Tartare is a light and flavorful starter made with good quality tuna, marinated briefly in ginger, soy, sesame oil, rice vinegar and honey. Sprinkle on some black sesame seeds for color and crunch.


Sprinkle on the black sesame seeds and green onions for garnish.

Food Lust People Love: Ginger Sesame Tuna Tartare is a light and flavorful starter made with good quality tuna, marinated briefly in ginger, soy, sesame oil, rice vinegar and honey. Sprinkle on some black sesame seeds for color and crunch.
Serve with rice crackers.

Food Lust People Love: Ginger Sesame Tuna Tartare is a light and flavorful starter made with good quality tuna, marinated briefly in ginger, soy, sesame oil, rice vinegar and honey. Sprinkle on some black sesame seeds for color and crunch.


Enjoy!

Check out all the other fabulous tuna recipes my Fish Friday Foodies are sharing today!


Would you like to join Fish Friday Foodies? We post and share new seafood/fish recipes on the third Friday of the month. To join our group please email Wendy at wendyklik1517 (at) gmail.com. Visit our Facebook page and Pinterest page for more wonderful fish and seafood recipe ideas.

Pin this Ginger Sesame Tuna Tartare!

Food Lust People Love: Ginger Sesame Tuna Tartare is a light and flavorful starter made with good quality tuna, marinated briefly in ginger, soy, sesame oil, rice vinegar and honey. Sprinkle on some black sesame seeds for color and crunch.
 .

Thursday, March 19, 2020

Banana Split Bundt Cake #BundtBakers

If you are a fan of banana bread you are going to love this banana split Bundt cake. It’s banana bread pumped up by the addition of cocoa and cherries!


I haven’t been talking about it much because this kitchen renovation has been quite the challenge and I don’t like to complain. No one wants to hear that! My cooking space has been the laundry room with an Instant Pot and one burner electric hot plate so, no oven.

But, if you’ve been following along here for a few years, you know that early March is the time to make banana cream pie for my husband’s birthday. He’s not a big cake eater so that is his chosen birthday treat. I bought the bananas in anticipation but then the kitchen wasn’t ready yet. So, as those bananas got too brown for pie, I put them in the freezer.

With high hopes, a few days later, I bought more bananas. I am definitely a glass half full kind of person at the same time as I prepare for the worse. It’s a strange dichotomy. As you can guess from today’s recipe, banana cream pie still hasn’t happened. On the other hand, I think you all are going to love this banana split Bundt cake.

Banana Split Bundt Cake

All the things you love in a banana split - bananas, chocolate and cherries - are baked into this wonderful cake! You can totally serve it with scoops of ice cream as well. I would have but the current coronavirus lock down meant that I didn’t have any.

Ingredients
For the Bundt cake
2 cup or 250g all-purpose flour, plus extra for flouring the pan
1 cup or 200g sugar
1 teaspoon baking powder
1 teaspoon baking soda
1/2 teaspoon salt
20 small bottled cherries (weight 65g), drained, juice reserved
4 oz or 113g pecan halves
3 very ripe bananas
1/2 cup or 120ml canola or other light oil, plus extra for greasing the pan
1/4 cup or 60ml milk
2 eggs
1 teaspoon vanilla extract
1/4 cup or 22g cocoa powder
1/3 cup or 110g cherry preserves

For the optional cherry glaze:
reserved juice from the bottled cherries (mine was about 1/2 cup or 118ml)
1 teaspoon butter

Method
Preheat your oven to 350°F or 180°C and prepare your 12-cup Bundt pan by brushing it with oil and coating the oil with flour. Decorate the bottom of your prepared Bundt pan with cherries and pecan halves.

 Then roughly chop the rest of the cherries and pecans.


In a large mixing bowl, whisk together your flour, sugar, baking powder, baking soda and salt. Add the chopped cherries and pecans to the dry ingredients and stir to coat.

In another large mixing bowl, use a fork to mash the bananas. Mix in the oil, milk and vanilla until well combined while still leaving some lumps.


Pour the wet ingredients into the dry ingredients and fold lightly.

Add in the cocoa by spoonfuls and cherry preserves in dollops.

Gently fold them into the batter. Do not over mix. Ideally you still want to see small pockets of cocoa, cherry and banana.


Spoon the batter into your prepared Bundt pan.


Bake the Bundt in your preheated oven for 50-55 minutes or until a toothpick comes out clean.


Cool on a wire rack for about 10 minutes then loosen the edges of the cake with your toothpick and turn the Bundt out onto the wire rack to cool completely. The cherries and pecans will be covered by the butter/flour coating but you can use the same toothpick to scrape that off so they show. Totally unnecessary but it makes the Bundt more attractive, in my humble opinion.


If you'd like to add a cherry glaze, cook the reserved juice of the bottled cherries for just a few minutes until it reduces by half and has thickened considerably. Remove from the heat and add the teaspoon of butter. Stir till the butter melts. Spoon the glaze over the Bundt.


Enjoy!


This month our Bundt Baker theme is cherries. Many thanks to our host Sue of Palatable Pastime! Check out all the other cherry Bundt recipes we are sharing today:
BundtBakers

#BundtBakers is a group of Bundt loving bakers who get together once a month to bake Bundts with a common ingredient or theme. You can see all of our lovely Bundts by following our Pinterest board. We take turns hosting each month and choosing the theme/ingredient. Updated links for all of our past events and more information about BundtBakers can be found on our home page.

Pin this Banana Split Bundt Cake!

 .

Monday, March 16, 2020

Sous Vide Bone-in Leg of Lamb

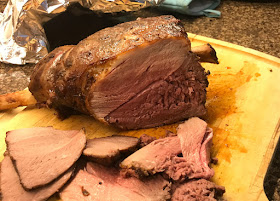
Tender and juicy, this sous vide bone-in leg of lamb is guaranteed to be cooked to perfection inside and out. You do have to start one day ahead of when you would like to serve it, but most of the time is hands off, with a sous vide precision cooker. Finish it off by roasting in a hot oven.

Food Lust People Love: Tender and juicy, this sous vide bone-in leg of lamb is guaranteed to be cooked to perfection inside and out. You do have to start one day ahead of when you would like to serve it, but most of the time is hands off, with a sous vide precision cooker. Finish it off by roasting in a hot oven.


When my son-in-law gave me a sous vide precision cooker for Christmas several years ago, I had very little knowledge about that method of cooking. A lot of research and a few experiments won me over. Sous vide is a great way to control the internal temperature of meat, making sure that it’s not over-cooked or dried out.

My one issue, which I touched upon in my post for a chicken crown roast, is that all the recipes I could find online were for boneless meat. Expanding on my triumph with the brace of guinea fowl and chicken roast, I gave a whole leg of lamb a try. Another triumph. In fact, I’ve made a whole leg of lamb this way a couple of times and now I don’t think I’ll roast one any other way. The only downside is that I have to plan ahead, but it's totally worth it!

The inside is tender and juicy from the long cooking at low temperature in the sous vide but the outside still has all the divine golden bits (and drippings in the pan) to make a delicious gravy from its time in a hot oven. Best of both worlds.

Sous Vide Bone-in Leg of Lamb

If you want tender lamb cooked to perfection, sous vide is the way to go. Perfect lamb every time. I'll be honest. I wasn't planning to share this recipe because I didn't know how popular sous vide cooking would get, but it was so good, I couldn't not share. Please forgive the non-staged photos.

Ingredients
1 whole leg of lamb, bone in – about 2 kg or 4 lbs 6 ozs
2 teaspoons fine sea salt
1 teaspoon fresh ground black pepper
3 tablespoons olive oil
3-4 sprigs fresh rosemary or thyme, stems discarded, leaves minced

Method
Use a sharp knife to score the fat on the leg of lamb. Rub it with the salt, pepper and herb of your choice. I usually do rosemary because it partners so well with lamb, but thyme is also good.

Put the leg of lamb in a sealable, sous-vide-friendly plastic bag with the olive oil and get all the air out of the bag by immersing it in water and sealing it up.

Pop your sous vide precision cooker into a large vessel of water and set the temperature for 131°F. Put the vacuum-bag-seasoned leg into the water. Sous vide for 22 hours.


When the 22 hours are up, you have two choices. If you are ready to roast and serve the leg of lamb, you can preheat the oven to 375°F or 190°C and roast it to an internal temperature of about 130°F or 55°C for rare lamb or 145°F or 62.78°C for medium well. Cover with foil and rest for 10 minutes before slicing.

Or you can chill the leg of lamb, still in the sous vide bag, until you are ready to roast.

If you chose option two, chill the lamb in the refrigerator till ready to roast. Bring it closer to room temperature as you preheat the oven to 375°F or 190°C.

Roast the leg of lamb in your preheated oven until it is well browned and has an internal temperature of 130°F or 55°C for rare lamb or 145°F or 62.78°C for medium well. Cover with foil and rest before slicing.

Food Lust People Love: Tender and juicy, this sous vide bone-in leg of lamb is guaranteed to be cooked to perfection inside and out. You do have to start one day ahead of when you would like to serve it, but most of the time is hands off, with a sous vide precision cooker. Finish it off by roasting in a hot oven.


Enjoy!

Welcome to another MultiCooker post! Check out all of the other alternative cooking method posts we are sharing today.

Pressure Cooker & Instant Pot Recipes:
Slow Cooker Recipes:
Sous Vide Recipes:
Tell your friends about #MulticookerMonday! We post each month on the third Monday with trusted recipes for your favorite small appliances!


Multicooker Monday is a blogger group created by Sue of Palatable Pastime for all of us who need encouragement to make better use of our small appliances like slow cookers, Instant Pots, Air Fryers, rice cookers and sous vide machines. We get together every third Monday of the month to share our recipes. If you are a food blogger who would like to post with us, please request to join our Facebook group.

Pin this Sous Vide Bone-in Leg of Lamb!

Food Lust People Love: Tender and juicy, this sous vide bone-in leg of lamb is guaranteed to be cooked to perfection inside and out. You do have to start one day ahead of when you would like to serve it, but most of the time is hands off, with a sous vide precision cooker. Finish it off by roasting in a hot oven.
.


Tuesday, March 10, 2020

Homemade Senbei Rice Crackers #BreadBakers

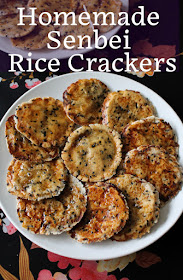
Light and crispy, these homemade senbei rice crackers with sesame seeds are so crunchy and tasty that it’s hard to eat just one! Fortunately this recipe makes two dozen.

Food Lust People Love: Light and crispy, these homemade senbei rice crackers with sesame seeds are so crunchy and tasty that it’s hard to eat just one! Fortunately this recipe makes two dozen.
When we lived in Southeast Asia, one of my favorite snacks was senbei or rice crackers. There was one particular brand that came in various flavors like barbecue, seaweed, plain, and spicy. You know, if you’ve been reading here a while, that I always bought the spicy ones.

But honestly, I loved them all. Okay, the plain ones weren’t that exciting but I loved the rest of them.

When I decided to try making them myself for this month’s Bread Bakers event, I was tempted to make spicy senbei but it occurred to me that rice crackers would go perfectly with a dish I was making for Fish Friday Foodies, ginger sesame tuna tartare. So I give you senbei with black sesame seeds! (Check back next Friday to see the other recipe.)

Homemade Senbei Rice Crackers

As I made the crumbly dough for this recipe, the texture reminded me of shortbread I have made, both sweet and savory, even though it has very little oil or fat. The best way forward seemed to be to slice it like I did with the shortbread. Worked a treat! This recipe is adapted from one on the Japan Centre website.

Ingredients
For the senbei:
3/4 cup or 120g glutinous rice flour aka mochiko
1/3 cup, loosely packed, or 40g cooked white rice
1/4 teaspoon sea salt
2 tablespoons vegetable oil
5-6 tablespoons water
2 teaspoons black sesame seeds

For the glaze:
1 tablespoons soy sauce (I use low sodium Kikkoman)
2 teaspoons mirin

Method
Preheat the oven to 375°F or 190°C. Line two baking sheets with parchment paper or silicone liners.

In a small bowl combine the soy sauce and mirin for the glaze and set aside.

To make the dough, place the rice flour, cooked rice, salt, and oil in a food processor. Run until finely ground.


Next, slowly add the water through the feed tube a tablespoon at a time. After four tablespoons, scrape the sides and bottom of the food processor with a rubber spatula and pulse again. The mixture will look pretty dry still, but put a little the palm of your hand and see if you can form a small ball that hangs together tightly.


If it hangs together but is still really crumbly like mine, add the last tablespoon of water and process again. Scrape the sides and bottom of the processor down again and retest to see if a ball hangs together better. You should be good to go now. Depending on the humidity in your location and how much moisture was in your cooked rice, you might not need the last tablespoon of water.


Place mixture into a bowl and add the sesame seeds. Knead to combine everything into dough.


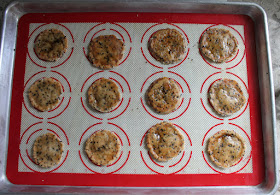
Roll the dough into a log. Cut the log into 24  1/4 in or 1/2cm slices.


Put the slices on your prepared baking pans and use your fingers to press them out into thin circles. The thinner, the better. If you leave them too thick, they'll still be crispy but they won't be light.


Bake the rice crackers, one baking pan at a time, for about 8-10 minutes. Flip the crackers with a spatula.


Bake again for another 10-12 minutes, or until the crackers start to brown around the edges.


Remove from the oven and allow to cool for a minute or two. Brush the tops with the soy sauce/mirin glaze.


Return to the oven and bake until lightly browned (about 3 to 4 minutes.) Keep a close eye on the crackers to make sure they do not burn.

Food Lust People Love: Light and crispy, these homemade senbei rice crackers with sesame seeds are so crunchy and tasty that it’s hard to eat just one! Fortunately this recipe makes two dozen.


Cool completely on a wire rack before serving. As they cool, they will get crispy.

Food Lust People Love: Light and crispy, these homemade senbei rice crackers with sesame seeds are so crunchy and tasty that it’s hard to eat just one! Fortunately this recipe makes two dozen.


Store in a dry, cool place.

Food Lust People Love: Light and crispy, these homemade senbei rice crackers with sesame seeds are so crunchy and tasty that it’s hard to eat just one! Fortunately this recipe makes two dozen.


Enjoy!

This month my Bread Baker friends are all sharing cracker recipes. Many thanks to our host, Sneha of Sneha's Recipe. Check out them out below:
#BreadBakers is a group of bread loving bakers who get together once a month to bake bread with a common ingredient or theme. You can see all our lovely bread by following our Pinterest board right here. Links are also updated after each event on the #BreadBakers home page. We take turns hosting each month and choosing the theme/ingredient.
BreadBakers

Pin these Homemade Senbei Rice Crackers!

Food Lust People Love: Light and crispy, these homemade senbei rice crackers with sesame seeds are so crunchy and tasty that it’s hard to eat just one! Fortunately this recipe makes two dozen.

 .