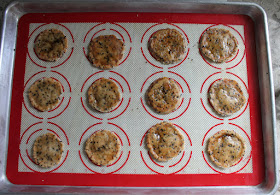
When we lived in Southeast Asia, one of my favorite snacks was senbei or rice crackers. There was one particular brand that came in various flavors like barbecue, seaweed, plain, and spicy. You know, if you’ve been reading here a while, that I always bought the spicy ones.
But honestly, I loved them all. Okay, the plain ones weren’t that exciting but I loved the rest of them.
When I decided to try making them myself for this month’s Bread Bakers event, I was tempted to make spicy senbei but it occurred to me that rice crackers would go perfectly with a dish I was making for Fish Friday Foodies, ginger sesame tuna tartare. So I give you senbei with black sesame seeds! (Check back next Friday to see the other recipe.)
Homemade Senbei Rice Crackers
As I made the crumbly dough for this recipe, the texture reminded me of shortbread I have made, both sweet and savory, even though it has very little oil or fat. The best way forward seemed to be to slice it like I did with the shortbread. Worked a treat! This recipe is adapted from one on the Japan Centre website.Ingredients
For the senbei:
3/4 cup or 120g glutinous rice flour aka mochiko
1/3 cup, loosely packed, or 40g cooked white rice
1/4 teaspoon sea salt
2 tablespoons vegetable oil
5-6 tablespoons water
2 teaspoons black sesame seeds
For the glaze:
1 tablespoons soy sauce (I use low sodium Kikkoman)
2 teaspoons mirin
Method
Preheat the oven to 375°F or 190°C. Line two baking sheets with parchment paper or silicone liners.
In a small bowl combine the soy sauce and mirin for the glaze and set aside.
To make the dough, place the rice flour, cooked rice, salt, and oil in a food processor. Run until finely ground.
Next, slowly add the water through the feed tube a tablespoon at a time. After four tablespoons, scrape the sides and bottom of the food processor with a rubber spatula and pulse again. The mixture will look pretty dry still, but put a little the palm of your hand and see if you can form a small ball that hangs together tightly.
If it hangs together but is still really crumbly like mine, add the last tablespoon of water and process again. Scrape the sides and bottom of the processor down again and retest to see if a ball hangs together better. You should be good to go now. Depending on the humidity in your location and how much moisture was in your cooked rice, you might not need the last tablespoon of water.
Place mixture into a bowl and add the sesame seeds. Knead to combine everything into dough.
Roll the dough into a log. Cut the log into 24 1/4 in or 1/2cm slices.
Put the slices on your prepared baking pans and use your fingers to press them out into thin circles. The thinner, the better. If you leave them too thick, they'll still be crispy but they won't be light.
Bake the rice crackers, one baking pan at a time, for about 8-10 minutes. Flip the crackers with a spatula.
Bake again for another 10-12 minutes, or until the crackers start to brown around the edges.
Remove from the oven and allow to cool for a minute or two. Brush the tops with the soy sauce/mirin glaze.
Return to the oven and bake until lightly browned (about 3 to 4 minutes.) Keep a close eye on the crackers to make sure they do not burn.
Cool completely on a wire rack before serving. As they cool, they will get crispy.
Store in a dry, cool place.
Enjoy!
This month my Bread Baker friends are all sharing cracker recipes. Many thanks to our host, Sneha of Sneha's Recipe. Check out them out below:
- Baked Nacho Chips from Anybody Can Bake
- Cheesy Crunchy Mini Crackers from Culinary Adventures with Camilla
- Homemade Senbei Rice Crackers from Food Lust People Love
- Lavash from Sneha's Recipe
- Olive Oil Crackers from A Messy Kitchen
- Rosemary Crackers from Passion Kneaded
- Sourdough Cheddar Cheese and Rosemary Crackers from Zesty South Indian Kitchen
- Sprouted Wheat Crackers with Sea Salt from Karen's Kitchen Stories
- Wholegrain Sesame and Flaxseed Crackers from Ambrosia
- Wholemeal and Oats Carrot Crackers from Cook with Renu


No comments :
Post a Comment
Where in the world are you? Leave me a comment! It makes me happy to know you are out there.