Pages

Monday, August 31, 2020

Dark Chocolate Coffee Muffins #MuffinMonday

Whether you need a pick me up for breakfast or a mid-morning snack, these dark chocolate coffee muffins would be perfect for either. Pour yourself a cup of coffee or a cold glass of milk and take a big bite of real coffee flavor complemented by the dark chocolate hiding near the bottom of each muffin. Oh, yeah!

Food Lust People Love: Whether you need a pick me up for breakfast or a midmorning snack, these dark chocolate coffee muffins would be perfect for either. Pour yourself a cup of coffee or a cold glass of milk and take a big bite of real coffee flavor complemented by the dark chocolate hiding near the bottom of each muffin.

I can hardly believe that it’s already the end of August. It doesn’t feel like it at all temperature-wise, but I know that soon (Please!) the weather will begin to turn colder and we’ll be able to switch off the air conditioner and open the doors again. I miss fresh air that's not more than 80 percent humidity.

It seems a whiney thing to complain about, not being able to open up my house, especially with all that is going on in the world right now. So I won’t. I will say that coffee muffins with dark chocolate almost make up for it.

What are you looking forward to in Autumn?

Dark Chocolate Coffee Muffins

Despite my best attempts, the chocolate morsels tend to sink to the bottom of these muffins. But I decided to see the positive and think of them as the dessert at the end of your snack muffins. This recipe was adapted from one on Serious Eats and makes 15 muffins.

Ingredients
2 cups or 250g all-purpose flour
2 teaspoons baking powder
1/2 teaspoon baking soda
1/2 teaspoon salt
1/2 cup or 100g granulated sugar
1/4 cup or 50g dark brown sugar
2 large eggs
1/2 cup or 120ml canola or other light oil
1 cup or 240ml milk
1 teaspoon pure vanilla extract
2 tablespoons instant espresso granules
1 cup or 170g dark chocolate morsels (I use Nestlé Tollhouse)

Method
Preheat your oven to 350°F or 180°C and prepare a 15-cup muffin pan by lightly greasing it or lining it with paper muffin cups. I used a 12-cup muffin pan and three silicone muffin cups set in a small baking pan.

In a large bowl, whisk together flour, sugar, baking powder, baking soda, and salt. It’s warm in Houston right now so my chocolate morsels were a bit sticky. If yours are the same, tip them into the flour mixture and use your hands to separate them and coat them with flour.


In another mixing bowl, whisk the eggs, oil, milk, vanilla, and espresso granules until the espresso granules have dissolved completely. It turns a lovely café au lait color.


Pour the wet ingredients into the dry ingredients bowl and fold until just combined.


Divide the batter between your muffin cups and bake in the preheated oven for 20-25 minutes or until the muffins are golden and a toothpick inserted in the middle comes out clean.


Leave to cool for a few minutes then remove the muffins to a wire rack to cool completely.


Enjoy!


It’s Muffin Monday and we have lots of great muffins to share! Check out the links below. 
Muffin Monday

#MuffinMonday is a group of muffin loving bakers who get together once a month to bake muffins. You can see all of our lovely muffins by following our Pinterest board. Updated links for all of our past events and more information about Muffin Monday can be found on our home page.

Pin these Dark Chocolate Coffee Muffins!

Food Lust People Love: Whether you need a pick me up for breakfast or a midmorning snack, these dark chocolate coffee muffins would be perfect for either. Pour yourself a cup of coffee or a cold glass of milk and take a big bite of real coffee flavor complemented by the dark chocolate hiding near the bottom of each muffin.

 .
Friday, August 21, 2020

Camarones a la Diabla - Deviled Shrimp #FishFridayFoodies

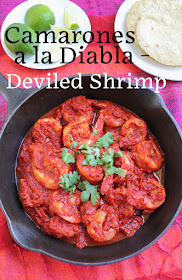
The wonderful bright sauce for Camarones a la Diabla or Deviled Shrimp is made with dried chili peppers, roma tomatoes, garlic and onions but the star of this dish is definitely the large flavorful shrimp. Serve with fresh corn tortillas as an appetizer or with rice as a main course.

Food Lust People Love: The wonderful bright sauce for Camarones a la Diabla or Deviled Shrimp is made with dried chili peppers, roma tomatoes, garlic and onions but the star of this dish is definitely the large flavorful shrimp. Serve with fresh corn tortillas as an appetizer or with rice as a main course.


Here in Texas we are big into Mexican food but frankly, much of it is what should properly called Tex-Mex and wouldn’t be recognized as Mexican food in its supposed country of origin. That’s why I was delighted when this month’s Fish Friday Foodies theme of Mexican seafood dishes was chosen. It’s always fun to explore new recipes and I rightly guessed that many I’d find on the internet were completely unfamiliar.

As with many regional dishes - this favorite is from the state of Veracruz, on the Gulf of Mexico coast - there seem to be as many camarones a la diabla recipes as there are Mexican mamás. Most use dried chili peppers and fresh tomatoes but sometimes chipotle peppers in adobo and roasted tomatoes are added and/or substituted.

I found them served with white rice, saffron rice, corn tortillas, avocados, limes and even fried platano, those lovely big bananas that turn super sweet when their skin is black and are wonderful for breakfast fried with butter.

I cooked fresh corn tortillas and served them with guacamole. Probably not traditional but they were delicious.

Camarones a la Diabla - Deviled Shrimp

I thought my Roma tomatoes, while quite lovely and ripe, were smaller than the ones I’m used to buying so I used four for this recipe. Come to find out, mine (at around 3 oz or 85g each) were in the medium range since Romas range in weight from 2-5 oz and 57-142g. Who knew? I give the exact weight I used below but know that a little more or less will still be delicious. My recipe is adapted from one on Isabel Eats.

Ingredients
8 dried guajillo chiles
3 dried chile de arbol chiles
4 Roma tomatoes (about 11 1/2 oz or 325g before coring)
2 cloves garlic
1/2 medium onion
1 teaspoon fine sea salt plus more as needed
1 teaspoon sugar
4 tablespoons olive oil
1 1/2 lbs or 680g frozen headless shrimp, peel on (about 20 large shrimp)
salt and pepper, to taste

To garnish: fresh cilantro
To serve: corn tortillas, limes and (not pictured) guacamole or see suggestions above.

Method
Set the shrimp in a colander in the sink or over a bowl to thaw and drain, preferably overnight in the refrigerator. If you don’t have time for this, run a little tap water over the shrimp to thaw them drain in the refrigerator while you make the sauce.

Once thawed and drained, peel and clean the shrimp but leave the tails on. Sprinkle with 1/2 teaspoon sea salt and refrigerate again until needed.


Meanwhile, remove the stems from your arbol chiles (the little ones) and remove the stems and seeds from the dried guajillos (the large ones.) I find the easiest way to deseed guajillos is to run a pair of scissors or a sharp knife up one side to open the pepper. The seeds fall out with hardly any effort.


Put the dried peppers in a heatproof bowl and cover them with boiling water. Set a plate on top to hold the heat in.  Set aside for 15 minutes or until the chiles have softened.


Remove the hard cores and chop your Roma tomatoes into large dice. Leave the seeds in; they add flavor.


Dice the onion and roughly chop the garlic.


Transfer the softened chiles with a pair of tongs to a large blender or a deep vessel suitable for a hand blender. Add the tomatoes, garlic, onion, salt and sugar along with 1/4 cup or 60ml of the soaking water. Puree until completely smooth.


Heat a large sauté pan or skillet over medium-high heat. Add the olive oil and shrimp. Cook shrimp for a minute or two per side, or until shrimp is lightly browned but not cooked through. You may have to do this in two batches as I did, to make sure you don’t crowd the pan. Remove the shrimp to a plate.


Add the red sauce to the pan. Cook for about 10-12 minutes over a medium low heat or until the mixture is thick and doesn’t taste as sharply of raw onion and garlic.


Add in the shrimp back to the pan and stir to coat the shrimp with the sauce.

Raise the heat and cook for 3 to 5 minutes, until the shrimp are cooked through and the sauce is really stuck to them. Taste and season with more salt, if necessary.

Food Lust People Love: The wonderful bright sauce for Camarones a la Diabla or Deviled Shrimp is made with dried chili peppers, roma tomatoes, garlic and onions but the star of this dish is definitely the large flavorful shrimp. Serve with fresh corn tortillas as an appetizer or with rice as a main course.


Remove the pan from the heat, garnish with cilantro if using and serve right away. The camarones a la diabla can also be refrigerated for a day and gently reheated in a pan in over a medium fire before serving.

Food Lust People Love: The wonderful bright sauce for Camarones a la Diabla or Deviled Shrimp is made with dried chili peppers, roma tomatoes, garlic and onions but the star of this dish is definitely the large flavorful shrimp. Serve with fresh corn tortillas as an appetizer or with rice as a main course.
Enjoy!

This month my Fish Friday Foodies friends are cooking Mexican seafood dishes at the instigation of our host Rebekah of Making Miracles. Check out all the great recipes below:


Are you a food blogger who would you like to join Fish Friday Foodies? We post and share new seafood/fish recipes on the third Friday of the month. To join our group please email Wendy at wendyklik1517 (at) gmail.com. Visit our Facebook page and Pinterest page for more wonderful fish and seafood recipe ideas.


Pin these Camarones a la Diabla - Deviled Shrimp!


Food Lust People Love: The wonderful bright sauce for Camarones a la Diabla or Deviled Shrimp is made with dried chili peppers, roma tomatoes, garlic and onions but the star of this dish is definitely the large flavorful shrimp. Serve with fresh corn tortillas as an appetizer or with rice as a main course.
 .

Thursday, August 20, 2020

Peach Rosé Blueberry Bundt #BundtBakers

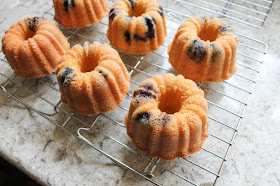
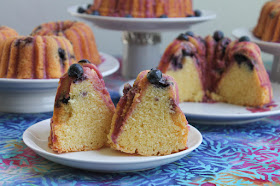
Tender peachy crumb is perfectly complemented by the juicy blueberries with a hint of rosé wine in this buttery pound cake I’m calling Peach Rosé Blueberry Bundt. You can bake it as one cake in a 10-cup pan or as mini and small Bundts for sharing.

Food Lust People Love: Tender peachy crumb is perfectly complemented by the juicy blueberries with a hint of rosé wine in this buttery pound cake I’m calling Peach Rosé Blueberry Bundt. You can bake it as one cake in a 10-cup pan or as mini and small Bundts for sharing.


A few years ago my friend Jenni of Pastry Chef Online shared her Van Halen pound cake adapted to include Moscato wine and strawberries. I’ve made that original pound cake (with my own variations) and it is delicious so her further adaptation with wine intrigued me. Jenni says towards the end of her post and I quote: “I think you could probably make this with whatever fresh fruit you have around. Just pair it with a wine that will work well with it.” Ever since then, I’ve been meaning to try.

I don’t know about every wine and every fruit, but I can tell you that peaches, rosé and blueberries most definitely work well together.

To conclude, Jenni is a genius.

Peach Rosé Blueberry Bundt with Blueberry Glaze

I give the weight of the two peaches I used below as a guideline but honestly, if your peaches are a little bit smaller or a little bit larger, no worries. Either way, the peach rosé puree will be fabulous. Even better, you only need about half of it for this cake so enjoy the rest in a cocktail or added to iced tea or soda water.

Ingredients
For the peach rosé puree:
2 sweet ripe peaches (about 13 3/4 oz or 390g whole, before pitting)
1/2 cup or 120ml your favorite rosé wine
1/4 cup or sugar
pinch salt

For the cake:
1 1/4 cups or 283g unsalted butter, softened, plus extra for the pan
2 1/8 cups or 425g granulated sugar
1 teaspoon fine sea salt
4 eggs, at room temperature
2 3/4 cups or 316g cake flour, plus extra for the pan
1 teaspoon baking powder
1/8 teaspoon baking soda
2/3 cup or 156ml peach rosé puree
1/4 cup or 60ml your favorite rosé wine
3/4 cup or 114g fresh blueberries, washed and picked over

For the blueberry glaze:
1 1/4 cups or 156g powdered sugar
1/3 cup or 60g fresh blueberries
1 teaspoon lemon juice
pinch salt

Method
To make the puree, cook the peaches together with the wine, sugar and a pinch of salt.

Cook for a few minutes over a medium heat, lid on, until the peaches have softened. Remove the lid and let them cook for another few minutes or until the peaches have completely slumped. You should be able to easily mash one with a spoon.


Puree in a blender or with a hand blender. Set aside to cool.

Preheat your oven to 350°F or 180°C and set your oven rack in the bottom third of your oven. Butter and flour your 10-cup Bundt pan.

(As you can see from my photos, I used two 5-cup Bundt pans instead, this one that makes mini Bundts*  and my duet pan.*  I am making a concerted effort to give out baked to my neighbors and smaller Bundts make sharing so much easier. *Amazon affiliate links)

In a mixing bowl, whisk the flour, baking powder, baking soda and salt together. Set aside. In your measuring cup, stir together the puree and wine. Set aside.

Cream the butter and sugar together pale and fluffy, scraping the bowl as needed. With the mixer on medium speed, add the eggs one at a time, beating well and then scraping the bowl before adding the next one.


When all the eggs have been added, mix for another few seconds.

Add 1/3 of the flour mixture and 1/3 the puree mixture, mixing on low speed for just a few seconds and scraping bowl. Add the next 1/3 flour and 1/3 puree, repeating the process of adding and mixing and scraping in between until all of the flour and puree have been added and mixed together.


Gently fold in the blueberries.


Pour your batter into your prepared pan (or pans) and bake until done.

If you are using a 10-cup Bundt pan, this will take about 50-55 minutes but it’s a good idea to start checking it at about 40 minutes. In smaller pans like I used, they should be done in about 30-40 minutes. Start checking the mini Bundts at 25 minutes. My duet pan Bundts were lovely and golden in 45 minutes , the mini Bundts in 35.

Food Lust People Love: Tender peachy crumb is perfectly complemented by the juicy blueberries with a hint of rosé wine in this buttery pound cake I’m calling Peach Rosé Blueberry Bundt. You can bake it as one cake in a 10-cup pan or as mini and small Bundts for sharing.


Remove from the oven and cool for a few minutes. I like to use the end of a wooden skewer to loosen the edges of my Bundt cakes before turning the pan over with a wire rack.


Cool completely before glazing.

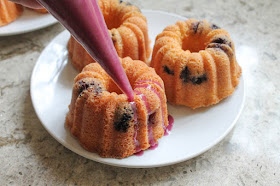
To make the glaze, mash the blueberries through a fine strainer over a mixing bowl and discard the pulp.

Add in the powdered sugar, lemon juice and salt, stirring till well combined.

Drizzle over cooled cakes.

Food Lust People Love: Tender peachy crumb is perfectly complemented by the juicy blueberries with a hint of rosé wine in this buttery pound cake I’m calling Peach Rosé Blueberry Bundt. You can bake it as one cake in a 10-cup pan or as mini and small Bundts for sharing.


Enjoy!

Food Lust People Love: Tender peachy crumb is perfectly complemented by the juicy blueberries with a hint of rosé wine in this buttery pound cake I’m calling Peach Rosé Blueberry Bundt. You can bake it as one cake in a 10-cup pan or as mini and small Bundts for sharing.
This month our Bundt Bakers theme is berries. Many thanks to our host, Rebekah of Making Miracles for all of her behind the scenes work. Check out all the berry Bundts we are sharing!
BundtBakers

#BundtBakers is a group of Bundt loving bakers who get together once a month to bake Bundts with a common ingredient or theme. You can see all of our lovely Bundts by following our Pinterest board. We take turns hosting each month and choosing the theme/ingredient. Updated links for all of our past events and more information about BundtBakers can be found on our home page.

Pin this Peach Rosé Blueberry Bundt!

Food Lust People Love: Tender peachy crumb is perfectly complemented by the juicy blueberries with a hint of rosé wine in this buttery pound cake I’m calling Peach Rosé Blueberry Bundt. You can bake it as one cake in a 10-cup pan or as mini and small Bundts for sharing.

.

Monday, August 17, 2020

Cheesy Chicken Chili (Instant Pot)

This Cheesy Chicken Chili is creamy spicy comfort food that no one can resist. Even better, it’s made in an Instant Pot so you will be serving it up in less than 30 minutes.

Food Lust People Love: Made with cream cheese and spices, this Cheesy Chicken Chili is  comfort food that no one can resist. It cooks quickly, using an Instant Pot!

Years ago, before my mom retired, one of her co-workers, a lovely lady named Esther, shared a recipe she and her husband loved. Of course, my mom forwarded it on to me. It was called white chili, I suppose to differentiate it from typical Texas chili which is red.

This dish is different from typical Texas chili in at least two other ways: It has beans in it and chicken instead of beef. Texas chili does not have beans! If you’d like to hear a funny story at my expense, check out my Texas chili post.

Esther’s recipe also called for two cups of cream and eight ounces of sour cream but I like to make it with cream cheese, also adding tomatoes, green pepper and corn. It occurs to me that Esther probably wouldn’t recognize my version but that’s okay. It’s delicious and my name is way more descriptive. I am grateful for the inspiration!

Cheesy Chicken Chili (Instant Pot)

A word about the bell pepper/capiscum. If I’m honest, I must confess that I am not a fan of green peppers. I do like the background flavor they add when well cooked at the beginning of a dish, like with gumbo or étouffée but I always make a point to chop them finely so I don’t get a big bite of bell pepper. If you are a fan, do chop yours bigger. They add color to the dish.

Ingredients
2 lbs or 900g boneless skinless chicken breasts
1/2 teaspoon salt
freshly ground black pepper
1/2 teaspoon cayenne
1 yellow onion, diced
1 green bell pepper/capsicum, chopped finely
2 tablespoon olive oil
3 cloves garlic, minced
1 1/2 teaspoons ground cumin
1 1/2 teaspoon chili powder
1 can (15.5oz or 439g) white beans, drained and rinsed
1 can (15.5oz or 439g) chickpeas, drained and rinsed
1 can (15oz or 425g) can whole kernel corn, drained
1 can (10 oz or 283g) diced tomatoes with peppers (like Ro-Tel)
1 1/2 cups or 355ml chicken broth
8 oz or 225g cream cheese, at room temperature
2 tablespoons cornstarch
Salt to taste, if necessary

Topping ideas:
sliced jalapenos
sliced avocados
dollop of sour cream
minced fresh cilantro
fried tortilla strips
shredded Monterey Jack, cheddar or Mexican queso fresco

Method
Cut the trimmed of excess fat chicken breasts into large chunks. Season them with a light sprinkle of salt, black pepper and ground cayenne.


Use your Instant Pot’s sauté function on low to sweat the onion and bell pepper in the olive oil for a few minutes, until they are translucent and softened. Add in the minced garlic and give it a quick stir.

 Turn the Instant Pot off.

Add the chicken to the pot.


Top it with the cumin, chili powder, beans, chick peas, tomatoes (with juice), corn and chicken broth. Do not stir. We want to make sure the chicken stays covered.


Pressure cook for 15 minutes. Leave to pressure release naturally for 15 minutes, then vent and remove the lid.


Use tongs to fish out the chicken breast pieces and put them on a plate. Shred the chicken with a couple of forks.


Make a slurry of 2 tablespoons cornstarch and 2 tablespoons cold water in a measuring cup, stirring until the cornstarch is completely dissolved.

Cut the cream cheese into chunks and add them to the Instant Pot along with the cornstarch slurry.

Stir well. Sauté on low for a few minutes or until the cream cheese is melted and the chili thickens a bit. Return chicken to the Instant Pot. Add salt as needed to taste.

Stir well and serve with desired toppings.

Food Lust People Love: Made with cream cheese and spices, this Cheesy Chicken Chili is  comfort food that no one can resist. It cooks quickly, using an Instant Pot!

Enjoy!

It's Multicooker Monday and our host is Sue from Palatable Pastime. Check out all the great recipes we are sharing that can be made with your small appliances.


Multicooker Monday is a blogger group created by Sue of Palatable Pastime for all of us who need encouragement to make better use of our small appliances like slow cookers, Instant Pots, Air Fryers, rice cookers and sous vide machines. We get together every third Monday of the month to share our recipes. If you are a food blogger who would like to post with us, please request to join our Facebook group.


Pin this Cheesy Chicken Chili! 

Food Lust People Love: Made with cream cheese and spices, this Cheesy Chicken Chili is  comfort food that no one can resist. It cooks quickly, using an Instant Pot!

.