Showing posts with label Christmas cookies. Show all posts

Sunday, December 22, 2024

Candy Cane Meringue Kisses

These peppermint candy cane meringue kisses are the perfect little melt-in-your-mouth treat for after dinner. They are small so you can’t eat just one.

Food Lust People Love: These peppermint candy cane meringue kisses are the perfect little melt-in-your-mouth treat for after dinner. They are small so you can’t eat just one.

My mom had only one brand of candy cane that she’d buy; they had to be Bobs. As a self-professed candy cane connoisseur, she said they were the best because they were made with all-natural peppermint and, while I never did a taste test, I trusted her judgement. After all, she had grown up with Bobs.

Bobs Candies – no apostrophe because it is plural not possessive – was a family business which was started back in 1919 by Bob MacCormack and Bob Mills. Innovations included the Keller machine, invented by McCormack’s brother-in-law, Father Harding Keller, which perfected the twisting and cutting of candy canes, giving them their signature spiral stripes.

According to the Georgia encyclopedia, the company also began wrapping their candy canes in cellophane, making them the first candy maker to do so. This simple but effective move helped preserve freshness and appeal to a growing market. 

Growing up, we always had a box or two of Bobs candy canes, shrink wrapped in cellophane to eat/hang on the tree, so I made sure to continue the tradition in my own family. 
What this means though is that at the end of the holidays, when the tree comes down, there are always a few candy canes that missed getting eaten. These candy cane meringue kisses make perfect use of them! (Here's a tip: Homemade kisses are a perfect Valentine's Day gift.)

Candy Cane Meringue Kisses

This recipe makes about 6 dozen bite-sized kisses or about 4 dozen larger ones. You can drop the mixture by small spoonsful on to the baking pans but if you have a piping bag, the process is much neater. If you are making the bite-sized ones, like I did, you will need to bake them in two batches. 

Ingredients
3/4 cup or 150g granulated sugar
2 teaspoons cornstarch
1/8 teaspoon salt
4 large egg whites
1/4 teaspoon cream of tartar
1/3 cup or 50g crushed candy canes, plus extra for decorating

Method
Preheat your oven to 225°F or 107°C. Adjust two racks so that they are in the upper-middle and lower-middle position.

Line 2 baking pans with baking parchment or silicone liners and set aside.

In a small bowl, combine the sugar, cornstarch, and salt, and whisk to combine.


Whip the egg whites and cream of tartar together with an electric mixer on medium-low speed, until the mixture is foamy, about 1 minute.


Increase the mixer speed to medium-high, and whip until the whites are soft and fluffy.


Gradually, add the sugar mixture while the mixer is running, and whip until the whites are glossy and form stiff peaks, 1 to 3 minutes.


Gentle fold in the 1/3 cup crushed candy canes.


Use a spoon or a pastry bag fitted with a plain tip to make 1 1/4 in or 3 cm wide meringue kisses on the prepared baking sheets, spaced about an inch or 2cm apart.


Sprinkle with more crushed candy canes.


Bake the meringue kisses for 1 hour. Turn off the oven, and let the meringues sit in the oven for an additional 1 hour (or 2 hours, if in humid or rainy conditions). 

Remove the kisses from the oven, and let them cool before serving, about 10 minutes.


Keep meringues crispy by storing extras in an airtight container, especially if you live in a humid area. 

Food Lust People Love: These peppermint candy cane meringue kisses are the perfect little melt-in-your-mouth treat for after dinner. They are small so you can’t eat just one.

Enjoy! 

It’s Sunday FunDay and today we are sharing peppermint recipes. Check out all the links below! 


We are a group of food bloggers who believe that Sunday should be a family fun day, so every Sunday we share recipes that will help you to enjoy your day. If you're a blogger interested in joining us, just visit our Facebook group and request to join.


Pin these Candy Cane Meringue Kisses! 

Food Lust People Love: These peppermint candy cane meringue kisses are the perfect little melt-in-your-mouth treat for after dinner. They are small so you can’t eat just one.

.

Sunday, December 10, 2017

Peppermint Pinwheel Cookies

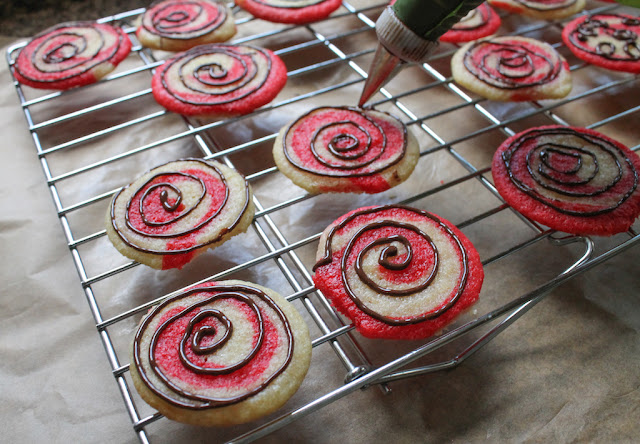
Peppermint dough and mint chocolate swirls or peppermint glaze - or both! - make these pretty peppermint pinwheel cookies. They are perfect for your Christmas table or cookie exchange.
  Food Lust People Love: Peppermint dough and mint chocolate swirls or peppermint glaze - or both! - make these pretty peppermint pinwheel cookies. They are perfect for your Christmas table or cookie exchange.


It wouldn't be Christmas without some cookies, right? And peppermint is an essential Christmas flavoring so I decided to put those two things together!

These peppermint pinwheel cookies are actually quite easy to make, although there is some waiting while the dough firms up, (See note below.) so do plan accordingly. They are the perfect size for popping in your mouth every time you pass the cookie plate but since the recipe makes 5 dozen, that shouldn't create a problem. With mint glaze and melted chocolate drizzled on them, they are sure to be everyone's new favorite Christmas cookie.

Note: Like any cookie dough that needs to be rolled out before cutting, the process will be easier if your dough has time to chill in the refrigerator. Plan on at least an hour of chilling time before rolling it out and four hours in the freezer before baking. Or make the dough a day or two before you plan to bake. It will keep beautifully, well-wrapped in cling film in your freezer.

Peppermint Pinwheel Cookies

These peppermint pinwheel cookies are adapted from this filled cookie recipe on My Recipes.

Ingredients for about 5 dozen + cookies
For the dough:
1/2 cup or 113g butter, softened
1 cup or 200g sugar
1 large egg
1/2 teaspoon vanilla extract
1 3/4 cups or 220g flour
1/2 teaspoon baking soda
1/4 teaspoon salt
1/2 teaspoon red food coloring paste for red half (I use Wilton no taste red.)
1/2 teaspoon mint extract for white half

For the peppermint glaze:
1/2 cup or 65g powdered sugar
2 teaspoons milk
1/2 teaspoon mint extract
Pinch salt

For the mint chocolate drizzle:
1 3/4 oz or 50g mint dark chocolate bar (I used half a Lindt bar.)

Method
Cream the butter and sugar together with your electric mixer, beating until light and fluffy.

Scrape the bowl down with a rubber spatula then add the egg and vanilla, beating until blended, scraping bowl again as needed.


In a separate bowl, sift together the flour, baking soda, and salt.

Gradually add the flour mixture to the butter mixture, beating at a low speed until blended.

Set aside half of the dough. (Mine weighed 598g so I took out 299g. Scale users unite!) If you don't have a kitchen scale, eyeball it.

Knead food coloring paste into remaining portion of dough while wearing rubber gloves or, if you are so fortunate, use the K-beater in your stand mixer to combine the two. Cover the dough with cling film and chill for at least one hour.


Knead the mint extract into the other half of the dough, or once again, use your stand mixer to combine the two. Cover the dough with cling film and chill for at least one hour.


Once chilled, roll each half into a 12- x 8-inch or 31x20cm rectangle between two pieces of baking parchment or waxed paper. Check out this great video from Crazy For Crust, to see how to do it. Just stop before you start cutting out cookies.


Once you have them rolled out, trim the rounded edges and neaten up your rectangles with a sharp knife.


Put the parchment or wax paper back on top and use your rolling pin and very little pressure to stick those pieces to the bigger piece again.

Peel one side of the parchment or wax paper off of each rectangle and lay one rectangle of dough on top of the other and press down gently so they stick together. Peel the paper off the top. Save the parchment paper because you can use it again for wrapping the dough and then baking.

Cut the double rectangle in half lengthwise to create two long equal rectangles.


I decided to roll one half up with the peppermint dough on the inside and one with the red dough on the inside, so I flipped one over, but you can make them all one way or the other.

Use a piece of the parchment or some cling wrap to help you roll the two dough rectangles up tightly, from the long end, so you end up with two long skinny tubes.


Wrap these again in parchment or cling film and freeze for several hours.

When you are ready to bake, preheat your oven to 350°F or 180°C and prepare a couple of cookie sheets by lining them with baking parchment or silicone mats.

Cut the rough ends off of one log, leaving the other in the freezer, then slice the log into circles. Depending on where you stand on the subject of eating raw egg (and now flour!) you can discard the ends or eat them.


Place them on the prepared cookie sheets with a couple of inches or at least five centimeters between them. As you will see, mine were too close so many of them spread out enough to join together.


Bake for 7-8 minutes or until puffed and set.

Food Lust People Love: Peppermint dough and mint chocolate swirls or peppermint glaze - or both! - make these pretty peppermint pinwheel cookies. They are perfect for your Christmas table or cookie exchange.

Cool cookies on baking sheets for several minutes and then remove to wire racks to cool completely.

Repeat with the other dough log until all the cookies are baked and cooled.

Mix up the glaze ingredients and set aside. When you are ready to decorate, put the glaze in a plastic bag and cut off a very small corner so you can pipe the glaze onto the cookies.

Or melt the mint chocolate in a microwaveable vessel, 15-second zaps at a time, stirring well between each zap. Use a piping bag to drizzle on the chocolate. You can use a plastic bag for the chocolate as well but I find the proper piping bags are easier to handle with warm chocolate.

Food Lust People Love: Peppermint dough and mint chocolate swirls or peppermint glaze - or both! - make these pretty peppermint pinwheel cookies. They are perfect for your Christmas table or cookie exchange.


Enjoy!

Food Lust People Love: Peppermint dough and mint chocolate swirls or peppermint glaze - or both! - make these pretty peppermint pinwheel cookies. They are perfect for your Christmas table or cookie exchange.

This week my Sunday Supper friends are sharing their favorite cookie recipes for Christmas. There are so many I'd like to try! Check out the list below.

Traditional and Tasty Cookies to Share

Fun and Festive Cookie Alternatives


Pin it! 

Food Lust People Love: Peppermint dough and mint chocolate swirls or peppermint glaze - or both! - make these pretty peppermint pinwheel cookies. They are perfect for your Christmas table or cookie exchange.

.

Monday, November 11, 2013

Chocolate-Filled Christmas Thumbprint Cookies

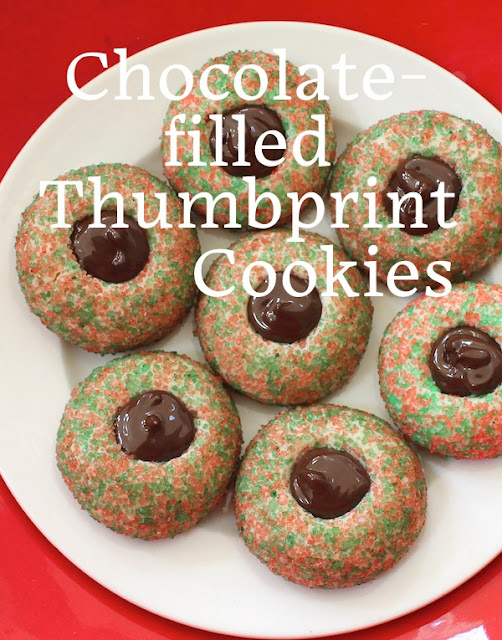
These pretty little chocolate-filled Christmas thumbprint cookies are a mouthful of wonderful on a Christmas plate. Roll the dough into balls and coat them with sprinkles or colored coarse sugar, then bake and fill with melted chocolate when cool. Santa and his helpers will love these!

Food Lust People Love: These pretty little chocolate-filled Christmas thumbprint cookies are a mouthful of wonderful on a Christmas plate. Roll the dough into balls and coat them with sprinkles or colored coarse sugar, then bake and fill with melted chocolate when cool. Santa and his helpers will love these!


Chocolate-Filled Christmas Thumbprint Cookies

This recipe is adapted by one from Juanita’s Cocina. Many thanks to Jen for the inspiration to create this Christmas cookie. It was published originally as part of an organized group called Christmas Week. Scroll down to see the list of recipes from the other participants.

Ingredients for two dozen cookies
For the cookie:
1 cup or 225g unsalted butter, softened to room temperature
1 cup or 125g powdered sugar
2 teaspoons vanilla
2 1/2 cups or 315g flour
1/2 teaspoon salt
Red and green sugar or red and green sprinkles (I used about a 1/4 cup of each color, mixed together.)

For the filling:
3 1/2 oz or 100g semi sweet or dark chocolate – I prefer to use bars rather than chips because the chips don’t melt as nicely.

Method
Preheat your oven to 350°F or 180°C. Grease two cookie sheets or line them with parchment paper with just a dab of butter to keep the parchment from sliding around.

Put your sprinkles in a small bowl and set aside.

Sift your powdered sugar into a large mixing bowl. Add in the butter and vanilla and beat until light and fluffy. This takes just a few minutes.


Add in the salt and about a quarter of the flour and beat until smooth. Keep adding the flour a quarter at a time and mixing well, until you have soft dough. 


Scoop out tablespoons of the dough and roll them into balls. 

Roll them around one at a time in your bowl of red and green sprinkles, until they are fully coated. Place them on a cookie sheet with a couple of inches between them. 


Press a small indentation in the top of each ball with your thumb or forefinger.


Bake the first pan for 10 minutes in your preheated oven.

Remove the pan from the oven and use the end of a wooden spoon or a pastry brush to enlarge the indentation in the cookie. 


Bake for another seven or eight minutes, then remove from the oven. You want them to be just set but not browned. I pushed the indentation down again, just gently. Allow the cookies to cool and repeat the process with the second pan of dough balls.

Leave the cookies to cool.

Meanwhile, melt your chocolate in a microwaveable bowl, by zapping it for 15 seconds at a time and stirring in between, until it is of pourable consistency. 


When the cookies are completely cool, put your melted chocolate in a piping bag with a small decorating tip and fill each cookie indentation with chocolate. 


The chocolate will set firm when it cools. 

Food Lust People Love: These pretty little chocolate-filled Christmas thumbprint cookies are a mouthful of wonderful on a Christmas plate. Roll the dough into balls and coat them with sprinkles or colored coarse sugar, then bake and fill with melted chocolate when cool. Santa and his helpers will love these!
Enjoy!

Check out the beautiful cookies all my fellow bakers have for you today:

Pin these Chocolate-Filled Christmas Thumbprint Cookies!

Food Lust People Love: These pretty little chocolate-filled Christmas thumbprint cookies are a mouthful of wonderful on a Christmas plate. Roll the dough into balls and coat them with sprinkles or colored coarse sugar, then bake and fill with melted chocolate when cool. Santa and his helpers will love these!
 .