Showing posts with label chives. Show all posts

Sunday, October 29, 2017

Sincere Pumpkin Patch Spicy Cheese Ball

Extra sharp cheddar and cream cheese can be flavored with a variety of herbs and spices and rolled up ball- or log-shaped for a savory appetizer that will be a welcome addition to any party table. For added interest, roll your cheese ball in chopped pecans or walnuts.

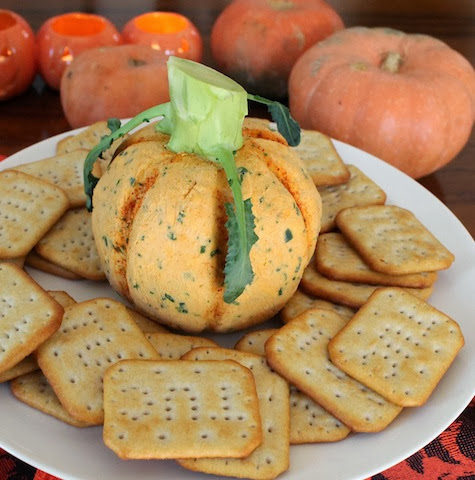
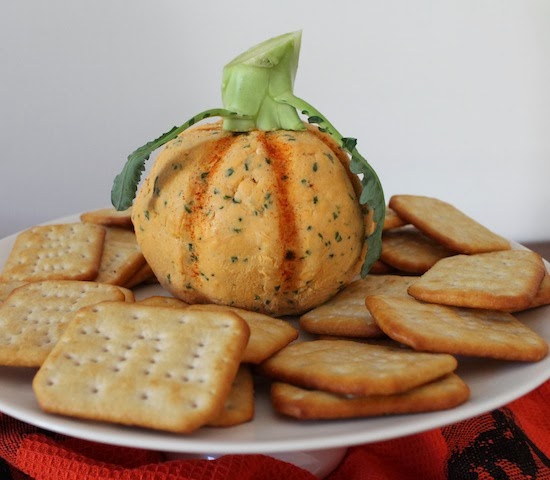
Food Lust People Love: This pumpkin-shaped spicy cheese ball is a great addition to any Halloween or Thanksgiving party table.


If you’ve been reading along for a while, you might have noticed something.  I didn’t have a single Halloween post until last week’s Muffin Monday.  It’s not that I don’t enjoy Halloween.  In fact, as I mentioned a few weeks ago, when my girls were little, I was chief organizer and instigator of Halloween celebrations in our little neighborhood in the small oilfield town of Macaé, Brazil.

When we lived in Kuala Lumpur, we took part in trick-or-treating by joining another neighborhood’s festivities since no one went door-to-door in our mostly local area.  We parked on the route, decorated the trunk of our car and gave out candy.  But since the girls left home for university and I started the blog, my Halloween decorating and baking has dropped off significantly, although I still join my friends to give out candy if I happen to be in KL for Halloween.  It’s such fun to see the children in costumes.

Trunk-or-Treat - Kuala Lumpur, Malaysia circa 2010


This week’s Sunday Supper theme is Halloween Finger Foods and since I don’t have little ones at home, I decided to go savory instead of sweet by making a spicy cheese ball that would be a great addition to any Halloween party table.  Goodness knows there will be enough candy already.

Like Linus from the comic strip Peanuts, I like to think that the Great Pumpkin will come to the most sincere pumpkin patch (or buffet table) and bring gifts for everyone.  He might even be tempted by this cheese ball.  It is most sincerely cheesy.

Ingredients
13 1/4 oz or 375g extra-sharp orange cheddar cheese
8 oz or about 225g cream cheese, at room temperature
1 small bunch chives (Mine was about 1/2 oz or 15g)
1 jalapeño (Mine was about 3/4 oz or 20g)
1 clove garlic
1 teaspoon smoked paprika plus extra for decorating, if desired
2 tablespoons plain yogurt

For decoration: One broccoli stalk - with leaves, if possible
To serve: Crackers of your choice or bread

Method
Grate your cheddar cheese into a large mixing bowl. Finely mince your chives and garlic. Cut the stem end off of the jalapeño and remove the seeds, if you want to add just a little spice. If you like spicy food, by all means, leave the seeds in. Mince the jalapeño finely.


Add the softened cream cheese, the chives, garlic, jalapeño, smoked paprika and plain yogurt to the cheddar cheese.


Mix thoroughly with a wooden spoon.


Line a small round bowl with cling film and heap the cheese mixture in it.  Press down with a spatula so the cheese fills the bottom of the lined bowl completely. Cover with the cling film and round out the top with your hands.  It’s like playing with Play-Do again.


Set the covered cheese ball in the refrigerator for several hours so it will stiffen back up.  I ended up leaving mine overnight because I got busy with other projects.

Remove the cheese ball from the bowl but leave it covered with the cling film.  Press the ball into a pumpkin-like shape.  Remember that pumpkins come in all shapes and sizes so don’t get too hung up on complete roundness or perfection.

Use your thumb to make grooves in the ball from top to bottom.


When you are satisfied that it looks like the best pumpkin you can manage, unwrap the cling film and use a soft paint brush to brush a little smoked paprika in the grooves to enhance the look.


Cut the stem off your broccoli, keeping a couple of leaves attached, if possible.  Cut what will be the top of your pumpkin stem at an angle.  Set the stem on top of your cheese pumpkin ball and push it in just a little.   Is that not the cutest thing!?


Serve with crackers or bread, and don’t forget to put out a knife so that folks can cut a piece off and spread the cheese ball.

Food Lust People Love: This pumpkin-shaped spicy cheese ball is a great addition to any Halloween or Thanksgiving party table.

Enjoy!


Still wondering what to make for your Halloween party? Sunday Supper is here to help with a great list of finger food recipes!

Spooky Snacks and Starters

Tasty Trick-or-Treats


Pin it! 

Food Lust People Love: This pumpkin-shaped spicy cheese ball is a great addition to any Halloween or Thanksgiving party table.
 .

Sunday, August 14, 2016

Spicy Bacon-wrapped Shrimp

These spicy bacon-wrapped shrimp will disappear so quickly that you might want to make a double batch. Serve them with some spicy bacon mayo for extra oomph.


I’m not going to give you a big song and dance story today about me and my avid relationship with bacon because no one should have to wait for bacon! My love of bacon has been fairly well documented, to the point that friends and family often send me links to bacon recipes or bacon roses, for which I am grateful. When I read that bacon was chosen as this week’s Sunday Supper theme, I sat down and wrote a list of possible recipes I’d like to share. SO MANY CHOICES. Then I headed to the grocery store.

My list went out the window when I came across the shrimp. Large and luscious, they cried out to be wrapped in bacon! Because my brain works in mysterious ways, I was already picturing them all lined up and skewered so they'd remain upright and their tails would curl up in the oven, creating the perfect little handles with which to eat them.

And so it was.

Ingredients
For the bacon-wrapped shrimp:
22 large shrimp – about 1.15kg or 2 1/2 lbs - before cleaning and peeling
1 lb or 450g bacon (normal, not thick cut)
3-4 hot chili peppers, cut into thin strips
Small handful chives, cut into pieces about the length of your shrimp

Extra equipment: wooden skewers

For the spicy bacon mayo dipping sauce:
1/2 cup or 125g mayonnaise
1 tablespoon bacon/shrimp drippings from baking pan
1 small clove garlic, grated finely
1 teaspoon or more hot sauce
1 tablespoon chopped chives

Method
Preheat your oven to 425°F or 218°C.

Peel and clean all the shrimp but leave the tails on.

Use a sharp knife to split the thick part of the shrimp so that they are open enough to put in one or two strips of pepper (depending on your heat threshold) and a couple of pieces of chive.


Cut the bacon slices in half.

Wrap one half bacon slice around each shrimp and secure it with a wooden skewer, cut side up.


Continue wrapping and skewering all the shrimp, cut side up, making sure to leave space between the shrimp.

Place the shrimp in one or more ovenproof pans. The tails should have enough space to curl up as the shrimp cook, creating the little handles I imagined.


Bake in your preheated oven for about 15-20 minutes or until the bacon is golden and crunchy looking.


When the spicy bacon-wrapped shrimp are done, whisk together all the dipping sauce ingredients.


Serve with warm shrimp.


Enjoy!


Many thanks to our event manager, Shelby of Grumpy’s Honeybunch and Erica of The Crumby Cupcake for all of their hard work behind the scenes. Check out all the wonderful bacon recipes my Sunday Supper group are sharing today!

Bacon in Appetizers
Bacon in Beverages
Bacon for Breakfast
Bacon for Lunch
Bacon for Dinner
Bacon as a Side Dish
Bacon for Dessert


Pin Spicy Bacon-wrapped Shrimp!

.

Wednesday, September 3, 2014

Loaded Baked Potato Waffles #FoodieExtravaganza


Take all the lovely ingredients of a fully loaded baked potato, stir them into waffle batter and bake till golden in a Belgian waffle iron. Perfection squared. 

Last month my Foodie Extravanza group celebrated peaches and I missed the whole thing because of traveling. It made me a little sad, but with the choice of London or cooking peaches, I had to go with London! But it did make me doubly determined to participate this month, especially when I heard that we were celebrating waffles. Waffles can be sweet or savory so, if you know me at all, you know which way I was sure to go. And since my mother, well documented on this site as being a lover of all things potato, was visiting, a waffle with all the fixings of a loaded baked potato seemed perfect. And indeed it was. Serve them plain with extra sour cream, chives and cheese. Or pop a fried egg on top.

Make sure you scroll down to the bottom to see all the lovely waffles we are sharing. Many thanks to Summer from Summer Scraps who is hosting this month!

Ingredients for six or seven square Belgian waffles
5-6 slices streaky smoked bacon (just less than 4 1/2 oz or 125g)
1 cup or 125g flour
1/2 teaspoon salt
1 teaspoon sugar
Fresh black pepper
1/2 teaspoon baking powder
1/2 teaspoon baking soda
1/2 cup or 120ml sour cream plus more to serve, if desired
3/4 cup or 180ml milk
1 egg
1 potato (about 7 1/2 oz or 210g)
1/2 oz or 15g green onions, plus more to serve, if desired
1/2 cup or 45g grated extra sharp cheddar cheese, plus more to serve, if desired

Method
Cut the bacon into small pieces and fry it until crispy. Remove it from the skillet with a slotted spoon and drain on some paper towels. Put a little of the bacon fat in a small bowl and set it aside. Yep, we are going to grease the waffle iron with it for extra flavor.

Combine the flour, salt, sugar, baking powder, baking soda and a few generous grinds of fresh black pepper in a large mixing bowl. Add in the grated cheese, crispy bacon and green onion tops and stir well.


Whisk the egg, sour cream and milk together in a smaller mixing bowl.  Peel and grate the potato and add it immediately to the egg bowl and stir to stop the potato from oxidizing and turning brown.

Looks like the grated cheese, doesn't it?


Preheat your waffle maker as per manufacturer’s instructions.

Now fold the wet ingredients into the dry ingredients.


Using a pastry brush, grease your waffle maker with a little of the reserved bacon fat.


Pour the manufacturer’s recommended amount of  batter into the center of the lower half of the waffle maker, being careful to leave room for when the batter spreads out as you lower the lid and also for when the waffle starts to rise when baking.


Close the lid and watch for the signal that your waffle is cooking.  On my waffle maker, the light goes green when it is ready for batter, red when it is cooking and then green again when the waffle is ready.  I leave the waffle in just a little bit longer after the light turns green the second time so the waffles are nice and crispy.  But if you like them less crunchy, by all means take them out earlier.


Serve topped with a little extra sour cream, green onions and even grated cheese, if desired.


If you have any batter left over, go ahead and baked the waffles and store them, wrapped in cling film, in the refrigerator or freezer. They reheat beautifully in the toaster. A couple of days after making these, I toasted one and served it with a couple sunny-side up eggs on top, more bacon on the side. Sadly, I didn’t take a photo but it was wonderful. The runny egg yolk nicely filled many of the waffle holes. Soooo much better than plain toast!

Enjoy!

My helper is always right there, on clean up duty, just in case I drop something. Hope springs eternal.


We are a group of bloggers who love to blog about food! And each month we all incorporate one main ingredient into a recipe or choose to celebrate a certain dish and put our own twist on it. This month that dish is waffles! We hope you all enjoy our delicious waffles this and come see what next month's new ingredient or dish will be. If you would like to join our group and blog along with us, come join our bloggers Facebook group Foodie Extravaganza. We would love to have you!

Check out all the fabulous waffles we've made this month!

Savory Waffles


Sweet Waffles


Ambidextrous Waffles


Monday, October 14, 2013

Chive Boursin Muffins #MuffinMonday


Savory muffins are a wonderful addition to a lunch or dinner table breadbasket.  Or make them in a mini muffin pan to serve with evening cocktails. 

This week our ingredient of choice was supposed to be blueberries but regular readers will recall that last week I baked in a bit of a panic as I rushed off to a blog workshop.  The ingredient for last week was cinnamon and I thought blueberries would go nicely.  And indeed they did!  But when I sent in the photo to my fellow Muffin Monday baker, Anuradha, the return email said, “Is this one for next week?”  I must confess that my response was a curse word.  One that is allowed on US television, but still.  And then she kindly agreed to change this week’s ingredient to chives!  I love those green onion tops and almost always have some in the vegetable drawer.  They liven up salads, add color to stews and who doesn’t like a healthy helping on a baked potato?   They are also one of the main flavor boosters (or perhaps their slim French cousins, ciboulette) of herb and garlic goat cheese.  Strictly speaking, I didn’t use the name brand Boursin, but Chive Herb and Garlic Goat Cheese muffins seemed an unbearably long title.  Boursin gives the correct idea of how these muffins will taste and, of course, YOU can use the real thing.

If you are serving a savory muffin to non-Americans, you might want to prepare them for that fact.  Not to paint whole nations with one sugary brush, but I have been informed that the rest of world assumes a muffin is sweet.  Was my informant correct?  I’d love to hear your opinion and experiences.

Ingredients

2 cups or 250g flour
1 teaspoon sea salt flakes or 1/2 teaspoon regular sea salt
2 teaspoons baking powder
2 eggs
1/4 cup or 60ml canola oil
1 cup or 240ml milk
Medium bunch of chives or green onion tops (Mine weighed about 3/4 oz or 20g after I cut the white bulby ends off.)
200g herb and garlic goat cheese – slightly frozen.  This is very soft cheese so it doesn’t really crumble or cut well.  I find that if I freeze it for an hour or so, I can cut it up with a sharp knife just before folding it into the muffin batter. That way you still end up with some solid bits of cheese.

Method
Preheat your oven to 350°F or 180°C and prepare your 12-cup normal or 24-cup mini muffin pan by greasing it thoroughly or spraying with non-stick spray.

Chop your chives.


In a large bowl, mix together the flour, baking powder, chives and salt flakes and stir well.


In another bowl, whisk together the milk, oil and eggs.


Pour your wet ingredients into the dry ingredients and fold them together until just mixed.


Chop your sort of frozen cheese into crumbles and small chunks.


Fold the cheese into the batter.


Divide the batter evenly among the muffin cups.


For full sized muffins, bake in the preheated oven about 20-25 minutes or until a toothpick inserted in the middle comes out clean.  Mini muffins will take less time so keep an eye on them.

Cool on a rack for a few minutes and then remove the muffins to cool completely.  Because of the cheese, you may have to run a knife around some of the muffins to remove them nicely.

See that golden brown?  Best part of the whole muffin!

These go just as wonderfully with a glass of beer or wine as they do with a cup of coffee.