Showing posts with label flatbread recipes. Show all posts

Tuesday, September 10, 2024

Rosemary Onion Socca - Chickpea Flatbread #BreadBakers

This rosemary onion socca aka chickpea flatbread is super easy to make and even easier to devour. The crispy edges and golden bottom are superb. This had us standing around, picking up just one more piece. And maybe just one more. All right, this really is the last one! And it's gone.

Food Lust People Love: This rosemary onion socca aka chickpea flatbread is super easy to make and even easier to devour. The crispy edges and golden bottom are superb. This had us standing around, picking up just one more piece. And maybe just one more. All right, this really is the last one! And it's gone.

Despite living in France for three years, I had never come across socca until a couple of years ago when I was researching gluten free recipes for another edition of Bread Bakers. It sounded delightful but I didn’t have any chickpea flour (and was too lazy to go shopping) so I chose to make something else. 

It popped back into my mind when our host for this month’s Bread Baker event chose flatbreads as our theme. As you can see from the photos, bread really doesn’t get any flatter than socca! There are no leavening agents so it doesn’t rise at all. 

I checked out several recipes for this French regional bread and while all of them had varying amounts of chickpea flour, water and oil, none had baking powder so I had to conclude that this is correct. 

Rosemary Onion Socca - Chickpea Flatbread

It’s best to start ahead by several hours or even the day before you want to make this as the batter needs time to be its best. This recipe is adapted from one on New York Times Cooking. If your local grocery store doesn't carry chickpea flour, try an Asian or Indian shop where it might be labeled besan or gram flour.

Ingredients
1 cup or 118g chickpea flour
1 teaspoon salt
1 teaspoon freshly ground black pepper
1 cup or 240ml lukewarm water
4 to 6 tablespoons olive oil
½ medium onion
1 tablespoon fresh rosemary, small tender leaves or chopped bigger leaves

Method
Put the chickpea flour in a bowl; add the salt and pepper. Slowly add the lukewarm water, whisking to eliminate lumps. Whisk in 2 tablespoons olive oil. 


Cover or pour into a jar and let sit for 12 hours or overnight in the refrigerator. The batter should be about the consistency of heavy cream. I like using a clean pint jar which fits better in the refrigerator. It also makes mixing easier, as you’ll see later. 


When you are about ready to bake the socca, finely slice your onions. 


Heat two tablespoons of the olive oil in a large iron skillet and pan fry the onions until crispy, about 8-9 minutes. 


Add in most of the rosemary, reserving just a little for sprinkling on the socca before baking, and give it a quick stir. Fry for one minute. 


Remove the onions and rosemary from the pan and leave them to cool. 


Meanwhile, heat your oven to 450°f or 232°C. Once hot, add two more tablespoons of olive oil to the iron skillet and put it in the oven for about 5 minutes. 

Mix the onions and rosemary into your socca batter. (If you’ve also put your batter in a jar, this is super easy. Add them in, screw the lid on tight and give the jar a good shake.) 


Immediately pour the batter into the hot pan. Sprinkle on the reserved rosemary leaves. 


Bake for 10 -12 minutes, or until the socca is firm and the edges set.


Heat the broiler/grill and brush the top of the socca with 1 or 2 tablespoons of oil. 


Set the pan a few inches away from the heat source, and cook just long enough to brown it in spots. 

Food Lust People Love: This rosemary onion socca aka chickpea flatbread is super easy to make and even easier to devour. The crispy edges and golden bottom are superb. This had us standing around, picking up just one more piece. And maybe just one more. All right, this really is the last one! And it's gone.

Cut the socca into wedges, and serve hot or warm.

Food Lust People Love: This rosemary onion socca aka chickpea flatbread is super easy to make and even easier to devour. The crispy edges and golden bottom are superb. This had us standing around, picking up just one more piece. And maybe just one more. All right, this really is the last one! And it's gone.

Enjoy! 

Since it’s the second Tuesday of the month, it’s BreadBakers day! Many thanks to our host Kelly of Passion Kneaded who chose flatbreads as our theme. Check out all the links below. 

#BreadBakers is a group of bread loving bakers who get together once a month to bake bread with a common ingredient or theme. Follow our Pinterest board right here. Links are also updated each month on this home page. We take turns hosting each month and choosing the theme/ingredient.


Pin this Rosemary Onion Socca
– Chickpea Flatbread!

Food Lust People Love: This rosemary onion socca aka chickpea flatbread is super easy to make and even easier to devour. The crispy edges and golden bottom are superb. This had us standing around, picking up just one more piece. And maybe just one more. All right, this really is the last one! And it's gone.
.

Tuesday, June 11, 2024

Garlic Chili Pepper Flatbread #BreadBakers

Chewy yet fluffy, this garlic chili pepper flatbread is great on its own as a snack or serve it with your favorite dhal or curry. The garlic and chili add so much flavor to this tasty bread! 

Food Lust People Love: Chewy yet fluffy, this garlic chili pepper flatbread is great on its own as a snack or serve it with your favorite dhal or curry. The garlic and chili add so much flavor to this tasty bread!

Homemade flatbread is so easy and always turns out nicer than almost anything I can buy on store shelves. I know in a lot of homes around the world, it’s a normal part of everyday cooking but unless I’m cooking curry, I just don’t think to make it. 

Note to self: Make homemade flatbread more often! Note to anyone reading this: You should too. 

Garlic Chili Pepper Flatbread

This recipe makes six flatbreads (about 7x4 in or 18x10cm each) and was adapted from one on Taste.com.au. These little guys definitely have a noticeable heat from the peppers. You can remove the seeds before mincing your peppers to make them less spicy.

Ingredients
1 teaspoon dried active yeast
1/4 teaspoon sugar
1 3/4 cups or 218g bread flour
3/4 cup or 180ml warm water (about 100–110°F or 38–43°C)
2 hot red chili peppers
3-4 sprigs fresh parsley, stems removed
2 cloves garlic
1/2 teaspoon fine sea salt
2-3 tablespoons olive oil 

Method
Warm the water to the required temperature and measure your flour into a small bowl. 

In a large mixing bowl, mix the yeast and sugar together with about 1/4 of the flour and the warm water. Set aside 20 minutes until foamy.


Mince your peppers, parsley leaves and garlic.


Add them along with the salt to the remaining flour. Stir to combine.


Add the flour mixture to the yeast mixture and combine using a Danish whisk or your clean hands. 


Knead on a clean surface until smooth and elastic.

Transfer the dough to a greased bowl.


Cover with a tea towel or cling film, then leave in a warm place for 1 hour or until doubled in size.


Form the dough into a stout log, then cut into 6 equal pieces. The log just makes it easier to eyeball what six equal pieces should look like. 


If you prefer to use a scale, you can skip that step. My dough ball weighed 212g so each piece was about 68g. Roll them them into balls.


Lightly flour your work surface and rolling pin and roll one ball into an oval and brush it with olive oil. 


Roll it up from the short end into a tight tube. 


Use two hands to roll the tube longer and thinner.


Coil the tube into a circle like a snail.


Tuck the end under. Press down gently. 


Repeat until you have six little swirled dough balls. 

Starting with the first one you made, use the rolling pin to form it back into an oval.


Heat a griddle over a medium high heat and cook the flatbread until puffed on top and lightly browned on the bottom. 


Turn and cook the other side. This takes just a couple of minutes on each side. 


Flip it over one last time. 


I like to put the finished flatbreads in a warm oven in a foil pouch to keep them warm. 


Repeat the rolling and cooking process for the remaining five dough balls. Serve warm. (Or eat at room temperature the next day for breakfast - OMG, still so good.)

Food Lust People Love: Chewy yet fluffy, this garlic chili pepper flatbread is great on its own as a snack or serve it with your favorite dhal or curry. The garlic and chili add so much flavor to this tasty bread!

Enjoy!

It’s the second Tuesday of the month so that means it’s time for my Bread Baker friends to share their recipes. Our theme is Spicy Breads with Peppers. Many thanks to our host, Radha of Magical Ingredients. Check out the links below: 


#BreadBakers is a group of bread loving bakers who get together once a month to bake bread with a common ingredient or theme. Follow our Pinterest board right here. Links are also updated each month on this home page. We take turns hosting each month and choosing the theme/ingredient.


Pin this Garlic Chili Pepper Flatbread!

Food Lust People Love: Chewy yet fluffy, this garlic chili pepper flatbread is great on its own as a snack or serve it with your favorite dhal or curry. The garlic and chili add so much flavor to this tasty bread!

 .
 

Wednesday, August 2, 2023

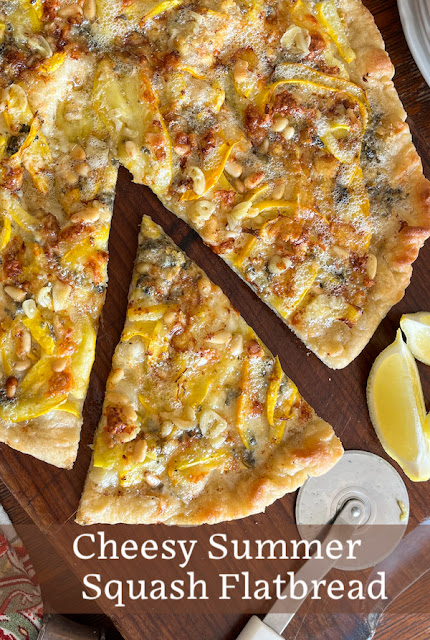
Cheesy Summer Squash Flatbread

This cheesy summer squash flatbread is heaped with marinated squash, blue cheese and mozzarella for a savory snack (goes great with white wine or chilled beer!) or even as a main course. In that case, you can serve it with salad to complete the meal. 

Food Lust People Love: This cheesy summer squash flatbread is heaped with marinated squash, blue cheese and mozzarella for a savory snack (goes great with white wine or chilled beer!) or even as a main course. In that case, you can serve it with salad to complete the meal.

So, our weather hasn’t been great – lots of rain and very little sun – but after the drought/scorcher that was summer 2022, I’m not about to complain. My tomatoes are still small and green but my summer squash are flourishing.

I grew them from seeds in smaller pots and transplanted them thinking they might vine but this variety of crookneck squash does not. That said, I deliberately chose the seeds that said “good in pots” and so they are! 

Fortunately, even though I have five plants, they grow just a few squash at a time and so – for now - I’m able to keep up with the harvest but we’ve still been eating a lot of summer squash and that’s a good thing. 


This is the first time I’ve attempted growing these crookneck squash but since they’ve turned out so easy, I know it won’t be the last. Only one caveat: I picked one to cook a week ago that was as big as full grown but it still had some green on it. Talk about bitter! I figured the size was what mattered but now I know not to pick them till they are completely yellow. 

Cheesy Summer Squash Flatbread

If you don't have summer squash, zucchini is an excellent substitute. In fact, this recipe is adapted from one on the delicious. magazine website using courgette (BrE for zucchini.)  If you do not have a 12 in cast iron skillet, this can also be baked in the oven on a pizza stone. Put the stone in as you preheat the oven. 

Ingredients
For the flatbread dough:
1 2/3 cups or 200g strong white flour plus extra for dusting
1/2 teaspoon fine sea salt
4 1/2 fl oz or 133ml tepid water
1/4 cup or 60g fed sourdough starter

For the topping:
2 cloves garlic, thinly sliced
1/4 cup or 60ml olive oil
3 small summer squash, trimmed (about 300g)
Finely grated zest 1 lemon
Fine sea salt and freshly ground black pepper
3 1/2 oz or 100g Roquefort or other strong blue cheese, crumbled
4 1/4 oz or 120g fresh mozzarella, thinly sliced
2 tablespoons pine nuts (20g)

Optional for serving: lemon wedges (from the one you zested)

Method
In a large bowl, mix the flour and salt together. Add the tepid water and the sourdough starter. 


Use a wooden spoon or a Danish dough whisk to combine everything into a wet and sticky dough. 


Use damp hands to form it into a loose lump. Cover the bowl with a damp towel or cling film and then leave it at room temperature for 6-8 hours.


Important: Stretch and fold the dough over several times during the rising time to develop the gluten. I set a timer for 30 minutes to remind myself to keep doing this step often.

Meanwhile, warm the olive oil in a small pot until it just starts to shimmer. Remove the pot from the heat and add in the sliced garlic. 


Leave to infuse until the oil is cool. Strain out the garlic with a small sieve and save for adding to the flatbread to serve. 

Cut the summer squash in half and scoop out any seeds. Discard or compost the seeds. Cut the squash into long ribbons using a vegetable peeler or slice finely lengthways. 


Put the thin slices in a bowl with the lemon zest and 2 tablespoon of the garlic oil, then season with a sprinkle fine sea salt and freshly ground black pepper. 


Massage the salt, pepper, zest and oil into the squash as you might do it raw kale for kale salad. Set aside for at least 30 minutes but longer is better to help soften the squash. 

Preheat your oven to 400°F or 200°C, and then start heating a large cast-iron skillet on your stovetop.

Roll out the dough into a circle on a piece of nonstick baking parchment. Despite mine being nonstick, I found it still needed quite a bit of flour underneath so it would turn loose when I needed it to. You may find the same. 


Prop the squash bowl on its side so that any juices that have accumulated can run off. Soak it up with a paper towel and discard. We are looking for crispy flatbread so want to keep the toppings as dry as possible. 


When the iron skillet is very hot, carefully transfer the dough circle to it. Cook the dough on the stovetop for about 2-3 minutes. You can see the middle starting to cook here. 


Pop the skillet into your preheated oven to cook the flatbread before adding the toppings. I set a timer for five minutes. 

When your timer rings, remove the flatbread from the oven. 


Top it with the summer squash slices, crumbled blue cheese, sliced mozzarella and pine nuts.


Return the flatbread to the oven. Cook for a further 10-12 minutes or until the cheese is melted and the summer squash is golden in places. 

You want a crunchy top and a crunchy bottom. Check the bottom with a wooden spatula and leave it in a bit longer if it isn't to your liking. 


Likewise, if you desire a little more color on your squash or cheese, you can turn the oven to broil for another minute or two. Just be watchful so it doesn't burn. 

Remove the pan from the oven and slide the flatbread onto a cutting board. Top with the reserved garlic and some more garlic oil, if desired. 


I found that extra oil was not necessary as the oils from the cheese created little pools already. In fact, I dabbed them with a paper towel to remove some of the oil. If you are a fan of oily focaccia, this probably won’t bother you. I like mine on the drier side. 

Cut into wedges to serve.  


I also gave my slices a squeeze of lemon juice. You might want to as well.


Enjoy!

It’s Foodie Extravaganza time, when my fellow bloggers and I share recipes for random foodie holidays. This month it’s National Zucchini Day on 8 August but our host, Wendy from A Day in the Life on the Farm said I could sub in my summer squash since many people use them interchangeably. Thanks, Wendy, and thanks for hosting! Check out all the recipe links below. 


Foodie Extravaganza is where we celebrate obscure food holidays by cooking and baking together with the same ingredient or theme each month. Posting day is always the first Wednesday of each month. If you are a blogger and would like to join our group and blog along with us, come join our Facebook page Foodie Extravaganza. We would love to have you! If you're a spectator looking for delicious tid-bits check out our Foodie Extravaganza Pinterest Board.

Pin this Cheesy Summer Squash flatbread!

Food Lust People Love: This cheesy summer squash flatbread is heaped with marinated squash, blue cheese and mozzarella for a savory snack (goes great with white wine or chilled beer!) or even as a main course. In that case, you can serve it with salad to complete the meal.

 .