Showing posts with label main courses. Show all posts

Wednesday, August 2, 2023

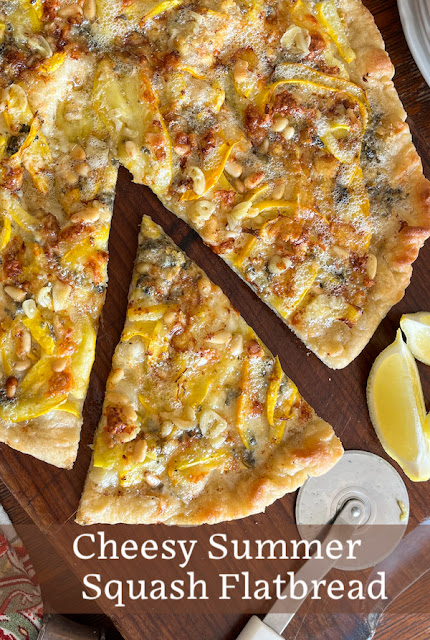
Cheesy Summer Squash Flatbread

This cheesy summer squash flatbread is heaped with marinated squash, blue cheese and mozzarella for a savory snack (goes great with white wine or chilled beer!) or even as a main course. In that case, you can serve it with salad to complete the meal. 

Food Lust People Love: This cheesy summer squash flatbread is heaped with marinated squash, blue cheese and mozzarella for a savory snack (goes great with white wine or chilled beer!) or even as a main course. In that case, you can serve it with salad to complete the meal.

So, our weather hasn’t been great – lots of rain and very little sun – but after the drought/scorcher that was summer 2022, I’m not about to complain. My tomatoes are still small and green but my summer squash are flourishing.

I grew them from seeds in smaller pots and transplanted them thinking they might vine but this variety of crookneck squash does not. That said, I deliberately chose the seeds that said “good in pots” and so they are! 

Fortunately, even though I have five plants, they grow just a few squash at a time and so – for now - I’m able to keep up with the harvest but we’ve still been eating a lot of summer squash and that’s a good thing. 


This is the first time I’ve attempted growing these crookneck squash but since they’ve turned out so easy, I know it won’t be the last. Only one caveat: I picked one to cook a week ago that was as big as full grown but it still had some green on it. Talk about bitter! I figured the size was what mattered but now I know not to pick them till they are completely yellow. 

Cheesy Summer Squash Flatbread

If you don't have summer squash, zucchini is an excellent substitute. In fact, this recipe is adapted from one on the delicious. magazine website using courgette (BrE for zucchini.)  If you do not have a 12 in cast iron skillet, this can also be baked in the oven on a pizza stone. Put the stone in as you preheat the oven. 

Ingredients
For the flatbread dough:
1 2/3 cups or 200g strong white flour plus extra for dusting
1/2 teaspoon fine sea salt
4 1/2 fl oz or 133ml tepid water
1/4 cup or 60g fed sourdough starter

For the topping:
2 cloves garlic, thinly sliced
1/4 cup or 60ml olive oil
3 small summer squash, trimmed (about 300g)
Finely grated zest 1 lemon
Fine sea salt and freshly ground black pepper
3 1/2 oz or 100g Roquefort or other strong blue cheese, crumbled
4 1/4 oz or 120g fresh mozzarella, thinly sliced
2 tablespoons pine nuts (20g)

Optional for serving: lemon wedges (from the one you zested)

Method
In a large bowl, mix the flour and salt together. Add the tepid water and the sourdough starter. 


Use a wooden spoon or a Danish dough whisk to combine everything into a wet and sticky dough. 


Use damp hands to form it into a loose lump. Cover the bowl with a damp towel or cling film and then leave it at room temperature for 6-8 hours.


Important: Stretch and fold the dough over several times during the rising time to develop the gluten. I set a timer for 30 minutes to remind myself to keep doing this step often.

Meanwhile, warm the olive oil in a small pot until it just starts to shimmer. Remove the pot from the heat and add in the sliced garlic. 


Leave to infuse until the oil is cool. Strain out the garlic with a small sieve and save for adding to the flatbread to serve. 

Cut the summer squash in half and scoop out any seeds. Discard or compost the seeds. Cut the squash into long ribbons using a vegetable peeler or slice finely lengthways. 


Put the thin slices in a bowl with the lemon zest and 2 tablespoon of the garlic oil, then season with a sprinkle fine sea salt and freshly ground black pepper. 


Massage the salt, pepper, zest and oil into the squash as you might do it raw kale for kale salad. Set aside for at least 30 minutes but longer is better to help soften the squash. 

Preheat your oven to 400°F or 200°C, and then start heating a large cast-iron skillet on your stovetop.

Roll out the dough into a circle on a piece of nonstick baking parchment. Despite mine being nonstick, I found it still needed quite a bit of flour underneath so it would turn loose when I needed it to. You may find the same. 


Prop the squash bowl on its side so that any juices that have accumulated can run off. Soak it up with a paper towel and discard. We are looking for crispy flatbread so want to keep the toppings as dry as possible. 


When the iron skillet is very hot, carefully transfer the dough circle to it. Cook the dough on the stovetop for about 2-3 minutes. You can see the middle starting to cook here. 


Pop the skillet into your preheated oven to cook the flatbread before adding the toppings. I set a timer for five minutes. 

When your timer rings, remove the flatbread from the oven. 


Top it with the summer squash slices, crumbled blue cheese, sliced mozzarella and pine nuts.


Return the flatbread to the oven. Cook for a further 10-12 minutes or until the cheese is melted and the summer squash is golden in places. 

You want a crunchy top and a crunchy bottom. Check the bottom with a wooden spatula and leave it in a bit longer if it isn't to your liking. 


Likewise, if you desire a little more color on your squash or cheese, you can turn the oven to broil for another minute or two. Just be watchful so it doesn't burn. 

Remove the pan from the oven and slide the flatbread onto a cutting board. Top with the reserved garlic and some more garlic oil, if desired. 


I found that extra oil was not necessary as the oils from the cheese created little pools already. In fact, I dabbed them with a paper towel to remove some of the oil. If you are a fan of oily focaccia, this probably won’t bother you. I like mine on the drier side. 

Cut into wedges to serve.  


I also gave my slices a squeeze of lemon juice. You might want to as well.


Enjoy!

It’s Foodie Extravaganza time, when my fellow bloggers and I share recipes for random foodie holidays. This month it’s National Zucchini Day on 8 August but our host, Wendy from A Day in the Life on the Farm said I could sub in my summer squash since many people use them interchangeably. Thanks, Wendy, and thanks for hosting! Check out all the recipe links below. 


Foodie Extravaganza is where we celebrate obscure food holidays by cooking and baking together with the same ingredient or theme each month. Posting day is always the first Wednesday of each month. If you are a blogger and would like to join our group and blog along with us, come join our Facebook page Foodie Extravaganza. We would love to have you! If you're a spectator looking for delicious tid-bits check out our Foodie Extravaganza Pinterest Board.

Pin this Cheesy Summer Squash flatbread!

Food Lust People Love: This cheesy summer squash flatbread is heaped with marinated squash, blue cheese and mozzarella for a savory snack (goes great with white wine or chilled beer!) or even as a main course. In that case, you can serve it with salad to complete the meal.

 .

Sunday, April 24, 2022

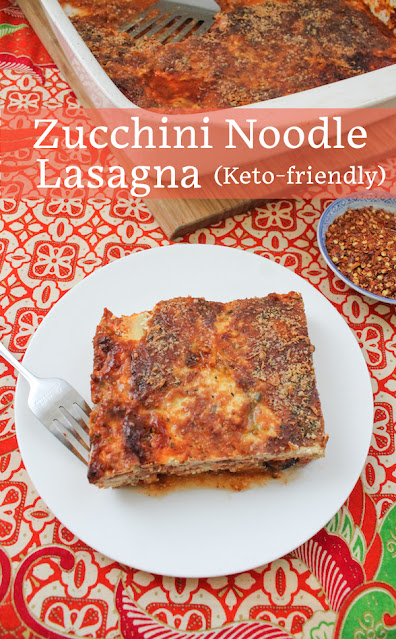
Zucchini Noodle Lasagna

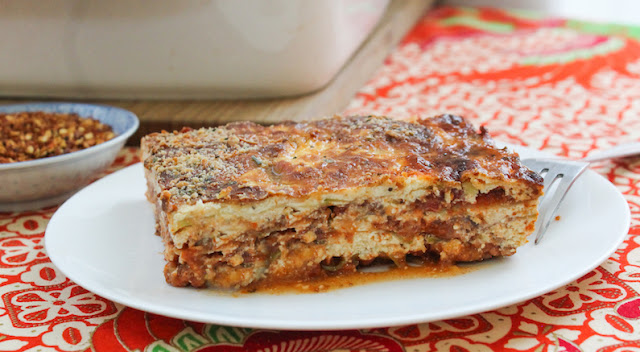
This zucchini noodle lasagna is made with zucchini “noodles” instead of pasta, upping your vegetable intake and lowering carbs. You won’t miss them!

Food Lust People Love: This zucchini noodle lasagna is made with zucchini “noodles” instead of pasta, upping your vegetable intake and lowering carbs. You won’t miss them!

I’ve wanted to share this recipe for the longest time but something kept getting in the way. I made it when we were attempting a keto diet and trying to eat more vegetables as well. The more veggies thing worked really well but the keto part, not so much. Pretty sure I gained weight. :D

While this dish is low carb, it’s not low calorie because of the beef, sausage and cheese. It is delicious!

For a vegetarian version, use double the amount of mushrooms in place of the beef and sausage or a meat substitute. 

Zucchini Noodle Lasagna

Unfortunately the process photos for the red sauce somehow went missing. I have no idea how or why but I hope the explanation is sufficiently clear. If you do have any questions, please leave me a comment and I will endeavor to respond in a timely manner. 

Ingredients
For the red sauce:
2 tablespoons olive oil
1 lb or 450g ground beef
14 oz or 387g smoked sausage
2 cans (14.1 oz or 400g) whole peeled tomatoes, with juice
4 3/4 oz or 135g tomato paste
2 tablespoons Italian seasonings  (I use Durkee Pasta Seasoning (<affiliate link) which has dehydrated onions, garlic, etc. along with the actual Italian spices.)*
2 bay leaves
1/2 teaspoon baking soda
*Without that lovely shortcut, mince 1 small onion and 3 cloves garlic. Add to pan while browning beef. 

For the cheese layers:
5 1/3 oz or 150g mozzarella, grated
8.8 oz or 250g fresh ricotta 
2 large eggs
Freshly ground black pepper

For the zucchini layers:
4 medium zucchini (about 1.1 lbs or 500g)
Fine sea salt

For topping:
1/2 cup or 55g Parmesan, grated
(Plus reserved grated mozzarella – see method below)
1 teaspoon oregano

Method
Add olive oil to pan, then the ground beef. Cook until ground beef is browned and the smaller bits are a little bit crispy. (Put in onion/garlic in at this point, when the smaller bits are well browned, if using.)

While that’s happening, cut the sausage lengthwise into four strips and then chop them into small cubes. Add the sausage to the beef pan and cook further until the sausage starts to brown. 

Add the Italian seasonings, canned tomatoes and tomato paste, along with about half a can of water, using that water to rinse out the tomato cans so as not to leave any tomato behind in them. 

Pop in the bay leaves, give the whole pot a good stir and simmer, covered, for about 45 minutes. 

Meanwhile, trim off the stem ends and slice your zucchini into thin strips with a vegetable peeler. 


Lay in single file on a clean kitchen towel. Lightly sprinkle the zucchini with salt and set aside. 


Put about 1/2 cup of the grated mozzarella in a small mixing bowl and stir in the Parmesan and dried oregano. Set aside till needed for topping. 

In a larger mixing bowl, whisk together the rest of the mozzarella, the ricotta, the eggs and some freshly ground black pepper. This is going to look much drier that the usual cheese layer for lasagna. Don’t worry. The cooking zucchini will ensure that this lasagna isn’t dry. 


After the red sauce has simmered for about 45 minutes, stir in the baking soda. I was taught this trick by an Italian American nonna. It’s going to bubble up as the soda reacts with the natural acids in the tomatoes. Keep stirring till about the bubbles are gone. The result is a sweeter, less acidic and according to my mentor nonna, more stomach-friendly sauce. 

Simmer for about 10-15 minutes longer, uncovered. Remove from the heat. Meanwhile, preheat your oven to 350°F or 180°C.

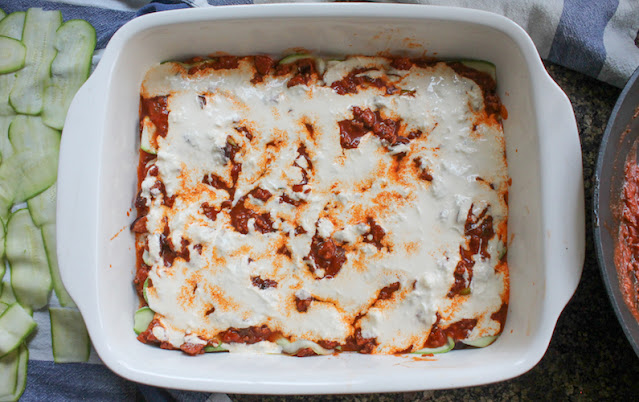
To assemble the zucchini noodle lasagna, remove the bay leaves from the red sauce and spoon a thin layer into your baking dish. (9x13in or 23x33cm for thin lasagna, a smaller pan for thicker lasagna).


Roll the zucchini tightly up in the clean kitchen towel to dry them off. Unroll the towel and top the red sauce with zucchini slices.


Add another layer of red sauce. Then spoon on a layer of the cheese mixture. 


Add another layer of zucchini, followed by red sauce and then cheese mixture. Keep going till you use up all the zucchini, the red sauce and cheese. In my pan, I did three complete sets of layers. 

Finish the dish by sprinkling it with the mozzarella/Parmesan cheese topping. 


Bake in your preheated oven for 45-50 minutes or until the zucchini noodle lasagna is hot through, bubbling around the edges and well browned on top. 


Leave to cool for about 10 minutes then cut in squares to serve. 

Food Lust People Love: This zucchini noodle lasagna is made with zucchini “noodles” instead of pasta, upping your vegetable intake and lowering carbs. You won’t miss them!

Enjoy! 

It’s Sunday FunDay and today we are sharing creative lasagna recipes! Check them all out below. 
 
We are a group of food bloggers who believe that Sunday should be a family fun day, so every Sunday we share recipes that will help you to enjoy your day. If you're a blogger interested in joining us, just visit our Facebook group and request to join.

Pin this Zucchini Noodle Lasagna!

Food Lust People Love: This zucchini noodle lasagna is made with zucchini “noodles” instead of pasta, upping your vegetable intake and lowering carbs. You won’t miss them!

 .

Sunday, January 9, 2022

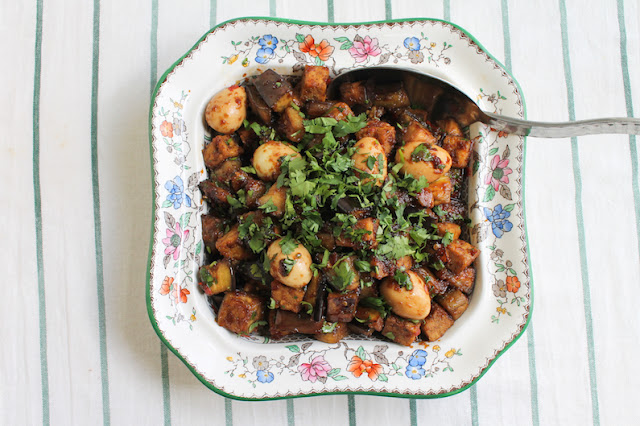
Spicy Sweet Soy Eggplant Tofu Quail Egg Stir-fry

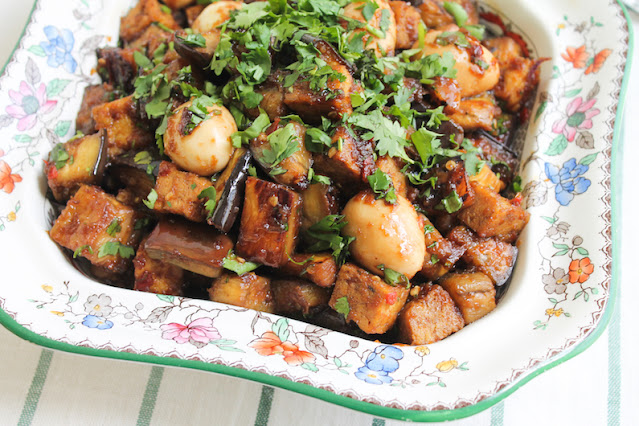
This recipe is a mouthful in more ways than one! Spicy Sweet Soy Eggplant Tofu Quail Egg Stir-fry will fill your belly and please all your taste buds.

Food Lust People Love: This recipe is a mouthful in more ways than one! Spicy Sweet Soy Eggplant Tofu Quail Egg Stir-fry will fill your belly and please all your taste buds.

Once upon a time (back in the late ’80s) we lived on the island of Borneo in the small oilfield town of Balikpapan. Borneo is owned by three countries. The tiniest bit in the northwest corner belongs to the Sultanate of Brunei and the rest falls under the jurisdiction of either Indonesia or Malaysia. Balikpapan is in the Indonesia section called Kalimantan. I had tried sweet soy sauce aka kecap manis before but that is where I fell in love.

Kecap manis, pronounced kuh-CHOP MAH-nees, is a must-have in so many Indonesian dishes. It’s soy sauce sweetened with palm sugar so it makes sense that the name translates to “sweet sauce” in English. 

In most Indonesian restaurants, a small bowl of kecap manis and chopped bird’s eye chili peppers will be on every table, just in case what you ordered didn’t have kecap manis in it but you want to add some. I usually did. 

I have hauled bottles of the ABC brand sauce in my luggage all over the world! I love it that much. It’s the key ingredient in my spicy sticky wings and my Bali spicy grilled fish.  

I came across this recipe online while searching for something to make with eggplant and tofu. As soon as I saw kecap manis in the ingredients list, I knew I had to make it. It reminded me a bit of my braised pork and egg dish and I adore that! 

Spicy Sweet Soy Eggplant Tofu Quail Egg Stir-fry

This recipe is adapted from one I found on Cookpad. The author is from Bandung, Indonesia, which is on Java, the same island as the Indonesian capital, Jakarta.  You can find kecap manis, fresh quail eggs, and fried tofu at most Asian markets. Check the refrigerated section for the latter two. 

Ingredients - serves 4
2 eggplant (approximately 1 2/3 lbs or 740g total) 
fine sea salt 
1 small onion – about 3 1/2 oz or 100g
4 cloves garlic
4 fresh red chili peppers
7 oz or 200g fried tofu - cut into cubes (I used already seasoned with lemon grass and chili) 
2 tablespoons canola or another light oil
1/3 cup or 80ml kecap manis aka sweet soy sauce
12 hard-boiled quail eggs
chopped cilantro – some for pan and some to garnish

To serve: cooked white or brown rice 

Method
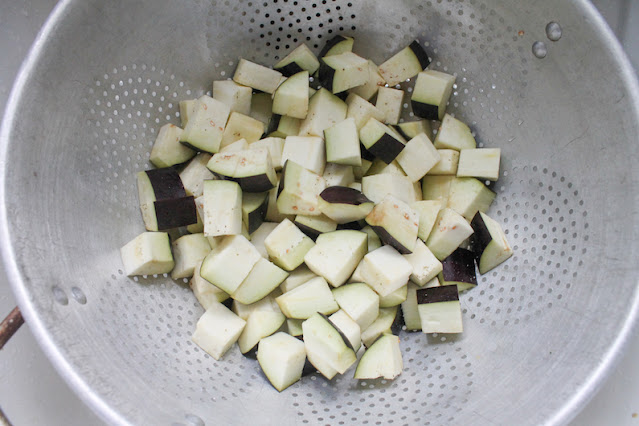
Cut the eggplant into cubes (no need to peel) and put them in a colander, lightly sprinkling on sea salt as you add the cubes in layers. Set the colander in a sink (or over a large bowl) to drain. 

The eggplant cubes draining

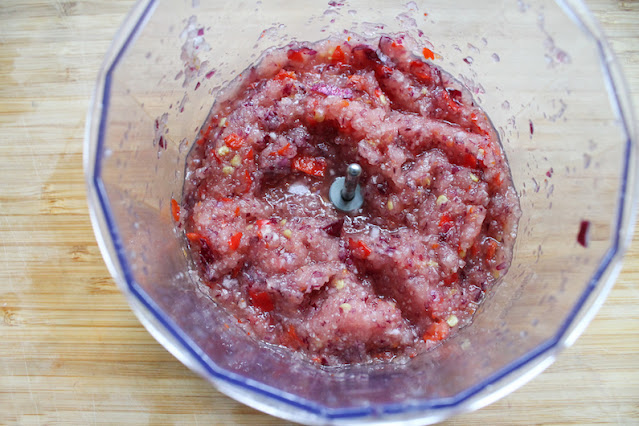
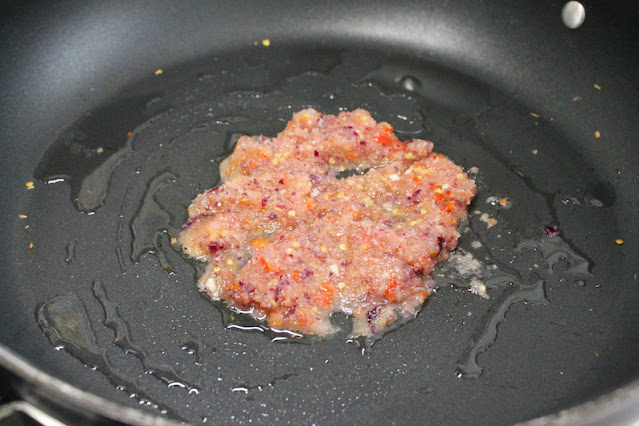
Meanwhile, make the onion, garlic and red chili peppers into a paste in a small food processor or mortar and pestle. Set aside.

Making a paste out of the onion, garlic and chili peppers

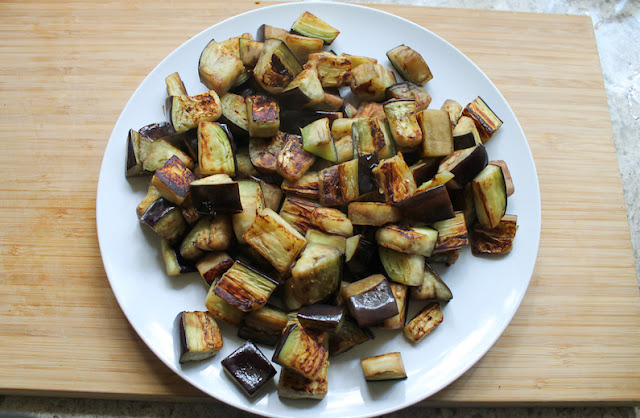
Dry the eggplant with paper towels then fry it in batches in large nonstick skillet until the pieces are golden on all sides. Sometimes a little drizzle of oil helps this process. It depends on your non-stick skillet. 

Frying the eggplant

Set the browned eggplant aside on a large plate. 

Setting aside the egglant

Cut the fried tofu into bite-sized pieces and repeat the pan-frying process in the same non-stick skillet. When the tofu is golden on all sides, pop it on top of the eggplant. 

The golden fried tofu

Heat 2 tablespoons of oil in a pan. Add in the onion/garlic/chili paste. 

Sauteeing the spice paste

Fry over a medium heat for a few minutes, until fragrant. That is to say, until it no longer smells sharply of onion and garlic. Add a couple of tablespoons of water and let it simmer for a few minutes more. 

Add in the sweet soy sauce and cook over a low heat till it’s a bit sticky looking. Stir often so it doesn’t burn. 

Adding the sweet soy sauce

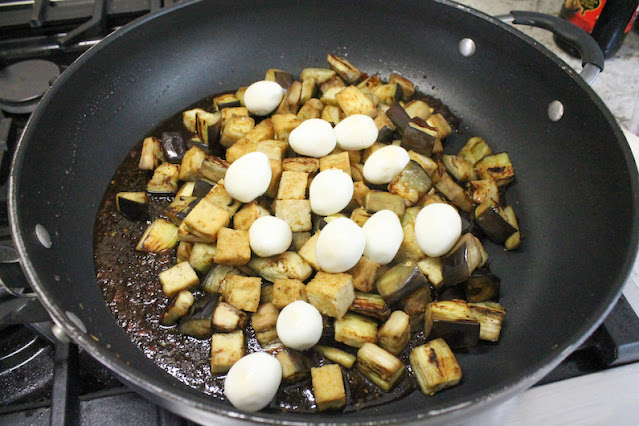
Add the tofu and eggplant back into the pan, along with the boiled quail eggs. 

Adding the eggplant, tofu and eggs to the pan

Fold gently to coat them with the sauce and cook for a few minutes more until everything is heated through again.  Sprinkle with some chopped cilantro and stir it in gently. 

Folding the ingredients to cover them with the sauce.

Top with more cilantro to serve. I serve this over cooked white or brown rice and put my habanero sauce on the table in case anyone would like it spicier than it already is!

Enjoy!

Food Lust People Love: This recipe is a mouthful in more ways than one! Spicy Sweet Soy Eggplant Tofu Quail Egg Stir-fry will fill your belly and please all your taste buds.

It’s Sunday FunDay again and our featured ingredient is the incredible edible egg! Check out the recipe links below. Many thanks to our host, Rebekah of Making Miracles!


We are a group of food bloggers who believe that Sunday should be a family fun day, so every Sunday we share recipes that will help you to enjoy your day. If you're a blogger interested in joining us, just visit our Facebook group and request to join.


Pin this Spicy Sweet Soy Eggplant

Tofu Quail Egg Stir-fry!

Food Lust People Love: This recipe is a mouthful in more ways than one! Spicy Sweet Soy Eggplant Tofu Quail Egg Stir-fry will fill your belly and please all your taste buds.

 .

Friday, October 15, 2021

Savory Craquelin Pastry Roast Salmon

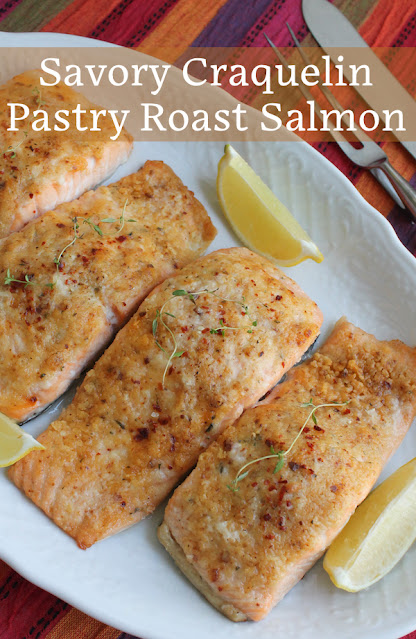
The topping on this Savory Craquelin Pastry Roast Salmon is a great way to add flavor and also make sure roast salmon doesn’t dry out in the oven. It's flavored with garlic, thyme, smoked sea salt flakes, aleppo pepper and just a sprinkle of nutmeg. 

Food Lust People Love: The topping on this Savory Craquelin Pastry Roast Salmon is a great way to add flavor and also make sure roast salmon doesn’t dry out in the oven. It's flavored with garlic, thyme, smoked sea salt flakes, aleppo pepper and just a sprinkle of nutmeg.

If you’ve seen my recipe for pineapple buns, you are already familiar with what craquelin pastry is, although to be fair, I never called it that. That thin topping I added to the buns - the one that baked up crunchy and shiny - is a craquelin. Indeed typically craquelin pastry is sweet. And it’s usually baked on a bread or pastry of some kind. 

The word itself is French, naturalment, and translates to “cracker.” I presume the topping was so named because it is crunchy like a cracker when baked, although I must warn you that that does not hold true when you bake it on top of fish.  It gets a little crunchy but certainly not cracker crisp!

Since craquelin pastry is usually sweet I was intrigued when I saw the recipe for savory craquelin in delicious. magazine and couldn’t wait to try it. Was it good? Suffice to say, I'll be making this again! The topping was flavorful and delightful and the salmon below was tasty and cooked to perfection.

Savory Craquelin Pastry Roast Salmon

As mentioned above, this recipe was adapted from one in the UK magazine delicious. March 2021 issue but you can also find it online. You can mix the craquelin by hand but it’s much easier to get it nice and smooth with an electric mixer and I promise you want it nice and smooth. 

Ingredients
4 salmon fillets, about 1.5 lbs or 800g altogether, at room temperature
Juice of 1/2 lemon, plus wedges for serving

For the craquelin pastry topping:
2 slightly rounded tablespoons unsalted butter (about 30g), at room temperature
1/2 teaspoon demerara sugar
1 teaspoon smoked sea salt flakes (I used Maldon.)
Sprinkle freshly grated nutmeg
1/2 teaspoon pul biber (aleppo pepper) or substitute 1/4 teaspoon cayenne pepper, plus extra to serve, if you like
1 fat clove garlic, crushed and minced
2 sprigs fresh thyme, leaves picked off and chopped, plus extra sprigs to serve
3 tablespoons plain flour

Method
Preheat your oven to 425°F or 218°C and prepare your baking pan by lining it with baking parchment.

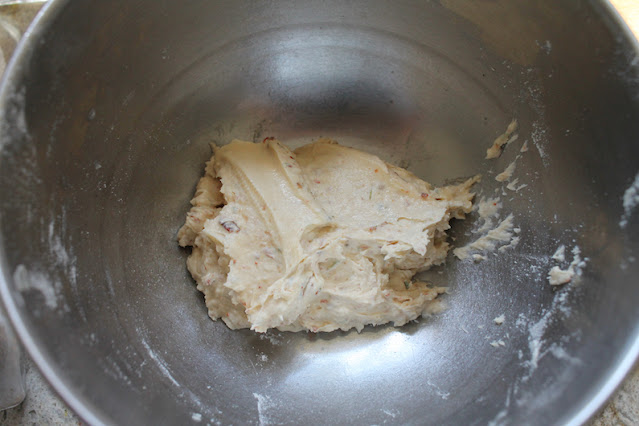
Use electric beaters to make the craquelin pastry topping by creaming the butter and sugar together until light and fluffy. Add in the salt, nutmeg, pul biber, garlic, thyme and flour.


Beat again until it’s thoroughly combined and spreadable.


Put the salmon on the lined baking pan, skin-side down. Dry the tops thoroughly with a paper towel. If the fish is wet, it’s a challenge to get the craquelin to stick and spread. 

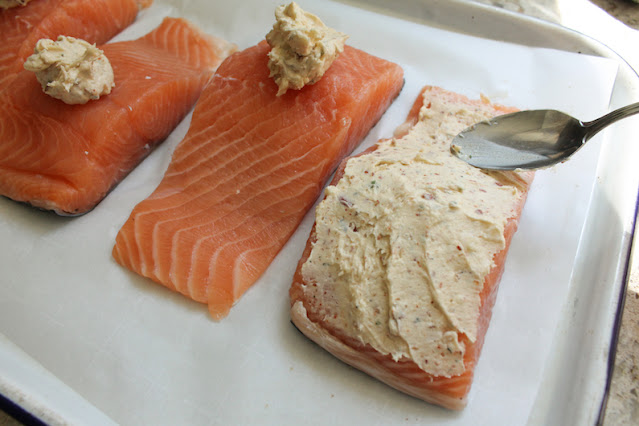
Divide the craquelin dough between the salmon fillets. Spread each over the top of the fish using the back of a spoon. 


Pop the pan in your preheated oven and bake for 15 minutes. Finish it off under the broiler for 1-2 minutes or until the top is golden and the fish is just cooked through.


Sprinkle the fillets with the lemon juice, then add an extra sprig of thyme to each and a pinch more aleppo pepper or cayenne, if desired. 


Enjoy!


It's the second Friday of the month so that means it's time for my Fish Friday Foodie friends to share recipes with you. Our theme today is Salmon Chanted Evening 🤣   but feel free to make these for lunch as well! Many thanks to our host, Sue of Palatable Pastime for the fun theme name and all her behind the scenes work! 


Would you like to join Fish Friday Foodies? We post and share new seafood/fish recipes on the third Friday of the month. To join our group please email Wendy at wendyklik1517 (at) gmail.com. Visit our Facebook page and Pinterest page for more wonderful fish and seafood recipe ideas.

Pin this Savory Craquelin Pastry Roast Salmon!

Food Lust People Love: The topping on this Savory Craquelin Pastry Roast Salmon is a great way to add flavor and also make sure roast salmon doesn’t dry out in the oven. It's flavored with garlic, thyme, smoked sea salt flakes, aleppo pepper and just a sprinkle of nutmeg.

 .