Showing posts with label onions. Show all posts

Friday, January 29, 2016

Sausage Apple Onion Tart #FridayPieDay


The apples and sausages go together beautifully, as pork and apples are wont to do, with the lovely added flavor of baked onions, in a crisp, golden puff pastry crust.  

The beauty of pies and tarts is that they can be sweet or savory. If you aren’t much of a dessert person, you can still enjoy a delicious pie, just add some sausage or salami. This month’s Friday Pie Day tart makes the perfect brunch, lunch or dinner fare and the ingredients are easily changed out for whatever you might have on hand.

I started by making my rough puff pastry recipe, or rather, I should say, Gordon Ramsey’s rough puff pastry recipe, cut off a little more than half and wrapped up the rest and popped it in the freezer. If you haven’t attempted rough puff before, I recommend you try it. It’s easy and way less work that actual puff pastry. In a pinch, of course, you can use store-bought puff pastry.

Ingredients
1 green apple (for example, Granny Smith)
2 teaspoons canola or other light oil
2 medium purple onions
6 fat sausages (about 14 oz or 400g)
A few fresh tender sprigs thyme – or leaves off of older sprigs
12 1/3 oz or 350g rough puff pastry dough from this recipe
2 tablespoons whole grain mustard

Method
Preheat your oven to 400°F or 200°C and prepare a baking sheet by lining it with baking parchment or a silicone liner.

Cut the apple in half, core it and cut it into thin slices, discarding the very end pieces that are all peel. Toss the apple slices in a medium sized bowl, with the oil to stop them turning brown.

Peel the onions, cut them in half and then slices them into thin wedges.

Toss them in the bowl with the apples.

Add the thyme sprigs, ripped into smaller pieces.

Cut the sausages into bite-sized pieces with a sharp knife of a pair of scissors. Mix the pieces in with the apples and onions.


Roll out your rough puff pastry into a large rectangle and trim the edges to make sure it will puff up successfully.


Gently score a line all the way around the inside with the tip of a sharp knife. This will be your puffy, crunchy crust, so don’t be skimpy with the margin.

Spread your mustard all over inside the scored line.


Tip the sausage, apple and onion onto the pastry and arrange it as evenly as possible all the way out to the scored line.


It's a pretty tall pile but it will bake down, I promise.

Bake for 30-35 minutes or until the pastry is puffed and golden and the sausage pieces are cooked through.


Allow to cool slightly before cutting.


Enjoy!

This sausage apple onion tart is my contribution to this month's Friday Pie Day, the brilliant creation of Heather from All Roads Lead to the Kitchen. (Formerly girlichef.)


I am pleased to join her on the last Friday of each month for pie and crust recipes, techniques, tools of the trade, and other inspiration.

For more information and recipes, please check out her #FridayPieDay page!

Saturday, November 14, 2015

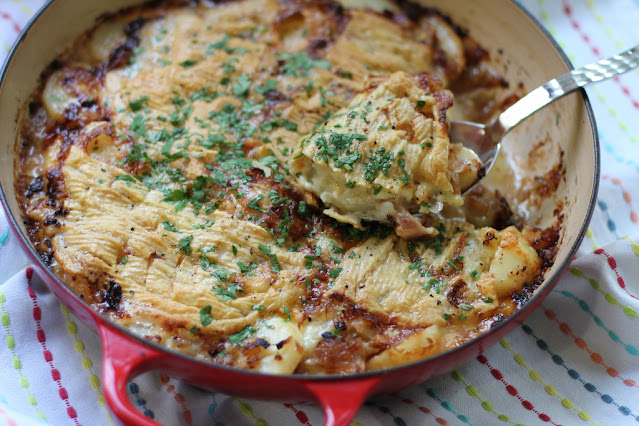
Traditional Tartiflette

Pure comfort food, tartiflette is made with potatoes, bacon and lots and lots of melty cheese. Make it and serve it to someone who could use some love today.
 
Food Lust People Love: Pure comfort food, tartiflette is made with potatoes, bacon and lots and lots of melty cheese. Make it and serve it to someone who could use some love today.

Ah, Paris. The City of Light, the City of Love. Every city we move to is unexpected and an adventure. Fast into the fray I plunge, learning new words, new places, getting lost with regularity and discovering the hidden corners by chance. Paris was no different. My high school French opened the doors just a crack. I could read signs and ask simple questions. Conversations about anything less than the mundane were impossible. Ou est le toilette, s’il vous plaît? Est-ce que il-y-a des oignons? 

I negotiated markets and buses and the Metro, all pushing a bundled-up toddler in an umbrella stroller, upstairs and down, trying hard to move at the same breakneck speed as the rest and not hold up the busy, busy people all dressed in grey and black.

In time my French became more fluent, as I practiced daily with neighbors, shopkeepers, the pediatrician, the pharmacist. Our second baby was born there in a local maternity hospital, chosen for its proximity to home and baby-centric focus, rather than the big, swanky American Hospital of Paris where the nurses might speak English. 

However decent my French, they still called me la américaine but it was a title I was pleased to wear because it was always accompanied by an approving nod of the head. I wasn’t their typical patient and they seemed to appreciate that I wanted to do everything for my baby, including keeping her with me all night.

I made friends with long time expat residents as well as a few local ladies who had lived abroad. We met for tea, for lunch, to watch our children on swings and slides in a nearby park. We compared notes on child rearing, schools and swapped recipes. 

As a family, we traveled around France, ogling the stained glass in churches and and the masterpieces in museums, often sitting with a picnic lunch of cheese and baguettes in the beautifully maintained grounds, feeling quite at one with the families playing and eating around us, just enjoying the view and the sunshine. And, of course, the wine. 

We planted tomatoes in early summer, feasted on the cherries from our large backyard tree when the weather turned warm and pruned the climbing roses when the bright yellow Forsythia bloomed in the front yard. My neighbor would call out to me in greeting, “Coo, coo!” then we chatted companionably across our party wall and the baker around the corner knew just what I would order, smiling in welcome as I pushed into her warm shop, my two small blondies in tow.

In short, Paris, like many other places we have lived, became home.

As I watch the news this morning, horrified at the terrorist attacks on the people of Paris, I was reminded of a meme I shared a few years back with a friend who writes often on the third culture kid experience.

Credit: Girl Gone International 

I mourn for the Paris that was home and for the friends I still love there, who keep part of my heart. Even as I pray for Paris, I am thanking God that they are safe. Which makes me feel guilty because so many have lost loved ones. Pray for Paris with me! God help us all.

When the cold weather starts closing in and the skies turn grey, French mothers warm and comfort their families with tartiflette, a rich hearty dish made with potatoes and melty Reblochon cheese. It seemed like the perfect dish for dinner tonight, when we could all use some comforting.

My tartiflette has been adapted from these two recipes from Journal des Femmes and Marmiton.

Ingredients
1 Reblochon cheese (1.1lb or 500g) (My nearby grocery store carries a cheese made specifically for tartiflette apparently. Since it's a French chain, I am guessing this is still the traditional Reblochon.)
2.2lbs or 1kg waxy, small potatoes
1.1lbs or 500g onions
7 oz or 200g bacon
2/3 cup or 150ml white wine (a Sauvignon Blanc is good, not a sweet wine!)
Freshly ground black pepper
1 tablespoon fresh minced parsley, optional

Method
Peel the potatoes and cook them in a large pot of salted water just until a knife slides in easily. Drain and set them aside to cool.

While the potatoes are cooking, cut your bacon into little strips and chop your onions.

In a large oven-proof pan, fry the bacon until it is crispy. Remove from the pan and drain on paper towels. Remove all but a tablespoon or two of the bacon grease and discard.

Preheat your oven to 350°F or 180°C.

Add the chopped onions to the bacon pan and sauté until golden.


Pour in the white wine and cook until the alcohol has evaporated.


Remove half of the onions and spread the remainder evenly in the pan. Top with half of the fried bacon.

Slice the potatoes and lay them out in the pan.


Top with the rest of the onions and bacon.

Cut the cheese in half lengthwise. By which I mean right through its equator.


Put the pieces in the pan, cut side down. I also cut mine in half again to better distribute melty cheese over all of the potatoes.


Bake in your preheated oven for about 30 minutes or until the cheese is completely melted. If it's not browned enough for your liking, put it under the broiler or grill for a few minutes or until it is lovely and golden.

Sprinkle with some fresh ground black pepper.

If you are serving the tartiflette from the pan, which I highly recommend, you can also add a sprinkle of minced parsley for decoration.

Make this for someone you love and serve it with a fresh green salad dressed in a light vinaigrette. Enjoy!

Food Lust People Love: Pure comfort food, tartiflette is made with potatoes, bacon and lots and lots of melty cheese. Make it and serve it to someone who could use some love today.


Pin this Tartiflette!

Food Lust People Love: Pure comfort food, tartiflette is made with potatoes, bacon and lots and lots of melty cheese. Make it and serve it to someone who could use some love today.

 .

Wednesday, November 4, 2015

Quick Pickled Beet Salad #FoodieExtravaganza

Fresh cooked beets, lightly seasoned and covered with sliced onions can be quick pickled with vinegar to make a lovely bright salad for beet lovers. It gets better and better as it marinates in the refrigerator so don’t be afraid of making this salad a day ahead. 

Even when I was a young girl, this was one of my favorite side dishes. To the best of my recollection (and I am sure my mom will write to set me straight, if need be) my grandmother and mother always made it with canned beets. But perhaps that was just a modern convenience that came into fashion in the ’60 and ‘70s. I do not recall ever seeing a fresh beet until my husband’s stepmother showed me how she cooked them. The secret, she said, was to choose beets that are the same size so that when you cover them with cool water and boil them whole, all of the beets will cook in the same amount of time. And the peels slide right off! Perhaps I am easily impressed but that part seemed like magic.

As my own girls were growing up, we were a small family divided by the beet - two lovers, two haters - so I seldom cooked them, especially when my one fellow lover went off to university and I was sorely outnumbered by the haters. I’ve given up trying to convert the unconvertible so occasionally when my husband is traveling, I’ll make this dish and eat the whole darn thing myself. And this summer, when it was just Mom and I, we enjoyed it together. Divine.

Ingredients
5-6 medium beets (Total weight 1.4lbs or 650g, to give you an idea of size)
1/2 medium purple onion
1/2 cup or 120ml apple cider vinegar
Sea salt
Black pepper
Drizzle olive oil to serve

Note: As recommended, make sure to choose beets that are reasonably the same size so that they will be cooked through at the same time.

Method
Rinse the beets to remove any dirt and then cover them with fresh water in a medium sized pot. Cook over medium heat for 50-60 minutes or until sharp knife slides in easily. Cover with lid and leave to cool.

Drain the water and rinse the beets again. Put on an apron or otherwise protect your clothing from possible beet juice, then gently rub the peels off of the beets.


Rinse the beets again. Dry the beets on some paper towels then slice them a little thicker than 1/4 in or 6mm. Slice the onion as thinly as you can manage.

Lay the beets out in more or less one layer on a deep plate and sprinkle them with sea salt and freshly ground black pepper.


Separate the sliced onion pieces and spread them over the sliced beets. Pour the vinegar over the whole plate and cover with cling film.


The salad can be served in as little as about half an hour. Or store it in refrigerator, covered tightly with cling film until the next day.

Drizzle with a little olive oil before serving, if desired.


Enjoy!


Foodie Extravaganza celebrates obscure food holidays or shares recipes  with the same ingredient or theme each month. This month our host is Camilla from Culinary Adventures with Camilla and we are celebrating National Pickle Day on November 14th early with eight tasty pickle recipes.

We hope you all enjoy our delicious pickled creations this month and come back to see what we bring for you next month.

Posting day is always the first Wednesday of each month. If you are a blogger and would like to join our group and blog along with us, come join our Facebook page Foodie Extravaganza. We would love to have you! If you're a spectator looking for delicious recipes, check out our Foodie Extravaganza Pinterest Board! Looking for our previous parties? Check them out HERE.

The Pickled Posts

.

Monday, October 26, 2015

Roasted Onion Brie Muffins #MuffinMonday


Roasted onions lend a subtle sweetness to this savory cheesy Brie muffin complemented by the added herby freshness of rosemary.

The other night I roasted a big pile of onions with just this muffin in mind for the leftovers. But since I know how we are about roasted onions, I actually removed the one cup from the serving dish before it even made it to the dining table and hide it in the refrigerator. (A small bowl of roasted onions left vulnerably open on the countertop will be emptied in no time in our house, just a pinch at a time. The same goes for crumbled bacon, grated cheddar and toasted pecans.) It was a good move, as it turns out, because we ate every last crunchy, succulent bite of the onions that were on the table.

Savory muffins may not be everyone’s choice for breakfast, but they sure make a great accompaniment to soup for a light lunch or dinner. These guys with roasted onions and Brie would be as happy on your holiday buffet table as they would be on a TV tray for a cozy night in.

Ingredients
2 sprigs fresh rosemary plus more to garnish if desired
1 cup or 125g roasted onions (from this recipe or your favorite)
2 1/2 cups or 315g flour
2 teaspoons baking powder
1/2 teaspoon baking soda
3/4 teaspoon fine sea salt
7 oz or 200g Brie
1/3 cup or 80ml canola or other light oil
1 cup or 240ml buttermilk
2 eggs

Method
Preheat your oven to 350°F or 180°C and prepare your 12-cup muffin tin by lightly rubbing it with oil or use non-stick spray to coat. Or if you have silicone liners, those work too.

Mince your rosemary leaves and roughly chop your roasted onions.


In a large mixing bowl, whisk together your flour, baking powder, baking soda, salt and minced rosemary.


Cut the outside rinds off of the Brie pointe (if it has any) but you can leave the top and bottom on. Cut the Brie into cubes.

Reserve 12 bigger pieces for topping each muffin before baking then add the rest of the Brie a few pieces at a time to the flour mixture, stirring between additions, so that they are coated by the flour and won’t stick back together.

Add in the chopped roasted onions and stir again to coat them with flour.


Whisk together the oil, eggs and buttermilk in a smaller mixing bowl.

Pour your wet ingredients into your dry ones and stir a couple of times, until just combined.


Divide the batter between the muffin cups and top with the reserved cubes of Brie and some rosemary leaves, if desired.


Bake in your preheated oven for about 20-25 minutes or until the muffins are golden and a toothpick inserted comes out clean.


Allow the muffins to cool for a few minutes then remove them to a wire rack to cool completely.


Enjoy!


I am delighted to have six muffins to share with you today! Which one will you bake first?


#MuffinMonday is a group of muffin loving bakers who get together once a month to bake muffins. You can see all our of lovely muffins by following our Pinterest board.

Updated links for all of our past events and more information about Muffin Monday, can be found on our home page.


.


Friday, October 23, 2015

Roasted Onions with Rosemary

There is something about the application of heat on onions that sweetens them as they roast, drizzled with olive oil, sprinkled with sea salt, freshly ground black pepper and rosemary. Simple, but delicious. 

Onions are vegetables so why is it we so often use them as a flavoring for less well-endowed dishes, instead of giving them their rightful place as the star in a side dish? It’s a question I’ve been asking myself for more than 14 years, which was the first time I made this Jamie Oliver recipe for cheesy stuffed onions with bacon. The main reason that many years ago was because my young daughters, still living at home, were not fans of cooked onions, although they both enjoyed them raw in salads. Perhaps your family is the same. Their father and I, on the other hand, love onions any way you’d like to prepare them but are particularly enamored when they are roasted.

A few years ago, when we were still living in Cairo, a friend was giving a dinner party and I was roped in to help. He would handle the starters and main course and I would bring the sides and desserts. One of the things I made was a huge pan of roasted onions that had been drizzled with olive oil and sprinkled with herbs. As they roast, the onion layers separate, some pieces breaking off entirely and becoming extra crispy in the heat of the oven, others softening sweetly into tenderness. I could have eaten the whole lot before it ever made it out of the kitchen.

We’ve been eulogizing those roasted onions for more than three years now. Last night I finally got around to making them again. I served them alongside some roasted chicken and they were sheer perfection. Just as good as we remembered. Which is somewhat of a relief.

Ingredients
2.2 lbs or 1kg small purple onions (Some people call them red onions but they sure look purple to me.)
3-4 sprigs fresh rosemary or your favorite fresh herb, plus extra for garnish
Olive oil
Sea salt
Freshly ground black pepper

Method
Preheat your oven to 375°F or 190°C. Peel your onions and cut the smaller ones in half. Cut larger ones in three or four pieces.

Set them cut side up on a large baking tray. Sprinkle with sea salt and freshly ground black pepper.

Pull the leaves off of the rosemary and sprinkle them on the onions as well.


Drizzle everything generously with extra virgin olive oil.


Pop the pan in your preheated oven and set the timer for 30 minutes.

When the timer goes off, have a look at the onions. If the edges are just beginning to turn brown, leave them another 15 minutes on that side.


When that time is up, take the pan out of the oven and give the onions a gentle stir. Some of the outer layers of the onions will come loose, but that’s okay.

Put the pan back in the oven for another 15-25 minutes, checking periodically so that the onions don’t burn. You want them very dark in some places, crispy in others but still with some soft insides showing.


Remove them from the oven and taste for seasonings. Add more salt and pepper, if needed.

Sprinkle with a little more chopped rosemary, if desired.


Enjoy!

.

Friday, January 31, 2014

Crock Pot French Onion Soup #FeaturedFriday with Momma's Meals

Hours of simmering make this delicious crock pot French onion soup the perfect bowl of rich stock and silky onions. Topped with melty cheese toast, it will warm your heart as well as your belly.


Today I am doing something a little bit different around here. I was invited by the adorable Tammi from Momma’s Meals to do a blogger exchange she calls Featured Friday. She chooses a dish from my site and I choose one from hers and we post the results together. It sounded like a lot of fun!  

I’ve been reading Tammi’s blog for a while now and her friendly, casual writing style makes every recipe approachable. I especially love the letters she writes to her two sweet children. She’s honest about the challenges of motherhood while still clearly head over heels in love with them both. 

I chose to make her French onion soup because it’s still a little bit chilly in Dubai, and this soup is one of my favorites. I was almost tempted by her Baked Parmesan Pork Chops and her Honey-Roasted Carrots with Walnuts.  Such lovely dishes.  But I love a good crock pot recipe, so soup it was! I can't wait to see what she has chosen to make of mine!

Ingredients for four or five good bowls
1 purple onion
1 white onion
1 yellow onion
1 large shallot – total weight of oniony things: 1 lb 9 3/4 oz or 730g
5 cloves garlic
2 tablespoons butter
2 tablespoons or 30ml balsamic vinegar
1 tablespoon brown sugar
3 tablespoons flour
1 can (11.1oz or 330ml or your nearest equivalent size) medium to dark beer  (I only had lager so my soup ended up lighter but still tasty.)
6 1/3 cups or 1.5 liters beef stock
Leaves from 2 sprigs fresh thyme (plus some extra for garnish)
1/2 teaspoon sea salt
Few good grinds of fresh black pepper
Bread – one slice per bowl.  I used slices of baguette but any will do nicely.
Cheese to cover each bread slice. (Pick your favorite, semi-hard to hard) I used a Tomme made from sheep’s milk.

Method
Peel then slice your onions and shallot very thinly. Mince the garlic.


Turn the crock pot to high. Add onions, garlic, sugar, butter and balsamic vinegar.

Cover, and let cook for at least one hour, stirring midway through.

After that hour or so, sprinkle on the flour and give the whole thing a good stir.


Add in the beer, stock, thyme and salt and pepper. Reduce heat to low and cook for eight hours.


Prior to serving, put the broiler or grill on in your oven. Toast your bread slices in the toaster then top with slices of your chosen cheese.

Put the toast on a piece of foil on a baking pan and pop it in the oven. Cook until the cheese is all bubbly and melted. When it’s almost ready, serve your portions out into bowls.


When the cheese toast is ready, lift the pieces off the foil, making sure to scrape up any cheese that melted over the side, and gently lay one on top of each bowl of soup. Garnish with more fresh thyme.


Enjoy!


Thanks again for choosing me for this week's Featured Friday, Tammi! It was such fun!