Showing posts with label puff pastry. Show all posts

Sunday, December 3, 2017

Puff Pastry Ravioli Mince Pies

If you have puff pastry in your freezer and a jar of mincemeat in the cupboard, you are ready for an impromptu potluck invitation or unexpected guests!  These little pies, made ravioli-style, are a welcome addition to the dessert table at any Christmas party or buffet table.

Food Lust People Love: Puff Pastry Ravioli Mince Pies uses a ravioli plaque to make mini mincemeat pies out of filling and puff pastry. Easy and adorable square pies!

Mince pies are traditional Christmas fare in the United Kingdom and everyone seems to have a favorite family recipe. Historically, mincemeat fillings actually contained minced meat or ground meat as we Americans call it. Nowadays most recipes call for apples, raisins, currants, spices, suet, citrus peel and possibly a splash of brandy. I was going for quick and easy and since I don’t have a granny’s recipe, I used a good quality store-bought brand.

Puff Pastry Ravioli Mince Pies


The puff pastry shortcut makes beautiful little flakey mince pies quick and easy.

Ingredients
1 large sheet puff pastry – I buy a British brand here in Dubai and one sheet weighs 11 1/4 oz or 320g and measures approximately 13 3/4 in x 9 in or 35cm x 22.5cm.
6 tablespoons good quality mincemeat
1/4 cup or 60ml milk
Powdered sugar - optional for serving

Tools: 1 ravioli plaque

Method
Preheat your oven to 400°F or 200°C and prepare your baking sheet by lining it with parchment.

Cover your work surface with cling film and lay out the puff pastry sheet.  Gently roll it a bit thinner until you have a big enough piece to cut two pieces the size of your ravioli plaque, possibly with leftovers.

Trim off any rough or dry edges.  A fresh cut always helps puff pastry rise more successfully.

Use your ravioli plaque as a guide, and cut two pieces of puff pastry to fit.  You may have some leftover but don’t worry because we can use that for decoration.


Sprinkle the plaque lightly with flour and lay the first piece of puff pasty on it.


Gently fill the holes with about 1/2 tablespoon each of mincemeat.


Brush the second piece of puff pastry with the milk.


Carefully place the second piece, milk side down on top of the filled pastry.


Press down all around the filling, starting in the middle first and try to push out any air before sealing the sides.  Just like making pasta ravioli.


Turn the whole tray of little raviolis out onto your cling film and cut into squares.


Brush the tops with more milk.


If you have leftover dough, cut shapes or strips out of it to decorate your little ravioli tarts.  I didn’t have any tiny cookie cutters so I made ribbons.  Stars or holly leaves would be more traditional for mince pies.


Carefully transfer the ravioli tarts to your prepared pan.  If you do ribbons as well, poke the middle with a sharp knife (but don't puncture the top of the ravioli!) so they don’t come “untied” while baking.


Bake for about 12 – 18 minutes in the preheated oven, or until the little pies are golden and puffy.


Allow to cool for a few minutes, and then remove to a serving dish.  Sprinkle with a little powdered sugar, if desired.  I forgot to take a photo of this step!

Food Lust People Love: Puff Pastry Ravioli Mince Pies uses a ravioli plaque to make mini mincemeat pies out of filling and puff pastry. Easy and adorable square pies!

Enjoy!

This week my Sunday Supper friends are sharing recipes that are perfect for a holiday buffet. If you are throwing a party or just need to bring a dish to someone else's party, we've got you covered. Check out the great list of recipes below. Many thanks to our event manager Christie from A Kitchen Hoor's Adventures for all of her hard work.

Abundance of Appetizers

Sundry of Savory Dishes

Desserts by the Dozen

Pin these Puff Pastry Ravioli Mince Pies!

Food Lust People Love: Puff Pastry Ravioli Mince Pies uses a ravioli plaque to make mini mincemeat pies out of filling and puff pastry. Easy and adorable square pies!
.


Wednesday, November 1, 2017

Fresh Fig Blue Cheese Tarts #FoodieExtravaganza

Flakey buttery puff pastry is the perfect crust for these fresh fig blue cheese tarts with rosemary and honey. Crunchy, sweet and salty, these little tarts are one of my favorite recipes to make with fresh figs.

Food Lust People Love: Flakey buttery puff pastry is the perfect crust for these fresh fig blue cheese tarts with rosemary and honey. Crunchy, sweet and salty, these little tarts are one of my favorite recipes to make with fresh figs. Serve these tarts as a main course, with a lovely salad of greens tossed with a sharp vinaigrette dressing.

This month my Foodie Extravaganza group is celebrating the start of National Fig Week by sharing fig recipes. When the theme was announced a few months back I was pretty sure that I was going to have to use dried figs, which are good – I love their sticky selves as a snack.

But I lucked out! My local shop had some lovely fresh figs. With some French Roquefort cheese and a sprig of rosemary from my own garden, I was in business.


Fresh Fig Blue Cheese Tarts


If you’ve never tried the combination of figs and blue cheese you are in for a treat. This works in salads as well as baked goods. Add a drizzle of honey, some rosemary and a little heat to this special combo. I served these tarts as a main course, with a lovely salad of greens tossed with a sharp vinaigrette dressing.

Ingredients
1 package puff pastry
3 1/2 oz or 100g blue cheese
4-5 fresh figs, sliced
1 sprig rosemary
1 1/2 teaspoons minute tapioca, divided
6 tablespoons honey

Method
Preheat oven to 400°F or 200°C.  Line six small tart pans with baking parchment. Roll pastry out big enough for your six small tart pans.


Fit puff pastry into lined tart pans, and trim, leaving a little overhang. Add one more circle baking parchment and fill the tart crusts with baking beads or dried beans.


Bake in the preheated oven for 10 minutes or until puffed and golden.


Leave to cool for a few minutes, then remove the baking beads and parchment inside the crust.

Crumble half of the blue cheese into the bottom of the tarts.


Sprinkle with 1/4 teaspoon tapioca in each crust.

Top with the sliced figs. Crumble on the rest of the blue cheese. Sprinkle each tart with a few rosemary needles.


Drizzle with 1 tablespoon of honey each.


Reduce oven temperature to 350°F or 180°C and bake until cheese is melted and figs are warmed through. They get quite juicy but this is where the magic of the minute tapioca comes in, slightly thickening the fresh fig juice as the tart filling bubbles in the heat.

Food Lust People Love: Flakey buttery puff pastry is the perfect crust for these fresh fig blue cheese tarts with rosemary and honey. Crunchy, sweet and salty, these little tarts are one of my favorite recipes to make with fresh figs. Serve these tarts as a main course, with a lovely salad of greens tossed with a sharp vinaigrette dressing.

Leave to cool completely before serving. This also gives the tapioca extra time to finish its thickening process.  Enjoy!

Food Lust People Love: Flakey buttery puff pastry is the perfect crust for these fresh fig blue cheese tarts with rosemary and honey. Crunchy, sweet and salty, these little tarts are one of my favorite recipes to make with fresh figs. Serve these tarts as a main course, with a lovely salad of greens tossed with a sharp vinaigrette dressing.

Check out all the other delicious fig recipes we are sharing! Many thanks to this month's host, Camilla of Culinary Adventures with Camilla.


Foodie Extravaganza celebrates obscure food holidays or shares recipes with the same ingredient or theme every month.

Posting day is always the first Wednesday of each month. If you are a blogger and would like to join our group and blog along with us, come join our Facebook group Foodie Extravaganza. We would love to have you!

If you're a reader looking for delicious recipes, check out our Foodie Extravaganza Pinterest Board!

 Pin it!

Food Lust People Love: Flakey buttery puff pastry is the perfect crust for these fresh fig blue cheese tarts with rosemary and honey. Crunchy, sweet and salty, these little tarts are one of my favorite recipes to make with fresh figs. Serve these tarts as a main course, with a lovely salad of greens tossed with a sharp vinaigrette dressing.
 .

Sunday, February 5, 2017

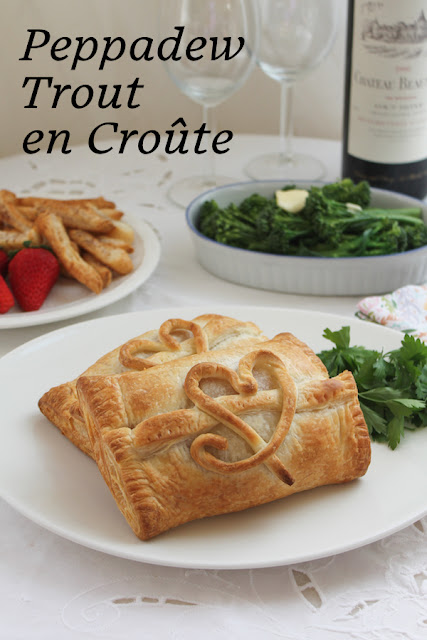
Peppadew Trout en Croûte

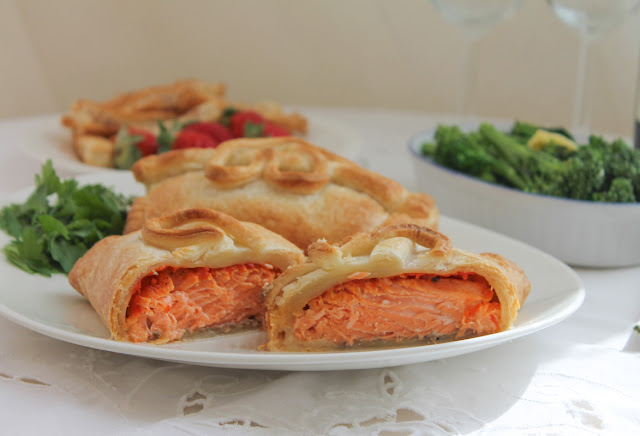
Peppadew Trout en Croûte looks fancy but it’s actually very easy, especially if you start with store-bought already rolled puff pastry. Peppadew peppers and garlic add a lovely fresh flavor that complements the richness of the trout and the flaky pastry.

Peppadew Trout en Croûte: Peppadew peppers and garlic add a lovely fresh flavor that complements the richness of the trout and the pastry. #SundaySupper


I went through a phase a few years ago where I fell in love with ready rolled puff pastry and used it to make so many things. It’s such a versatile ingredient that my freezer is rarely without a package. Whatever simple dish you want to fancy up can be kicked up several notches by the addition of some puff pastry, baked till flakey and golden. When the French wrap something in puff pastry, they call it en croûte – literally, in crust - which immediately makes it sound fancy too.

This week my Sunday Supper group is sharing easy dinners for two ahead of Valentine’s Day, with more than 30 meals you can make at home to celebrate. Individual peppadew trout en croûte is my contribution.

If you can't find trout, salmon is a great substitute.

Ingredients
2 trimmed trout steaks about 5 1/3 oz or 150g each (See note below.)
Salt
Pepper
8-9 peppers or 25g Peppadew peppers, drained
1 small clove garlic
13 1/4 oz or 375g sheet pre-rolled puff pastry (See note below.)

Method
Preheat oven to 400°F or 200°C. Line a baking pan with parchment. Pound the peppers and garlic together with a mortar and pestle or blend in a small food processor, till they form a thick paste.

To prepare the trout steaks, skin them and trim the thin side so that you are left with two thick steaks. Remove the pin bones with needle-nose pliers, if this has not already been done. (See note below for a quick, fresh appetizer recipe, using the trimmed bits.)


Season the trout steaks with salt and pepper. Fry the trout skin until crispy in a non-stick skillet. Remove to a piece of paper towel to drain and sprinkle with a little salt. These are the cook's treat and we fight over them at our house, but they also leave behind just enough oil for the next step.

Over a very high heat, brown both sides of the trout for about 1 minute on each side in that same pan. Remove from heat to a cool plate and leave to cool.


Unroll the puff pastry and trim all around the edges with a sharp knife, then cut it half. Place one trout steak on each half and top them with the Peppadew garlic paste.


Fold the first side of the puff pastry over the trout. Fold the second side up to the middle of the trout and make a little fold in the end of the puff pastry.

Gently press down on the puff pastry and remove all the air from inside, sealing the puff pastry on each side. Use the tines of a fork to seal the sides and a sharp knife to trim the excess off of the puff pastry. Decorate with some of the puff pastry scraps, if desired.

Left - ready to bake. Right - still needs trimming and decorating. 


Bake for about 15-17 minutes or until the puff pastry is golden brown, in the preheated oven.


Note: For a quick starter, toss some sliced purple onion with a couple of tablespoons fresh lime juice. Cut the trimmed pieces of trout into thin strips and add them to the sliced onion with a little cilantro, salt, black pepper. Stir well and refrigerate till ready to serve. For a quick and easy dessert, the puff pastry scraps can be baked in the oven once the trout comes out, sprinkled with sugar and cinnamon. Serve alongside some sweet strawberries. 

Remove the Peppadew trout en croûte from the oven and allow to rest for 5-7 minutes before serving with a salad or fresh steamed broccolini to complete your dinner for two.

Peppadew Trout en Croûte: Peppadew peppers and garlic add a lovely fresh flavor that complements the richness of the trout and the pastry. #SundaySupper


Enjoy!

Do you like to go out to eat for Valentine’s Day or stay in for a special meal? If you choose the latter, Sunday Supper’s got you covered this week! Many thanks to Candace from Authentically Candace, our host, and Cricket of Cricket's Confections for managing this event!

Chicken Recipes

Pasta Recipes

Pork Recipes

Red Meat Recipes

Seafood Recipes

Veggie Recipes


 Pin it! 

Food Lust People Love - Peppadew Trout en Croûte: Peppadew peppers and garlic add a lovely fresh flavor that complements the richness of the trout and the pastry. #SundaySupper

.

Friday, May 27, 2016

Pear and Preserves Tart #FridayPieDay


Freshly sliced pears and your favorite fruit preserves, mingle with browned butter in a puff pastry crust to create this tasty, easy pear and preserves tart. 

It’s Friday Pie Day once again! We celebrate on the last Friday of every month by baking. This week I’m doing my annual doctors' visits and trying to work from home. It’s been crazy busy so I sent my daughter out to the grocery store and said, “Check out the fruit and bring me something I can bake into a pie, please.” She returned with four beautiful fat pears, not quite enough for a full size pie but plenty for a puff pastry tart, and then some.

Ingredients
1 sheet ready rolled puff pastry - Mine weighed 8.6 oz or 245g.
2 large pears, sliced thinly1/4 cup or 60g unsalted butter
About 1/4 cup or 120g preserves of your choice (I used my cherry lemon preserves.)

Method
Thaw your puff pastry if it’s frozen and then lay it out flat on a piece of baking parchment or a silicone liner.

Preheat your oven to 425°F or 218°C.

Score your puff pastry with the tip of a sharp knife about 1 inch or 2.5 centimeters from the edge.

Slice the pears into thin wedges and then remove the seeds.


Start laying the pear slices inside the scored line on your pastry, overlapping as you go. Depending on the size of your puff pastry sheet (and pears) you might not need all of the slices. I used about 1 1/2 pears.

Heat the butter in a small pan until it starts to bubble and foam rises to the top. Skim the foam off as it forms. Continue to heat the butter until it starts to brown and then remove it immediately from the stove. We want browned butter, not burned butter and it will continue to darken from the heat of the pot.

N.B. It was too dark in my kitchen to take decent photos but I wasn't at all worried because whenever I use browned butter in a recipe, I like to send folks over to my friend, Kayle, the Cooking Actress. She's got a great how-to for browning butter.  She puts browned butter in All The Things, both sweet and savory.

Use a spoon to drizzle the browned butter all over the pear slices.


Spoon the sweet preserves of your choice over the pears.


Bake in your preheated oven for 15-18 minutes or until the pastry is puffy and golden brown.

Remove from the oven and leave to cool for about 20 minutes before serving, to allow the sweet runny juices to thicken up. My puff pastry somehow sprung a leak and some of the sticky juice ran out onto the silicone mat, which is why we use those things or parchment. They make clean up so much easier!


Enjoy!


My friend and creator of Friday Pie Day, Heather, over at All Roads Lead to the Kitchen has made a gorgeous blushing apricot pie with fresh apricots and strawberries to share today. You need to go and see that beauty!


I am pleased to join her on the last Friday of each month for pie and crust recipes, techniques, tools of the trade, and other inspiration.

For more information and recipes, please check out her #FridayPieDay page!


.

Friday, March 25, 2016

Creamy Leek and Chicken Hand Pies #FridayPieDay

Leeks sautéed in butter are the perfect start to a creamy béchamel sauce which is folded around tender chicken then baked in puff pastry till flakey and crunchy. These handy chicken pies are perfect for lunch boxes or a special brunch or dinner at home. 

Leeks are the milder cousin of the onion, not so sharp but still with a lovely oniony flavor. They soften beautifully when sautéed in butter and almost melt into a white sauce. They are a beautiful match for chicken in a pot pie or really, any dish but today, for Friday Pie Day, I created these hand pies with my favorite chicken pot pie in mind.

Ingredients
2 cooked chicken breasts, bones removed  - about 9 1/2 oz or 270g total
1 long leek - about 6 oz or 172g whole, 4 oz or 113g after the hard green bit is trimmed
1 red chili pepper
2 tablespoons butter
3 tablespoons flour
Fine sea salt
Freshly ground black pepper
1/2 cup or 120ml whole milk
11 2/3 oz or 330g puff pastry
1 egg

Method
Cut the hard green part off of your leeks and trim the roots. Split the white part in half. Wash well, making sure to clean any dirt that might be hiding in the root end. Slice the clean leek into small pieces and cube the cooked chicken.


Mince the red chili pepper then sauté it with the leek in the butter until softened, add a healthy pinch of salt and freshly ground black pepper.


Sprinkle on the flour and stir to combine it with the softened leeks and butter. Cook for a few minutes, stirring frequently.


Remove the pan from the heat briefly and add in the milk.

Stir vigorously until you have a thin sauce. Put the pan back on the stove over a medium heat and cook until the sauce begins to thicken and a spoon dragged through leaves a gap that fills up again slowly.


Add in the chicken and stir to coat. Cook for a few minutes more, until the sauce is very thick. Remove from the heat and leave to cool.


Preheat your oven to 400°F or 200°C and prepare a cookie sheet by lining it with baking parchment or a silicone mat.

Cut your puff pastry dough into four equal pieces and roll one out until it is about 7in or 28cm square.

Whisk your egg with a fork and brush a little bit all around the pastry square with a pastry brush.


Divide the cooled chicken leek mixture into four equal portions and put one on the pastry square.


Fold the pastry over to form a triangle and press the air out as you seal the sides by pressing down all around the edges. Brush more egg around the edges of the pastry triangle.


Start folding the pastry over again, to double seal the edges.


Place the triangle on your lined cookie sheet and repeat the process until you have four hand pies ready to bake. Brush them all with the beaten egg.


Bake in your preheated oven about 20-25 minutes or until the hand pies are puffed and golden.


Remove from the oven and allow to cool for at least a few minutes before serving. You do not want to burn your mouth with the hot filling.


Enjoy!

Now after you have these for your main course, may I suggest finishing off the meal with Triple Cherry Pie  from my friend and creator of Friday Pie Day, Heather, over at All Roads Lead to the Kitchen?


I am pleased to join her on the last Friday of each month for pie and crust recipes, techniques, tools of the trade, and other inspiration.

For more information and recipes, please check out her #FridayPieDay page!


.