Showing posts with label seafood recipes. Show all posts

Sunday, March 24, 2024

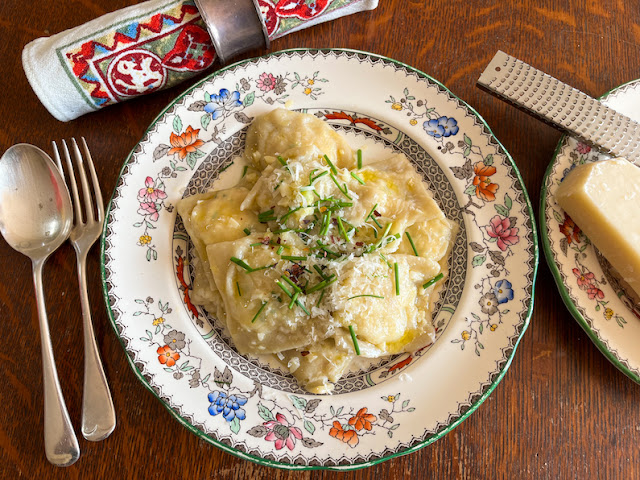
Crab Rangoon Ravioli

Fresh sheets of egg pasta filled with crabmeat, cream cheese, chives and garlic make the most succulent crab Rangoon ravioli! Serve simply buttered or with the sauce of your choice.  

Food Lust People Love: Fresh sheets of egg pasta filled with crabmeat, cream cheese, chives and garlic make the most succulent crab Rangoon ravioli! Serve simply buttered or with the sauce of your choice.

We don’t eat out very often since I love to cook and my husband has gotten pretty good at it himself, since he started taking turns during the recent pandemic. One place we do like to go is a Chinese buffet that has wonderful sticky ribs and crispy shell on shrimp. It also serves my late sister's favorite, crab Rangoon, crunchy deep-fried wonton wrappers filled with cream cheese and crab. 

Crab and cream cheese are a delightful mixture but I'm not big on deep frying at home so when I had leftover crab a while back filling ravioli to boil seemed like much a better idea.

This is a dish that takes time to make but homemade ravioli dough is so worth it. And the filling is super easy to make! It’s special enough for either the main course at an intimate dinner party, or like fancy Italian restaurants do, you can serve just three or four per person in shallow bowls, as your starter. 

Crab Rangoon Ravioli

This recipe makes about 24 ravioli but is easily doubled. After making and filling the ravioli, any scraps of pasta can be cut into noodles and refrigerated to be boiled for another dish, another day. I used my leftovers in a stir-fry. This recipe was adapted from one on Thailand 1 Dollar Meals.

Ingredients  
For the egg pasta dough:
1 1/2 - 1 2/3 cups or 187.5- 208g tipo 00 flour (plus extra for rolling out the pasta)
1 egg 
1 egg yolk (save white for filling)
2 teaspoons olive oil 
1/2 teaspoon fine sea salt

For the filling:
Small bunch chives
1 clove garlic
4 3/4 oz or 135g cream cheese
3/4 cup, lightly packed, or 130g crabmeat
1 egg white (saved from making the egg dough)
1 teaspoon Worcestershire sauce


For serving:
Pasta sauce of your choice or simply melted butter and garlic
Parmesan cheese, grated
Extra chives for garnish
Crushed red pepper (optional)

Method
In large bowl, combine 3/4 cup or 94g flour, 1/4 cup or 60ml water and remaining dough ingredients. With mixer at slow speed, beat for two minutes, occasionally scraping the bowl with a rubber spatula.


Using a wooden spoon or a Danish dough whisk, stir in enough of the remaining flour to make a soft dough. I start with half and go from there. You may not use it all. 


Turn out onto floured surface and knead until smooth and elastic, about 10 minutes. Wrap in cling film and let stand at least 30 minutes. (After the 30 minutes, refrigerate the dough if you aren’t ready to assemble your ravioli yet.) 


While the dough rests, we can get on to the ravioli filling. It couldn’t be simpler. 

Finely chop the chives and mince the garlic. 


Mix all the ingredients together well in a mixing bowl. Set aside.


Once the dough has rested, cut it in four equal pieces and remove one. Wrap the rest of the dough again with the cling film.


Flour the dough ball well and use a rolling pin or a pasta roller to roll it out quite thinly to the size of your ravioli plaque. Check out my original ravioli post to see my roller in action.

Flour your ravioli plaque liberally and lay the sheet of pasta on top. Fill each hole with about a teaspoon of the filling.


Using the second quarter of the dough and, following the same instructions, roll it out to the size of your ravioli plaque.

Use a pastry brush to wet the pasta on the plaque between the spoons of filling.

Carefully, starting at one end, lay the second sheet of pasta on top of the filled one, sticking the two sheets together and pressing out the air as you go along.


Turn the ravioli plaque over and let the filled pasta drop out onto your countertop. If it sticks, just gently pry it off.


Trim the ravioli around the edges and cut them apart.


Set them aside on a plate lined with cling film that has been well floured.


Continue the process until all the ravioli are rolled out, filled and cut apart. I put another layer of cling film and flour again with each layer of ravioli.

The ravioli should be stored in the refrigerator, covered with cling film until you are ready to boil them.

When you are ready to cook the ravioli, warm your sauce of choice or serve simply with some melted butter, perhaps with a little chopped garlic. 

When your sauce is simmering, if using, heat a pot of salted water to boiling. 

Add several ravioli at a time, using a slotted spoon being careful not to over-crowd the pot. Cook for 4 to 5 minutes, or until tender.


Remove with a slotted spoon to the pan with the warmed sauce. As you can see, I added mine to a pan with just butter and garlic. 


Stir gently to coat then spoon into plates or bowls to serve. Top with grated Parmesan, crushed red chili pepper and some chopped chives for garnish, if desired.

Food Lust People Love: Fresh sheets of egg pasta filled with crabmeat, cream cheese, chives and garlic make the most succulent crab Rangoon ravioli! Serve simply buttered or with the sauce of your choice.

Enjoy!

It’s Sunday FunDay and today we are sharing dinner party dishes! Check out the links below. 

We are a group of food bloggers who believe that Sunday should be a family fun day, so every Sunday we share recipes that will help you to enjoy your day. If you're a blogger interested in joining us, just visit our Facebook group and request to join.


Pin these Crab Rangoon Ravioli!

Food Lust People Love: Fresh sheets of egg pasta filled with crabmeat, cream cheese, chives and garlic make the most succulent crab Rangoon ravioli! Serve simply buttered or with the sauce of your choice.

 .

Sunday, June 4, 2023

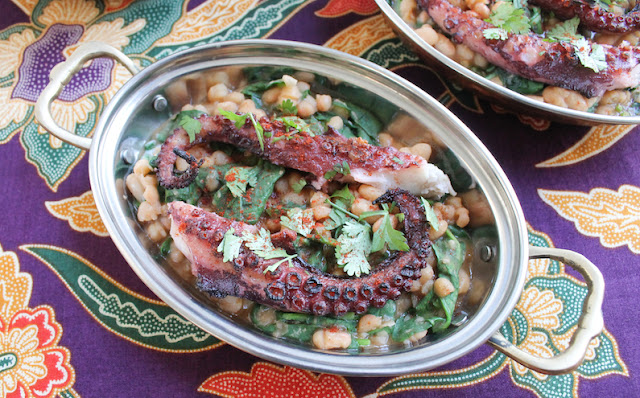
Grilled Octopus with Spinach and Smoky Beans

This grilled octopus with spinach and smoky beans will seduce you with the tenderest octopus atop melt-in-your-mouth white beans. Serve as an appetizer or main dish. 

Food Lust People Love: This grilled octopus with spinach and smoky beans will seduce you with the tenderest octopus atop melt-in-your-mouth white beans. Serve as an appetizer or main dish.

Ten years ago, almost to the day, our eldest daughter graduated from Rhode Island School of Design in Providence, Rhode Island. We celebrated with dinner at a local restaurant named Bácaro, specializing in Italian fare. 

For my appetizer, I ordered their wood-grilled crispy baby octopus which was described thusly: 


The dish was so good that we attempted to go back the very next day to have it again. I kid you not. Everyone who had tried mine wanted their own bowl! Unfortunately, the restaurant is only open for dinner Tuesday through Saturday so we were out of luck that Sunday. 

The disappointment was keenly felt. 

For years I've waxed lyrical about that bowl of wonderful smoky beans with the grilled octopus and numerous times, I’ve searched online for a recipe. I even wrote the restaurant and Edible Rhody, a local Providence food and drink magazine, to ask for one. The magazine folks did write back and say they’d try. Sadly, no joy. 

I finally decided it was time to stop dreaming and try to recreate it myself. Final result: Delicious. Was it the same? Probably not but then, it's hard to live up to a dream. 

Grilled Octopus with Spinach and Smoky Beans

This recipe is my attempt to somewhat replicate the flavors I remember. I don’t recall the grilled radicchio with honey and balsamic so I just skipped that part of the description. Please read through the method before starting so you can decide how you will cook the beans. I use a pressure cooker or Instant Pot. 

Ingredients
1 lb 8 oz or 680g octopus
Olive oil
8oz dried navy beans
2 cloves garlic, crushed and chopped
1 teaspoon smoked paprika
1/2 teaspoon salt
1/2 teaspoon liquid smoke
6oz or 170g baby spinach leaves

Parsley for garnish, if desired

Method
Preheat the oven to 220°F or 104°C. 

Clean the octopus well (I empty the head) and remove the beak. 


Heat a large pot of water to boiling. Drop the octopus in and set a timer for 45 seconds. 


When the timer rings, remove the octopus to a colander and drain. 

Transfer the octopus to an ovenproof pot with a tight-fitting lid with just a drizzle of olive oil. 


Put it in the preheated oven, lid on, for two hours. The octopus will create its own braising liquid. Photo after one hour:


Photo after two hours:


If you are cooking the beans in a traditional manner, pour boiling water over them in a metal mixing bowl and cover it with a plate. Leave to soak for one hour. Drain and rinse then cook the beans using your favorite method with the garlic, smoked paprika, salt and liquid smoke. 

Alternatively, DON’T SOAK THE BEANS and follow my instructions here for using a pressure cooker or Instant Pot: 
I can never be bothered to soak dried beans so I use my pressure cooker or Instant Pot. Put the beans in the pot with the other ingredients. Add water to cover twice the level of beans and 1. in a pressure cooker, cook for 30 minutes once the pot gets up to pressure or 2. in an Instant Pot, choose the beans/chili setting, which is also usually 30 minutes. 

In both cases, leave to de-pressurize naturally for at least 10 minutes when cooking time is up. You can cook them a bit longer uncovered to reduce the liquid, if desired. 


Cool and refrigerate the beans until you are ready to grill the octopus and serve. 

When the octopus is tender – you can test this after two hours by inserting a knife into the top of one of the tentacles, just where it joins the body. It should go in easily - start your charcoal or wood fire. Reserve the octopus cooking pot broth for possibly adding to the beans later. 

The coals should be quite hot so you can quickly grill the octopus so it browns and sears without drying out. Put your grill rack about 4 inches from heat source. 

Brush the octopus with olive oil. 


Grill it over the hot coals until the outside is browned but the inside is not dried out, about 8-10 minutes. 


We started tentacles down and turned it over about halfway through.

And by we, throughout this part, I mean my grill guy (best husband!) put the lid on for a couple of the minutes, to let it smoke. 


Turn the octopus over and brush with more olive oil about halfway through.


Cut the octopus apart, leaving the tentacles whole and chopping the head, into bite-sized pieces


Heat the beans in a pot over medium heat till they are bubbling.


Heap the baby spinach in the hot beans and pop the lid on so they wilt. Stir them into the beans. 


For extra flavor (and saltiness), you can add some of the broth left behind in the octopus cooking pot, if desired. I suggest straining it as you do. I'll be honest, I don't remember why but there must have been something in there that I thought we'd be better off without in the beans. 🤷‍♀️


Serve the beans in shallow bowls, topped with a grilled octopus tentacle or two. Garnish with an extra sprinkle of smoked paprika and some parsley, if desired. 

Food Lust People Love: This grilled octopus with spinach and smoky beans will seduce you with the tenderest octopus atop melt-in-your-mouth white beans. Serve as an appetizer or main dish.

Enjoy! 

It’s Sunday FunDay and today we are sharing seafood recipes to celebrate National Seafood Month or sides that go great with seafood. Many thanks to our host, Wendy of A Day in the Life on the Farm. Check all the links out below:


We are a group of food bloggers who believe that Sunday should be a family fun day, so every Sunday we share recipes that will help you to enjoy your day. If you're a blogger interested in joining us, just visit our Facebook group and request to join.

Pin this Grilled Octopus
with Spinach and Smoky Beans!

Food Lust People Love: This grilled octopus with spinach and smoky beans will seduce you with the tenderest octopus atop melt-in-your-mouth white beans. Serve as an appetizer or main dish.

.
 

Friday, March 17, 2023

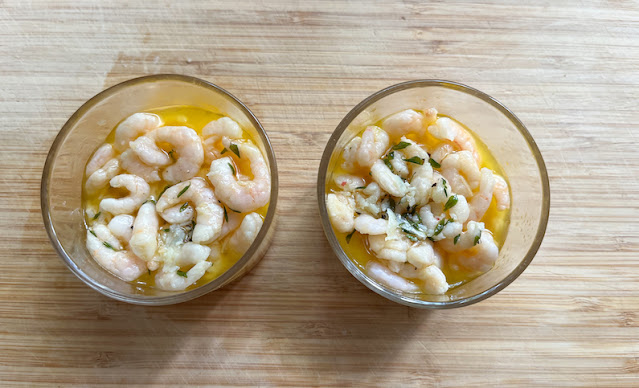
Ballymaloe Potted Shrimp

A traditional Irish starter, this Ballymaloe potted shrimp recipe is from the Ballymaloe Restaurant cookbook, updated by Irish cooking teacher and doyenne Darina Allen. Flavored with garlic and lemon juice, this Irish recipe is fresh and so tasty. 
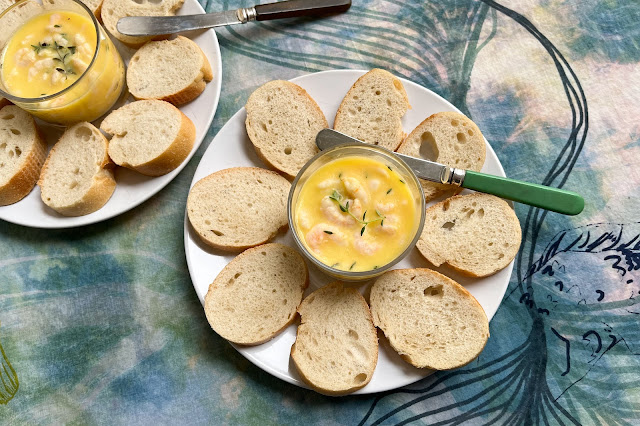
Food Lust People Love: A traditional Irish starter, this Ballymaloe potted shrimp recipe is from the Ballymaloe Restaurant cookbook, updated by Irish cooking teacher and doyenne Darina Allen. Flavored with garlic and lemon juice, this Irish recipe is fresh and so tasty.

Unlike English potted shrimp, the Irish version doesn't have nutmeg which makes this my favorite potted shrimp. Not that I don't like nutmeg but I've always kind of thought it weird with shrimp. The Irish also use Atlantic shrimp instead of the Morecambe Bay brown shrimp typical in English potted shrimp. I used wild caught cold water shrimp which I thought might be close to the Irish ones. 


When Myrtle Allen opened Ballymaloe Restaurant in East Cork back in 1964, it was a revolutionary place, serving delicious recipes using only local seasonal ingredients. It would not be an understatement to say that Ballymaloe changed Irish food culture with that emphasis. 

Her daughter-in-law, Darina Allen, a chef in her own right, continued Myrtle’s legacy and expanded her reach when, along with her brother, she opened the Ballymaloe Cookery School in 1983. Darina is also a leader in the Slow Food Movement in Ireland. 

Darina's own daughter-in-law Rachel Allen is a well-known food writer, cookbook author and tv chef as well as also teaching at the Ballymaloe Cookery School. I'm pretty sure when you search "Irish chef," photos of the Allen family appear near the top of the list!

Ballymaloe Potted Shrimp

Darina says that this amount serves four as a first course – and it is rich because of the clarified butter - but two of us polished this off in no time. I anticipated that, as you can see, by only putting it in two little pots. If I were indeed serving four, I'd double the amounts. Although the recipe is originally from the Ballymaloe Cookbook, Darina also shared it online, in a tribute to Keith Floyd

Ingredients
1 small clove garlic
1/4 teaspoon fine sea salt
2 oz or 56g clarified butter or ghee, with extra as needed
1 teaspoon fresh thyme leaves (plus tender sprigs to garnish, if desired)
freshly ground black pepper
4 oz or 110g (about 1 cup) shelled, cooked salad shrimp
2 teaspoons fresh lemon juice

Method
Use the side of a wide knife to crush the garlic into a paste with the salt. I hit the garlic clove once then added the salt, which makes it easier to crush. 


Bring the clarified butter to a low boil along with the thyme leaves, crushed garlic and a couple of grinds of black pepper. 


Add the shrimp and toss for about 30 seconds. Set aside to rest. Season with a little more salt, if necessary and add the lemon juice. Stir to combine.

 
Pack the shrimp into little pots and pour over the clarified butter. 


Melt a little more ghee as need to just about cover the shrimp. Finish each pot with the tender end of a fresh thyme sprig. 


Put the pots into the refrigerator and leave to set. Potted shrimp will keep in the refrigerated for three or four days so they are a great make-ahead starter for dinner parties.


Remove the little pots from the refrigerator and leave to come to room temperature before serving with sourdough bread or sliced baguette.


Enjoy! 

It’s been seven great years posting recipes with my Fish Friday Foodie friends so I am sad to say that this will be our final group post. Many thanks to Wendy from A Day in the Life on the Farm who started this group and kept us motivated to add more seafood to our menu plans for so long. Today, in honor of St. Patrick’s Day, we are sharing Irish recipes. Check them out below. 


Fish Friday Foodies is ending its run but our recipes can still be found on our Pinterest page! Check it out for more wonderful fish and seafood recipe ideas.


Pin these Ballymaloe Potted Shrimp!

Food Lust People Love: A traditional Irish starter, this Ballymaloe potted shrimp recipe is from the Ballymaloe Restaurant cookbook, updated by Irish cooking teacher and doyenne Darina Allen. Flavored with garlic and lemon juice, this Irish recipe is fresh and so tasty.

 .

Friday, February 17, 2023

Salmon and Shrimp Strudel

This salmon and shrimp strudel is fish pie made fancy but that doesn’t mean it’s not easy! Puff pastry elevates this most tasty of fillings to fabulous. 

Food Lust People Love: This salmon and shrimp strudel is fish pie made fancy but that doesn’t mean it’s not easy! Puff pastry elevates this most tasty of fillings to fabulous.

I’m a fan of pastry in all its forms, shortcrust, puff, rough puff, phyllo, what else have I missed? I firmly believe that with a bit of pastry any dish is made better, especially if it bakes up flakey, golden and maybe a little bit crunchy. 

For just that reason, for this month’s Fish Friday Foodie friends event, I chose seafood in pastry for our theme. I make this same dish with chicken for a fancy chicken pie but the salmon and shrimp version is way more flavorful. 

Salmon and Shrimp Strudel

Do not get too caught up in exact weights for the vegetables. I give the weights of mine to give you a guideline only. After all, my idea of what a small onion is may not be the same as your own. This makes enough filling for two salmon and shrimp strudels. I baked one the first day and saved the filling for about the third day, refrigerated, then baked the second. Both delicious and we were delighted to eat it again, just the two of us. If you are feeding four people, bake them both the same day! 

Ingredients - to serve four 
1/2 large or 1 whole small onion (about 5 1/3 oz or 150g)
1 long stalk celery, trimmed (about 2 3/4 oz or 78g)
1 - 2 medium carrots, cut in fine dice (ideally you want about the same amount of carrots as peas)
1 potato, cut in large dice (9 oz or 256g unpeeled) – soaked in cold water to stop it turning brown
1 1/2 cups or 380ml milk
1 teaspoon fine sea salt for poaching, plus extra at the end for final seasoning
10 oz or 284g wild salmon
1 lb or 450g thawed, peeled shrimp
1 slice streaky bacon
2 tablespoons or 28g butter or a little bit extra as needed
1/4 cup or 31g flour
2 tablespoons or 30ml heavy cream
1 tablespoon whole grained mustard
Zest and juice of ½ lemon
3/4 cup or 95g frozen peas, thawed
1 teaspoon fine sea salt, or to taste
1/2 teaspoon freshly ground black pepper
1/2 teaspoon cayenne
2 (9 oz or 255g) all butter puff pastry sheet (I used the Trader Joe’s brand), thawed

Method
Peel and mince the onion. Remove the tough strings and mince the celery. Peel and cut the carrots into small dice. Notice the peas for size comparison. 


Poach the salmon in simmering milk, skin side down, for 10 minutes. 


Remove the salmon from the pot with a slotted spoon and add the shrimp. 


Bring it back up to temperature and then turn it down to simmer for about 5 minutes. 

While the shrimp poach, carefully remove the skin from the salmon and discard. 


(Or fry till crispy with a little oil in a nonstick skillet as the chef’s treat. We always do!)


Remove the shrimp from the pot with a slotted spoon and set aside to cool. 


Cook the potato cubes in the reserved poaching liquid for about five minutes or until almost cooked through. Use a slotted spoon to remove from the liquid. Pour the liquid into another vessel and set both aside to cool.  


Wash the pot out and then fry the bacon strip in it. Remove it from the pot when crispy. Chop the bacon into small strips.

Add the butter to any bacon fat left in the pan and sauté the onion, celery and carrots in it for about 10-12 minutes, covered, until softened. 


Test a carrot piece. If it’s cooked or just about, you are good to go. 

Slowly sprinkle the flour onto the vegetables and stir well with each addition. 


We are trying to avoid lumps of flour. Add a little more butter if the flour is dry. 


Cook for a few minutes. Stir in the poaching liquid slowly. 


Cook for a couple of minutes until the mixture thickens a little. 


Remove the pan from the heat. 

Add in the bacon, cream, mustard, lemon zest and juice. Stir well. 


Add in cooked potatoes and the shrimp, along with any juice that has accumulated on the cooling plate. Use your hands to break the salmon into smaller pieces and add them to the pot. Don’t go too small or they will ending breaking down completely when you fold to mix. Top with the peas.


Fold the ingredients together gently. Sprinkle with a little salt, the black pepper and cayenne, if using. 


Fold the ingredients again to combine. 


Refrigerate the filling, covered, until it is chilled and you are ready to bake the strudel. 

When you are ready to bake, preheat your oven to 400°F or 200°C.

Lay one square of the puff pastry out on piece of baking parchment. 

Use a rolling pin to roll it out a little more from the middle, creating a rectangle out of your puff pastry square. 

Pile half of the cold filling in the middle of the puff pastry.


Cut slits in each side about a 1/2 inch or 1 cm in width. Leave the ends intact. 

Fold one end up and tuck the sides toward the middle. Fold the other end up and pinch to connect them to hold in the filling. 


Cut the rest of the pastry outside into pieces. Randomly pull each cut piece up and over, connecting them together over the filling and pinching to make them hold, knowing that they probably won’t but, hey, it’s worth a try. 


If you are baking both strudels the same day, put the first filled one in the refrigerator and repeat the process with the second puff pastry and the rest of the filling.

Bake the strudel in your preheated oven for about 35-40 minutes or until the pastry is puffed and golden and the filling is hot through. (Use a thermometer to check.) If it’s browning more quickly than it is heating through, you can cover it with foil. 

Remove from the oven and leave to rest for about 10 minutes before slicing to serve.  

Food Lust People Love: This salmon and shrimp strudel is fish pie made fancy but that doesn’t mean it’s not easy! Puff pastry elevates this most tasty of fillings to fabulous.

Enjoy! 

Check out the lovely pastry seafood dishes my Fish Friday Foodie friends are sharing today: 


Would you like to join Fish Friday Foodies? We post and share new seafood/fish recipes on the third Friday of the month. To join our group please email Wendy at wendyklik1517 (at) gmail.com. Visit our Facebook page and Pinterest page for more wonderful fish and seafood recipe ideas.


Pin this Salmon and Shrimp Strudel!

Food Lust People Love: This salmon and shrimp strudel is fish pie made fancy but that doesn’t mean it’s not easy! Puff pastry elevates this most tasty of fillings to fabulous.

.