Showing posts sorted by date for query "cooked in translation". Sort by relevance Show all posts

Tuesday, February 11, 2020

Pönnukökur aka Swedish Pancakes #BreadBakers

Thin, soft and golden, these lightly cardamom scented pönnukökur are a traditional teatime treat in Sweden. In their homeland, they are served simply: sprinkled with sugar then rolled up individually by each person around the table. You can push the boat out by adding lemon slices, fresh berries, jam and hazelnut spread to the add-on offerings.

Food Lust People Lust: Thin, soft and golden, these lightly cardamom scented pönnukökur are a traditional teatime treat in Sweden. In their homeland, they are served simply: sprinkled with sugar then rolled up individually by each person around the table. Push the boat out by adding lemon slices, fresh berries, jam and hazelnut spread to the add-on offerings.


I made these for the first time a few years back when we had an overnight guest and Swedish pancakes sounded like a great Sunday brunch dish. As I followed the instructions, it occurred to me that pönnukökur – literal translation: pancakes - were just Swedish crêpes. (For you language buffs, the singular “pancake” is pönnukaka.) The British also call crêpes pancakes so I don’t know why I was surprised.

The funny thing is, as I searched for the Swedish recipe again recently, pönnukökur amerískar kept popping up. You know, the fluffy kind we also call pancakes and serve in a stack with butter and syrup. It’s a mad, mad world.

Near as I can figure, the difference between the British pancakes/French crêpes and Swedish pönnukökur is the addition of ground cardamom and baking powder.

Pönnukökur aka Swedish Pancakes

This recipe has been adapted from several I found on various websites. Some call for melted butter, margarine or vegetable oil in place of the cream but I liked the richness of using cream. I lightly crushed cardamom pods, discarded the husks and ground the tiny seeds with a mortar and pestle. The fragrance and taste is fresher that store-bought ground cardamom. That said, use what you have. It’s all good.

Ingredients - for about 18 (6 in or 15cm) pancakes
1 3/4 cups or milk
1/2 cup or 120ml heavy cream
1 teaspoon vanilla extract
1 cup or 125g all-purpose flour
3 tablespoons sugar
1 teaspoon baking powder
1 teaspoon salt
1/2 teaspoon ground cardamom
2 large eggs

Method
Combine the milk, cream and vanilla. Add the dry ingredients and eggs.


Whisk until a smooth batter is created. Refrigerate for 1-2 hours. When the foam subsided, I ended up with a little more than 4 1/2 cups of batter.


Heat a frying pan and thinly grease it, or use a non-stick skillet. Ladle about 3-4 tablespoons of batter into the hot pan. Swirl the batter around until the whole bottom of the pan is covered with a thin layer of the batter. Cook on that side until the edges begin to brown slightly.


Loosen the sides and turn the pancake with a spatula. Cook the other side briefly, until you can shake the pan and the pancake slips around easily.

Food Lust People Lust: Thin, soft and golden, these lightly cardamom scented pönnukökur are a traditional teatime treat in Sweden. In their homeland, they are served simply: sprinkled with sugar then rolled up individually by each person around the table. Push the boat out by adding lemon slices, fresh berries, jam and hazelnut spread to the add-on offerings.


Slide the pancake on to a warm plate.

Continue the process until all of the pancakes are cooked, stacking them on top of each other, lightly covered with a bit of foil to keep them warm. Or if the hungry hordes are standing by waiting, employ two small pans on your stove and serve the pancakes directly.

You can also cover the stack with cling film and rewarm the pancakes in a microwave.

The most traditional Swedish way to eat these is with just a sprinkle of sugar but we like a squeeze of lemon too. (Some Swedish sites also suggested one alternative is a spoonful of rhubarb jam.)

Food Lust People Lust: Thin, soft and golden, these lightly cardamom scented pönnukökur are a traditional teatime treat in Sweden. In their homeland, they are served simply: sprinkled with sugar then rolled up individually by each person around the table. Push the boat out by adding lemon slices, fresh berries, jam and hazelnut spread to the add-on offerings.
These can also be enjoyed with hazelnut spread, jam or fruit and whipped cream, which means they make a great dessert as well as a good breakfast or teatime snack.

Food Lust People Lust: Thin, soft and golden, these lightly cardamom scented pönnukökur are a traditional teatime treat in Sweden. In their homeland, they are served simply: sprinkled with sugar then rolled up individually by each person around the table. Push the boat out by adding lemon slices, fresh berries, jam and hazelnut spread to the add-on offerings.


Enjoy!

This month my Bread Baker friends are sharing Scandinavian recipes from the countries of Sweden, Norway and Denmark. Many thanks to our host, Felice of All That's Left Are The Crumbs for this fun theme! Check out the recipes below:

#BreadBakers is a group of bread loving bakers who get together once a month to bake bread with a common ingredient or theme. You can see all our lovely bread by following our Pinterest board right here. Links are also updated after each event on the #BreadBakers home page. We take turns hosting each month and choosing the theme/ingredient.
BreadBakers

Pin these Pönnukökur aka Swedish Pancakes!

Food Lust People Lust: Thin, soft and golden, these lightly cardamom scented pönnukökur are a traditional teatime treat in Sweden. In their homeland, they are served simply: sprinkled with sugar then rolled up individually by each person around the table. Push the boat out by adding lemon slices, fresh berries, jam and hazelnut spread to the add-on offerings.
.

Friday, April 20, 2018

Bolinhos de Bacalhau or Deep-fried Cod Fritters #FishFridayFoodies

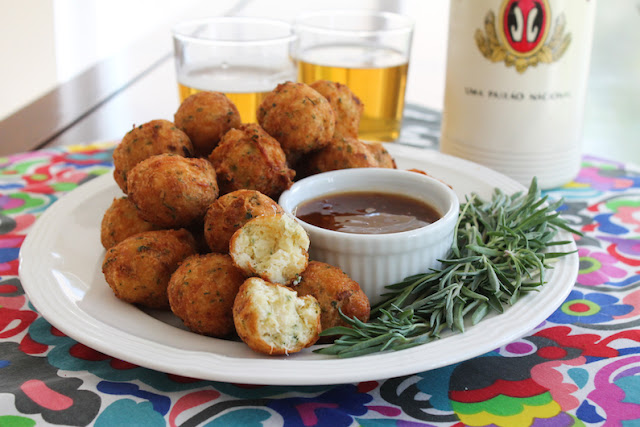
These tasty little morsels are called bolinhos de bacalhau in Brazil, where they are a traditional dish and a favorite party food. In English, a literal translation is little cod balls, but deep-fried cod fritters gets the idea across much better.

Food Lust People Love: Bolinhos de bacalhau are crispy deep-fried cod fritters made with mashed potato. They are crunchy on the outside and tender on the inside, the perfect appetizer or main dish.


My first memory of salt cod, that is, cod that has been liberally salted then dried to preserve it, was on a holiday in Portugal. The grocery stores had stacks of salt cod, in bins like we might find a pile of lemons or a display of corn on the cob. I had no idea what to do with such a salty dry ingredient.

It took moving to Brazil to learn several recipes. Since it doesn’t need refrigeration and maintains its nutrients and flavor for several years, salt cod is a staple in many countries. In Brazil, it is often rehydrated and cooked in rich stews or pan-fried with potatoes and served with hard-boiled eggs and olives.

But my favorite recipe is definitely bolinhos de bacalhau, crispy cod fritters made with mashed potato that are deep-fried till crunchy on the outside and tender on the inside.

Bolinhos de Bacalhau or Deep-fried Cod Fritters

Start the preparations for this recipe at least one day before you want to fry your fritters. The salt cod needs to be soaked for a minimum of 24 hours to get rid of the salt and rehydrate the fish.

Ingredients - makes 2 dozen
8 oz or 225g salt cod
1 tablespoon olive oil
1 small onion, minced
2 cloves garlic, minced
Small bunch parsley, thick stalks discarded, finely chopped
2 large eggs
1/2 teaspoon freshly ground black pepper
1/4 teaspoon cayenne
(1-2 tablespoons flour)

Canola or other light oil for deep-frying

Method
Put the salt cod in a bowl and cover with fresh cool water. If you live in a warm climate, you can put this bowl in the refrigerator. Very important: Change the water at least four times in the next 24 hours.


Meanwhile, you can prepare the rest of the ingredients and refrigerate them until the cod is ready or start the cooking process when the 24 hours is up.

Peel and quarter the potatoes.

Boil in unsalted water until just tender, then mash them with a potato masher or a fork, until there are no lumps. Set aside to cool.

Cut the bones and skin off of the cod and discard. Use the tines of a fork to shred the cod, making sure that you pick out any bones you missed the first time. Use a sharp knife to chop the shredded cod finely.


Sauté the minced onion and garlic until they have softened, in the olive oil over a medium fire. Remove the pan from the stove and mix in the chopped parsley.

Mix the mashed potato and shredded cod with the sautéed onion mixture, the ground peppers and the eggs.


This should be fairly stiff. If need be, add some flour to help it bind. I don’t usually need to add any, but many of the Brazilian recipes suggest that flour may be necessary.

Lay paper towels on top of a wire rack, nearby the stove.

Heat enough oil to cover a 2-tablespoon ball of the mixture (about 2 1/2 in or 6.3cm deep should do it) in a deep fryer or a deep pot on the stove, to about 375°F or 190°C.

Use a tablespoon or a cookie scoop to make small balls and drop them carefully into the hot oil, just a few at a time. Do not crowd the pot.  Traditionally, these should be oval or American-football shaped, but I have a cookie scoop and it’s so much easier!


Fry the bolinhos for several minutes or until they are a lovely golden brown and crunchy on the outside. Use a slotted spoon to carefully remove them from the hot oil and put them on the paper towels to drain. Continue until all of the fritters are cooked.

Food Lust People Love: Bolinhos de bacalhau are crispy deep-fried cod fritters made with mashed potato. They are crunchy on the outside and tender on the inside, the perfect appetizer or main dish.


Serve hot and fresh with some spicy hot sauce or your favorite tartar sauce, if desired.

Food Lust People Love: Bolinhos de bacalhau are crispy deep-fried cod fritters made with mashed potato. They are crunchy on the outside and tender on the inside, the perfect appetizer or main dish.


Enjoy!

Food Lust People Love: Bolinhos de bacalhau are crispy deep-fried cod fritters made with mashed potato. They are crunchy on the outside and tender on the inside, the perfect appetizer or main dish.


This month my Fish Friday Foodies are sharing Latin American seafood dishes so make sure you check out the list below. Many thanks to our host, Karen of Karen’s Kitchen Stories.


Pin it! 

Food Lust People Love: Bolinhos de bacalhau are crispy deep-fried cod fritters made with mashed potato. They are crunchy on the outside and tender on the inside, the perfect appetizer or main dish.
 .

Thursday, September 26, 2013

Apple Brown Betty Bread Pudding


If you’ve been reading along for a while, you might recall when I belonged to a group called Cooked in Translation.  The idea was to take a recipe and give it a twist into another culture.  I enjoyed the monthly challenge and was disappointed when the group fell apart.  This recipe is one I made for Cooked in Translation but never posted, a fusion of the American classic apple brown Betty and the English classic bread pudding.  As it’s apple season in the northern hemisphere, I thought this might be a good time to share it.  This is a comfort dessert, if there ever was one.  On both sides of the big pond.

Ingredients
1 cup or 200g dark brown sugar
1/2 cup or 115g sugar
1/2 teaspoon salt
4 eggs
1 cup or 240ml heavy whipping cream
1/2 cup or 120ml milk
2 teaspoons vanilla extract
7 slices or about 9-10 oz or 255-280g strong white or wheat bread
3 whole apples, preferably Granny Smith or similar
1/4 cup or about 55g butter plus extra for greasing the baking dish

Recommended for serving:  more heavy whipping cream

Method
Preheat your oven to 375°F or 190°C and prepare your baking dish by buttering it liberally and completely.   Don’t be shy with the butter here.

Mix the sugars together thoroughly with the salt.


Whisk your eggs with the whipping cream, milk and vanilla.


Slice bread into a small dice, or tear into very small pieces.


Peel, core and thinly slice your three apples.


Sprinkle a little less than one-third of the brown sugar in the buttered baking dish.


Then add about one-third of the apple slices then one-third of the bread cubes.


Repeat these layers twice more, finishing the last time with small chunks of butter rather than bread and the balance of the sugar mixture.

So it goes: Sugar, apples, bread - sugar, apples, bread - sugar, apples, sugar, butter.  Got it?  Easy peasy.


Pour on the whisked egg mixture and top with a bit of cling film.  Press down gently on the whole thing and leave to sit for a few minutes so that the bread absorbs the liquid.


Remove the cling film and cover the baking pan with foil.  Bake in a 375-degree oven for about 45 minutes.

Remove the foil in last five to 10 minutes of baking to brown the top.  This is most delicious served warm.


Bread pudding is one of my husband’s all-time favorite desserts and he insists that it is incomplete without a generous pour of whipping cream on top.  This now applies to Apple Brown Betty Bread Pudding.  Pour it on!

See the sticky syrup that was created?  YUM. 


Enjoy!


Wednesday, January 23, 2013

Spicy Sticky Wings


The Super Bowl is coming up, as it does every year.  And we watch it with pleasure, sometimes taping it when that’s an option, but we have also been known to wake up at all hours and even head to a sports bar at 4 a.m. if that’s the only way to watch, since we’ve been living overseas.

But more important that the Super Bowl in our house, is the World Cup.  According to my husband, soccer is the real football (and he has a point since, save the goalie, players can’t touch the ball with their hands inside the boundary lines) and the World Cup, played only every four years, well, that’s the real championship.

For Cooked in Translation this month, our theme is Wildly Delicious Wings, so I am going to share with you a dish I created for the World Cup in 1998.  We were living in Brazil where everything stops when the home team is playing and, frankly, not much gets done when any game is on.  The weather was beautiful so we had all the doors and windows open and whenever a player scored, we could hear the cheers or jeers from all the neighboring houses and we just knew that every eye in town was fixed on a television, watching football.  For our part, throughout the Copa, as it’s called there, we took turns hosting, watching with a group of friends, all bringing snack foods and cold beverages and wearing our lucky shirts (or underwear or socks or whatever we were wearing when our country team won last.)  Superstitions abounded!  These were lucky wings and we have eaten them often since.

Next year the World Cup will actually be in Brazil and there is talk around our house of going.  If anyone invites us to stay, I promise to make all the snacks!  I’ll even buy the cold beer!

Still have my shirt so I'm ready!


Ingredients
1 1/2 lbs or 1.125kg chicken wings (about 22 whole wings)
1 1/2 cups or 355ml kecap manis or sweet soy sauce
(or 1 cup normal soy sauce plus 1 cup packed dark brown sugar)
2 small red chilies or 1 teaspoon crushed red chilies
1/2 small head cabbage (optional for serving)

Method
Cut your wings into three pieces, discarding the tips or, better, boiling them up for chicken stock to be used in another dish.


Chop your chilies into little bitty pieces.


Put your drumettes and whatever that other part is called into a large pot that allows sufficient stirring room.  If you use a non-stick pot, you will be able to get the wings really, really sticky, but it’s not essential.

Pour in the kecap manis and the chilies.  Cook over a low to medium flame, gently stirring occasionally.


Meanwhile, slice your cabbage very finely and spread it around on the serving plate.  I have to admit that we don’t usually eat this, except for the parts that end up having sticky kecap manis on them, but the cabbage stops the wings from sticking to your plate, and saves you the indignity of licking it to get all the good stuff off.


As you keep cooking them, the chicken wings will give off some liquid and the kecap manis will thin as it heats up.  Just keep stirring and cooking until the liquid starts to evaporate.


At this point, watch the wings carefully because they can be prone to burning because of the sugar in the kecap manis. (Turn the fire down to low if necessary.) Stir more often, still gently though, as you don’t want the meat to fall off the bones. Keep cooking and stirring until all the liquid is gone and the wings are nice and sticky. 


Place the wings on the cabbage to serve.  Sit in front of your television and watch your favorite ball game. (This past weekend, it was the Australian Open.)  Cold beer optional but highly recommended.


Enjoy!


Tuesday, November 20, 2012

Pecan Pie Baklava with Dried Cranberries for #CookedinTranslation

Sticky, crunchy pecan pie baklava is made in the traditional manner but with the unusual ingredients of pecans, cranberries and pecan pie syrup for a delicious cross cultural treat.


A couple of years back, I had the good fortune to attend a class at the Asian Food Channel kitchen in Singapore.  I wrote all about it here.  One of the recipes we made was traditional Middle Eastern baklava with honey syrup and pistachios.  The chef demonstrated how to roll the first tube of filo pastry with nuts and then squish it off into the baking tray and then asked for a volunteer for the next one.  I held back a minute or two, in case someone else would step forward, but since no one did, I raised my hand. The chef looked much relieved and complimented me nicely on my baklava roll.

I was amazed at how easy baklava really is because it always looked so complicated on the plate, with all those layers! After that, my fellow students got into it and several took a turn. Sometimes you just have to start the ball rolling, you know. They turned out to be nice folks and we had a great time learning, cooking and eating together.

When my fellow Cooked in Translation members were discussing the theme for this month, we decided that we would each “translate” a different Thanksgiving favorite, rather than working on the same dish.  I remembered my baklava class and thought that pecan pie would translate quite well.  And while I was playing free and easy with pecan pie, I also decided to throw in some dried cranberries.  Just because I could.  If this were real pecan pie, no variations are allowed.  Whatsoever.  Because we use my aunt’s recipe and it is engraved in stone.

As you might remember from past months, Cooked in Translation is where we take a recipe from one culture or ethnicity and interpret it from another culture or ethnicity.  It makes me put my thinking cap on and I thoroughly enjoyed the challenge.

Ingredients
For the baklava:
1 cup or 225g butter, melted
About 14 oz or 400g pecans, separated (1/4 cup chopped will be reserved for topping)
16oz or 500g package filo pastry (You will probably have a few sheets leftover if you buy the 500g package.)
1/2 cup or 60g dried cranberries, separated (two tablespoons reserved for topping after chopping)

For the pie filling:
1 egg
3/4 cup or 180ml light Karo
1/2 cup or 115g sugar

For the topping:
Reserved chopped pecans and cranberries

N.B.  You will also need a wooden dowel, which can be purchased at a craft or hardware store, or one long chopstick that is used for cooking, like this or this.  This also bakes best in a non-stick pan.  It will get lovely and sticky and you want to be able to remove it easily.


Method
Preheat oven to 350°F or 180°C.

Chop your nuts finely in a food processor.  Take out 1/4 cup and set aside for topping later.  Chop your dried cranberries in the food processor.  Reserve about two tablespoons for topping.


Mix the remaining pecans and cranberries together in one bowl.

Using a pastry brush, brush the top layer of filo pastry with melted butter.  Sprinkle with a thin layer of the chopped pecans and cranberries.


Roll up from the long side with your dowel or chopstick and roll it all the way off the stack of filo pastry.


Brush the next layer of filo with butter.  Place your roll back on the near edge of the filo and roll up once more.


Using a hand on either side, compress the stuffed filo roll.

This was a hard step to photograph with only one hand.  You will use both hands to push the filled roll to the middle. 
 Now push it down to one end of the dowel and slide it into the pan.


Make as many rolls as will fill your pan.  My pan is 21cm x 21cm or about 8 1/4 in x 8 1/4 in and, as you will see, it took six rolls.  Which also just finished my pecans, so that worked out. :)

No problem if you didn't compress the roll enough. 

Just push it in and make it fit. 
Brush the tops liberally with butter.


Using a sharp knife, cut the rolls into short lengths - about an inch and a half or four centimeters. Be careful not to mar your non-stick pan though!


Bake for about 25-30 minutes in the preheated oven.

Meanwhile, put your egg, Karo and sugar into a medium bowl.  Whisk until the sugar is dissolved.  This should turn a pale yellow color but, as you can see, my lovely egg yolk was vivid orange so mine just turned yellow.


When the timer rings or your baklava is slightly golden and crunchy, remove it from the oven but leave the oven on. (Sorry about this but the baklava needs to go back in.)  Let it cool for about 10 minutes.


When cooling time is up, give your sugar/Karo mixture another good whisk.  You just thought the sugar was dissolved.  But a little always seems to settle out again.

Pour the mixture over your baklava.  Give it a few minutes to soak in, pushing the pieces apart gently with a spatula, if necessary.


Pop the pan back into the oven for about 20-25 minutes or until it is a nice medium gold and completely sticky around the edges.

You can see that it was still bubbling a little but that subsided when it cooled. 

Mix your reserved pecans and cranberries together and sprinkle them all over the top of the rolls.


Allow to cool just a few minutes before removing from the pan to serve.  The sticky, chewy edges are the best part but it is all delicious.


Enjoy!


And just a quick picture of something I am thankful for today.  The pooch has arrived in good form!