Monday, June 10, 2019

Mini Fruit-topped Pavlovas #BakingBloggers

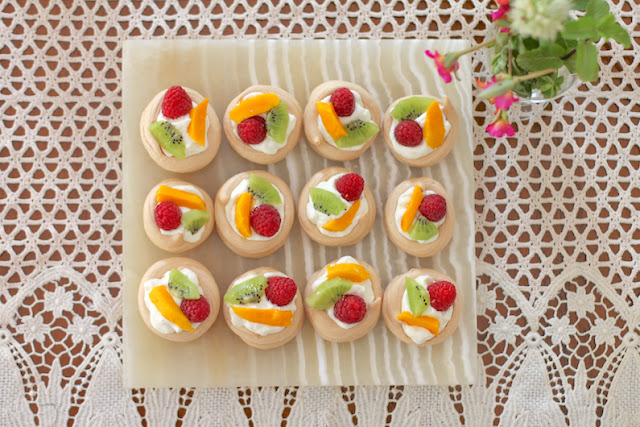
These mini fruit-topped pavlovas are the perfect dessert for a dinner party or potluck.  The meringue bases can be made ahead of time then all you need to do is whip the cream and pop the fruit on top. They are so easy but look impressive.

Food Lust People Love: These mini fruit-topped pavlovas are the perfect dessert for a dinner party or potluck.  The meringue bases can be made ahead of time then all you need to do is whip the cream and pop the fruit on top. No matter how it got there, pavlova is still a quintessential Australian or New Zealand dessert. A traditional fruit topping down under is passion fruit pulp but you can use whatever fruit you have on hand. Serve the mini fruit-topped pavlovas shortly after topping them as the cream will soften the meringues.


Who owns bragging rights to the creation of pavlova is a hotly contested subject between Australians and New Zealanders so sometimes it’s fun to bring it up if you have a few at your gathering. The best part is that once you’ve let them vie for ownership for a while, you can flummox them all with more current research.

Dr. Andrew Paul Wood, a New Zealander, and Australian Annabelle Utrech have traced the origins of pavlova as we know it back to the German-speaking Habsburgs who made a certain dessert, a confection of meringue and cream and fruit, that they had “borrowed” from Spain. They named it Spanische Windtorte, which translates to wind pie. Apt for a light and fluffy meringue, don't you think?

German immigrants brought that recipe and its cousin the schaum torte or foam cake to the United States, which eventually evolved into a recipe called Forgotten Cake. It was quite popular in the 1940s, and was so called because meringue is put into a hot oven, which is then turned off and is left for at least eight hours. Forgotten cakes were originally served with a fruit filling and cream on top, but eventually busy housewives started just topping them with cream and then fresh fruit. Much like the traditional pavlova.

So how did the recipe make its way to our friends in the southern hemisphere? Wood and Utrech discovered that an American cornstarch company began importing their product to New Zealand in the 1890s, with a pavlova-type recipe on the package. So it’s really sort of American, by way of Germany and Spain.

Mini Fruit-topped Pavlovas 

No matter how it got there, pavlova is still a quintessential Australian or New Zealand dessert. A traditional fruit topping down under is passion fruit pulp but you can use whatever fruit you have on hand. Serve the mini fruit-topped pavlovas shortly after topping them as the cream will soften the meringues.

Ingredients for 4 dozen mini pavs
4 large egg whites
1 pinch salt
1 cup or 225g caster sugar (I used golden caster sugar.)
2 teaspoons cornstarch
1/2 teaspoon vanilla extract
1 teaspoon white vinegar

To serve:
1 3/4 cups or 414ml whipping cream
Selection of fresh fruit - I used 7 oz or 200g raspberries, 2 small mangoes and two kiwi fruit.

You will need 4 baking sheets, lined with parchment or silicone liners and a piping bag with a large hole tip.

Method
Preheat the oven to 350°F or 180°C. Whisk the egg whites with the salt until they're holding firm peaks but are not stiff.


Gently add in the sugar a spoonful at time, still beating, until you've got a bowl full of shiny, thick meringue. There should be no grittiness left when you rub the meringue between your thumb and finger.


Use a sieve or sifter to sprinkle in the cornstarch, add the vanilla and vinegar, then gently fold to combine.

If you are using parchment paper without guidelines, you can use permanent marker or pencil to draw small circles as guide. Mine are about 2 inches or 5cm wide. Turn the paper over so you will be adding the meringue on the clean side.

Put the meringue in a piping bag with a large tip. Start in the middle of your circles and pipe a solid base, finishing with one more circle of meringue on top of the very outside of the base.


Put the first two pans into the oven, turn it down to 300°F or 150°C and bake for 20 minutes. Turn the oven off and leave the meringues in for another 20 minutes, then take them out of the oven and put them in a cool dry place.

Food Lust People Love: These mini fruit-topped pavlovas are the perfect dessert for a dinner party or potluck.  The meringue bases can be made ahead of time then all you need to do is whip the cream and pop the fruit on top. No matter how it got there, pavlova is still a quintessential Australian or New Zealand dessert. A traditional fruit topping down under is passion fruit pulp but you can use whatever fruit you have on hand. Serve the mini fruit-topped pavlovas shortly after topping them as the cream will soften the meringues.


Once the first batch is out, preheat your oven again to 350°F or 180°C and repeat the process with the last two pans.

When you are ready to assemble the bite-sized pavlovas, whip the cream into soft peaks and peel and cut your fruit, if necessary. Small fruit, like raspberries, can be left whole.


Spoon a couple of teaspoons into the meringues then top with fruit.

Food Lust People Love: These mini fruit-topped pavlovas are the perfect dessert for a dinner party or potluck.  The meringue bases can be made ahead of time then all you need to do is whip the cream and pop the fruit on top. No matter how it got there, pavlova is still a quintessential Australian or New Zealand dessert. A traditional fruit topping down under is passion fruit pulp but you can use whatever fruit you have on hand. Serve the mini fruit-topped pavlovas shortly after topping them as the cream will soften the meringues.


Enjoy!

This month my Baking Blogger friends are sharing their favorite recipes with summer berries. Many thanks to our host Sue of Palatable Pastime for her behind the scenes work and this fun theme. Check out all the tasty berry recipes below.


Baking Bloggers is a friendly group of food bloggers who vote on a shared theme and then post recipes to fit that theme one the second Monday of each month. If you are a food blogger interested in joining in, inquire at our Baking Bloggers Facebook group. We'd be honored if you would join us in our baking adventures.

Pin these Mini Fruit-topped Pavlovas!

Food Lust People Love: These mini fruit-topped pavlovas are the perfect dessert for a dinner party or potluck.  The meringue bases can be made ahead of time then all you need to do is whip the cream and pop the fruit on top. No matter how it got there, pavlova is still a quintessential Australian or New Zealand dessert. A traditional fruit topping down under is passion fruit pulp but you can use whatever fruit you have on hand. Serve the mini fruit-topped pavlovas shortly after topping them as the cream will soften the meringues.
.

Wednesday, June 5, 2019

Potato Cake Grilled Cheese Nibbles #FoodieExtravaganza

These easy appetizers are perfect for cocktail time and plenty filling for your tapas party. Made with extra sharp cheddar and herby mashed potatoes, potato cake grilled cheese nibbles go down a treat.

Food Lust People Love: These easy appetizers are perfect for cocktail time and plenty filling for your tapas party. Made with extra sharp cheddar and herby mashed potatoes, potato cake grilled cheese nibbles go down a treat.


Since 2016, the third Thursday in June has been designated World Tapas Day, a holiday I can completely get behind. After all, who doesn’t love little tasty nibbles? A snack is a snack but when you call it tapas, you are pretty much required to have a drink as well, which pushes us right into party territory.

If you agree, you might also like to check out some of my other tapas recipes. I'm particularly partial to my Garlicky Artichokes which are divine heaped on crusty bread, Spicy Squid with Bacon which also has a good hit of garlic, and the sweet and salty combination of these Chorizo Date Skewers topped with crumbled blue cheese. So good! I tasted that last one in a restaurant in Atlanta and could not wait to get home to make them again myself.

Potato Cake Grilled Cheese Nibbles

These fun little “sandwiches” can be made with your favorite herbs to flavor the potatoes but using green onion tops makes them taste like my favorite baked potatoes. In fact, sometimes I add crispy bacon to the mix. Everything’s better with bacon.

Ingredients
1 3/4 lbs or 790g waxy potatoes
Fine sea salt
Fresh ground black pepper
1 medium egg, lightly whisked
Herbs of your choice
3 oz or 85g extra sharp cheddar – or your favorite flavorful melty cheese

Method
Peel the potatoes and cut into them chunks. Boil them until just fork tender, then drain and leave to air dry in the hot pot for a few minutes, lid removed.

Mash the potatoes with a potato masher until smooth. Set aside to cool to room temperature. Add salt and pepper to taste.

Now mix in the egg and the chopped herbs until both are completely incorporated.


Use a scoop or a tablespoon to divide the potatoes into about 26 pieces. I used a 2-tablespoon cookie dough scoop and got 27.


Cover the potato balls with cling film and chill them for a couple of hours.

Wet your hands to avoid the potato sticking to them then form the balls of potato into little cakes. I like to use the edge of a rubber spatula to pat the cakes into square-ish shapes. This is totally unnecessary but I think it made them look more like toast. Which makes the potato cake grilled cheese nibbles look more like tiny sandwiches. Such fun!


Slice your cheese thinly and set aside.

Put a non-stick griddle to heat over a medium flame. If your griddle is on the older side (and not as non-stick as it used to be), you might want to drizzle on a little canola or olive oil. You don’t want the potato cakes to stick.

Put the cakes a few at time on the griddle, making sure to leave enough room to get a spatula in to turn them. Cook on the first side for several minutes or until the bottom is nicely browned.


Carefully turn the potato cakes over and cook the other side till browned.

At this point I take time out from our regularly scheduled, eat-right-now recipe to offer you a party plan version for making ahead.

PARTY PLAN MAKE AHEAD: Cook all the potato cakes and refrigerate until ready to serve. Reheat in a single layer in your oven, preheated to 375°F or 190°C for about 7-10 minutes or until heated through. Top half with the sliced cheese and pop back into the oven until the cheese just starts to melt. Remove from the oven and cover the cheesy potato cakes with a plain one. Serve!

Now back to our make them/eat them recipe:
Add the cheese to half of the potato cakes and put the other half on top to make a sandwich. Since the potato cakes are hot, it will take just a minute or so for the cheese to melt.

Food Lust People Love: These easy appetizers are perfect for cocktail time and plenty filling for your tapas party. Made with extra sharp cheddar and herby mashed potatoes, potato cake grilled cheese nibbles go down a treat.


Remove them to a platter and add the next batch of potato cakes to the griddle. Repeat process until all the potato cake grilled cheese nibbles are done. Garnish with more chopped herbs.

Enjoy!

Food Lust People Love: These easy appetizers are perfect for cocktail time and plenty filling for your tapas party. Made with extra sharp cheddar and herby mashed potatoes, potato cake grilled cheese nibbles go down a treat.


This month’s Foodie Extravaganza party is celebrating World Tapas Day. Created by Spain, the home country of tapas, it was first declared to commemorate of their favorite snacks in 2016. It's always the third Thursday so this year get ready to party on June 20th. We are here to help with several delicious recipes. Check out the links below. Many thanks to this month’s host, Juli from Pandemonium Noshery for choosing this excellent theme.


Foodie Extravaganza celebrates obscure food holidays by posting delicious recipes your family will love. Posting day is always the first Wednesday of each month. If you are a blogger and would like to join our group and blog along with us, come join our Facebook page Foodie Extravaganza. We would love to have you! If you’re a home cook looking for tasty recipes, check out our Foodie Extravaganza Pinterest Board!

Pin these Potato Cake Grilled Cheese Nibbles!


Food Lust People Love: These easy appetizers are perfect for cocktail time and plenty filling for your tapas party. Made with extra sharp cheddar and herby mashed potatoes, potato cake grilled cheese nibbles go down a treat.
.

Monday, May 27, 2019

Orange Marmalade Muffins #MuffinMonday

These orange marmalade muffins bake up fluffy and tender. The yogurt and zest add an extra punch to the already flavorful buttery crumb.

Food Lust People Love: These orange marmalade muffins bake up fluffy and tender. The yogurt adds an extra punch to the already flavorful buttery crumb. Pump up the orange flavor in these muffins by adding a little tangerine or orange zest to your granulated sugar before mixing in the other dry ingredients.


Any good cookbook I've ever read always suggests reading the recipe through before starting to cook or bake. Wise advice for sure so I do try to comply. In the case of muffins, I've been baking them so long and so often that I make up my own recipes with ease.

I sit at my computer before heading into the kitchen. For 12 muffins, 2 cups of flour is about right. Are they going to be sweet muffins? Well then, I add some white sugar, brown sugar or honey or even jam (or a combination) to the ingredients list. What will I use to moisten the dry ingredients? Milk, melted butter, oil, yogurt, buttermilk? How many eggs? Usually one will do. Don't forget a leavening agent and salt. Even a sweet muffin needs some salt.

Finally, or sometimes initially, to be honest, what add-ins or flavorings will I use? Fruit in season, chopped candy bars or maybe leftover meat and cheese in the fridge. Any of these might motivate me to create a muffin recipe. This morning my inspiration came from a jar of homemade orange marmalade I bought at a weekend market a couple of years ago. It's been languishing, still sealed, in the cool pantry ever since, slightly darker than when I bought it but just as good.


The one thing I had not considered was a muffin pan. Much to my horror, I realized that I don't have one in the house I'm staying in right now! I was saved when I came across a set of 12 silicone muffin cups tucked into a kitchen drawer. That was close. It's also why my very first instruction for Muffin Monday recipes is to prepare your pan! Better to know before you start if job one is actually to go buy a muffin pan (or silicone cups.)

Orange Marmalade Muffins

Pump up the orange flavor in these muffins by adding a little tangerine or orange zest to your granulated sugar before mixing in the other dry ingredients.

Ingredients
2/3 cup or 132g sugar
Zest 1 small tangerine, minced or finely grated
2 cups or 250g flour
2 teaspoons baking powder
1/2 teaspoon baking soda
1/2 teaspoon salt
1/2 cup or 113g butter, melted and cooled
1/2 cup or 120g plain yogurt
1/2 cup or 120ml milk
1/4 cup or 60ml good quality marmalade
1 large egg

Optional glaze:  2 tablespoons marmalade, slightly warmed

Method
Preheat your oven to 350°F or 180°C and prepare your 12-cup muffin tin by greasing it or lining it with paper muffin cups. Or use silicone cups on a baking pan! These little miracles allow one to bake muffins, even if you actually don't own a muffin pan in your current location.

In a large bowl, rub your sugar with the tangerine zest to release the oils. I use the back of my silicone spoon against the bowl.


Add the flour, baking powder, baking soda and salt to the sugar bowl and whisk to combine.

In another smaller bowl, whisk together your melted butter, milk, yogurt, egg and marmalade.

Check out the gorgeous color of my butter, there on the left. All natural, from Jersey Dairy, made with the rich cream from Jersey cows. 


Pour your egg/milk mixture into your dry ingredients and fold until just combined.


Divide the muffin batter between the muffin cups.


Bake in your preheated oven for about 20-25 minutes or until a toothpick comes out clean.

Remove from the oven and allow to cool for a few minutes. Warm the extra marmalade briefly in the microwave and then brush it onto the muffins to glaze.

Food Lust People Love: These orange marmalade muffins bake up fluffy and tender. The yogurt adds an extra punch to the already flavorful buttery crumb. Pump up the orange flavor in these muffins by adding a little tangerine or orange zest to your granulated sugar before mixing in the other dry ingredients.


Remove the muffins from the pan (or silicone cups) and cool completely on a wire rack.

Food Lust People Love: These orange marmalade muffins bake up fluffy and tender. The yogurt adds an extra punch to the already flavorful buttery crumb. Pump up the orange flavor in these muffins by adding a little tangerine or orange zest to your granulated sugar before mixing in the other dry ingredients.


Enjoy!

Check out all of the other lovely muffins my Muffin Monday friends have baked for you today!
Muffin Monday
#MuffinMonday is a group of muffin loving bakers who get together once a month to bake muffins. You can see all our of lovely muffins by following our Pinterest board. Updated links for all of our past events and more information about Muffin Monday can be found on our home page.

Pin these Orange Marmalade Muffins! 

Food Lust People Love: These orange marmalade muffins bake up fluffy and tender. The yogurt adds an extra punch to the already flavorful buttery crumb. Pump up the orange flavor in these muffins by adding a little tangerine or orange zest to your granulated sugar before mixing in the other dry ingredients.

 .

Tuesday, May 14, 2019

Blossom Tea Honey Buns #BreadBakers

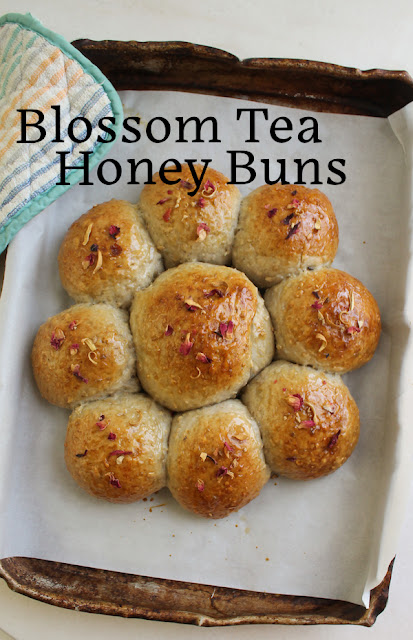
Made with a fragrant tea mix of hibiscus, rose and orange blossoms, paired with ginger and apple, these blossom tea honey buns have a subtle floral note that goes excellently with a hot cup of tea.

Food Lust People Love: Made with a fragrant tea mix of hibiscus, rose and orange blossoms, paired with ginger and apple, these blossom tea honey buns have a subtle floral note that goes excellently with a hot cup of tea.  For these blossom tea honey buns, I used a Tiesta tea  that my grocery store called Ginger Sweet Peach, despite the complete lack of peaches in the mix. You can use your favorite fruit infusion to make these buns.

Yesterday for Mother’s Day we hosted a backyard cookout. The menu included chicken, sausage and pork ribs, along with two substantial salads, garlic bread and my world-famous lentil burgers for the vegetarian contingent. My lentil burger recipe calls for 1 cup or 210g of uncooked lentils, which usually means buying a box or bag and dealing with leftovers.

Now that I’m back in the States, I am discovering the joys of the self-serve  bulk food department of my neighborhood stores. Not that we didn’t have bulk foods in Dubai, but I wasn’t allowed to help myself. It’s such fun to use the little scoop and measure out just how much I need for a recipe. I was able to buy exactly 210g of French lentils and now I don’t have a box in the cupboard with leftovers that are never enough for another recipe.

Another bonus of the bulk foods is the fabulous mix of teas and infusions available. They all sound and smell wonderful but I especially love the ones with ginger.

Blossom Tea Honey Buns

For these blossom tea honey buns, I used a Tiesta tea that my grocery store called Ginger Sweet Peach, despite the complete lack of peaches in the mix. You can use your favorite fruit infusion to make these buns.

Ingredients
2 tablespoons blossom tea or your favorite mix
2 tablespoons butter, melted and cooled
1/4 cup or 60ml honey
1/4 cup or 50g white sugar
1 teaspoon salt
1 envelope (1/4 oz or 7g) active dry yeast
2 3/4 cup or 350g bread flour
1 cup or 110g whole grain rolled oats

1 egg, beaten, for brushing on buns before baking
Optional for decoration: honey and extra tea leaves

Method
First, brew your tea by adding 1 1/4 cups of boiling water to the tea mix. Steep for 5 minutes then strain and discard the tea mix. Check out that gorgeous color!

Add in the honey and butter and stir till the honey is dissolved.

Mix white sugar and yeast in a large bowl. When the liquid has cooled to a lukewarm temperature, add it to bowl containing the sugar and yeast. Leave to prove for a few minutes.

When the yeast starts to foam, mix in the flour, oats and salt.


Knead until you have a smooth dough ball. This is a soft dough but don’t be tempted to add more flour. The rolled oats will need that moisture as the dough is kneaded and then rises.

Place the dough ball in an oiled bowl and cover with cling film. Put it in a warm place to rise until doubled, about 45 minutes.


Divide and form the dough into 10 balls and place them on a baking pan lined with baking parchment. Make sure to leave some space for rising. Since our theme is flowers, I made a last minute decision to make a larger bun out of two balls of dough so I could lay them out in a flower shape. So, as you can see in the photos, I only made nine buns out of mine.

Cover the bun pan with a proofing bag or clean garbage bag. Leave to the buns to rise for 30 more minutes.

When dough has almost finished rising, preheat your oven to 350°F or 180°C. Brush the tops of the buns with beaten egg.


Bake for 17-20 minutes or until tops are golden brown, turning your pan around halfway through so they will brown evenly. Remove the buns from the oven.

Food Lust People Love: Made with a fragrant tea mix of hibiscus, rose and orange blossoms, paired with ginger and apple, these blossom tea honey buns have a subtle floral note that goes excellently with a hot cup of tea.  For these blossom tea honey buns, I used a Tiesta tea  that my grocery store called Ginger Sweet Peach, despite the complete lack of peaches in the mix. You can use your favorite fruit infusion to make these buns.


Optional: While the buns are still warm, brush them with some honey and sprinkle with a few tea leaves for decoration.

Food Lust People Love: Made with a fragrant tea mix of hibiscus, rose and orange blossoms, paired with ginger and apple, these blossom tea honey buns have a subtle floral note that goes excellently with a hot cup of tea.  For these blossom tea honey buns, I used a Tiesta tea  that my grocery store called Ginger Sweet Peach, despite the complete lack of peaches in the mix. You can use your favorite fruit infusion to make these buns.


Enjoy!

Food Lust People Love: Made with a fragrant tea mix of hibiscus, rose and orange blossoms, paired with ginger and apple, these blossom tea honey buns have a subtle floral note that goes excellently with a hot cup of tea.  For these blossom tea honey buns, I used a Tiesta tea  that my grocery store called Ginger Sweet Peach, despite the complete lack of peaches in the mix. You can use your favorite fruit infusion to make these buns.


Many thanks to this month’s Bread Bakers host is Mireille of Schizo Chef. She challenged us to bake with flowers. Check out all the lovely recipes:


Pin these Blossom Tea Honey Buns!

Food Lust People Love: Made with a fragrant tea mix of hibiscus, rose and orange blossoms, paired with ginger and apple, these blossom tea honey buns have a subtle floral note that goes excellently with a hot cup of tea.  For these blossom tea honey buns, I used a Tiesta tea  that my grocery store called Ginger Sweet Peach, despite the complete lack of peaches in the mix. You can use your favorite fruit infusion to make these buns.
 .


Monday, May 13, 2019

Cheesy Grilled Corn Tartlets #BakingBloggers

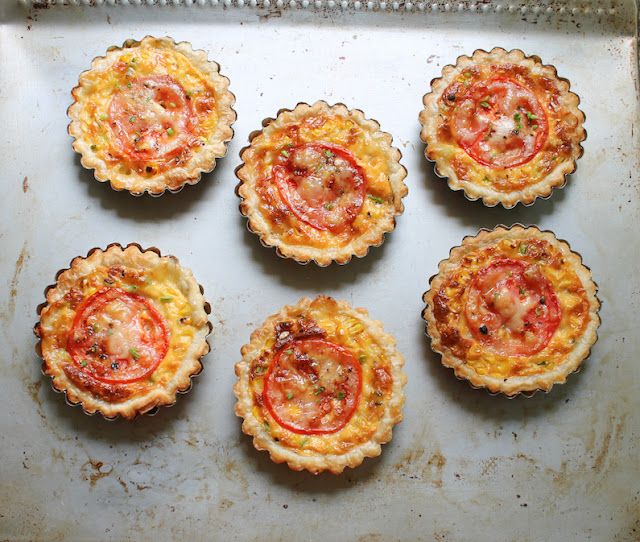
These cheesy grilled corn tartlets boast grilled fresh corn, melty Saint Félicien cheese and a pretty slice of tomato on top, baked up in a flakey puff pastry crust.

Food Lust People Love: These cheesy grilled corn tartlets boast grilled fresh corn, melty Saint Félicien cheese and a pretty slice of tomato on top, baked up in a flakey puff pastry crust. We ate these little beauties as a main course, alongside salad and green beans, but they would also be perfect for a special tea party or brunch.


Growing up mostly in the United States, I was spoiled with ample sweet corn every summer. When the first ears would start appearing at farm stands and grocery stores, we would eat it often. Boiled briefly, embuttered, with a sprinkling of salt and black pepper.

What I didn’t realize until I moved overseas was that not every country feels the same way about corn on the cob as we do.

In France and Brazil in particular, corn is cow feed. The varieties they grew, at least when I lived there, were not sweet or juicy. An Australian friend once told me the story of serving up sweet corn on the cob to her French in-laws. They stared at their plates in horror, not even knowing where to start. At first she couldn’t figure out what was wrong. Then, thinking that the cob was the problem, she sliced the niblets off for them, but still they picked at the corn, just to be polite. Mais, non, people don’t eat cow feed! My friend and I had a good laugh but we both agreed that there is nothing better than good sweet corn, eaten right off the cob.

Now that I’m home in Houston again, that tradition continues. Just recently fresh sweet corn was on sale: six ears for only one dollar! After the high prices of imported sweet Australian corn in Dubai, I was in heaven. I bought 36. My husband and I ate sweet corn for days and, I tell you, friends, it was glorious.

Cheesy Grilled Corn Tartlets

Sweet corn is fabulous just on its own but if you want to get fancy, grill it on a grill pan or over a charcoal fire to add a smoky flavor, then cut the niblets off and use it in cheesy grilled corn tartlets. We ate these little beauties as a main course, alongside salad and green beans, but they would also be perfect for a special tea party or brunch.

Ingredients for 6 individual tartlets (4 in or 10cm)
2 small ears corn or sub 3/4 cup or 150g frozen niblets, thawed
150g strong flavored, melty cheese like Saint Félicien or Camembert
Small bunch green onions, finely sliced, plus extra for garnish - optional
1 ripe but firm large tomato
2 eggs
1/4 cup or 60ml cream
1/4 teaspoon sea salt
few grinds fresh black pepper
8 3/4 oz or 250g ready rolled puff pastry sheet

Method
Use a grill pan over a medium high heat to grill your corn on the cob. Turn every couple of minutes until there are some nice charred marks all over the cobs. I used two for the tartlets and ate two with butter. So good!


Set aside to cool.  When cool enough to handle, cut the niblets off of the cobs. Mince your green onions and set aside a small pile for garnish. Cut the rind off of your cheese, if it has one. Then cut the cheese into small pieces. Set aside a small pile for adding to the tartlets just before baking.


Slice your tomato into six circles and lay them out on paper towels to get rid of excess juice.

Preheat your oven to 375°F or 190°C. Prepare your tartlet pans by cutting out little circles of baking parchment and placing them in the bottom of the pans. This will make removing the tartlets much easier.

Unroll your puff pastry sheet and cut it into six equal pieces. Fit the puff pastry into each pan. Press down on the pastry all around the edges and remove the excess.


In a medium mixing bowl, whisk your eggs together with the cream, salt, corn, green onions and cheese. Give the bowl a few good grinds of fresh black pepper.


Put the lined tart pans on a cookie sheet. Use a measuring cup to distribute the filling relatively evenly in the six tartlets. Top each with a slice of tomato, then sprinkle on the reserved cheese.

Food Lust People Love: These cheesy grilled corn tartlets boast grilled fresh corn, melty Saint Félicien cheese and a pretty slice of tomato on top, baked up in a flakey puff pastry crust. We ate these little beauties as a main course, alongside salad and green beans, but they would also be perfect for a special tea party or brunch.


Pop the tartlets in your preheated oven. Bake for about 20-25 minutes or until pastry and filling are both golden.

Remove from the oven and allow to cool for a few minutes.

Food Lust People Love: These cheesy grilled corn tartlets boast grilled fresh corn, melty Saint Félicien cheese and a pretty slice of tomato on top, baked up in a flakey puff pastry crust. We ate these little beauties as a main course, alongside salad and green beans, but they would also be perfect for a special tea party or brunch.


Run the point of a knife or wooden skewer around the edges of the tartlets to loosen the crust. Carefully remove the tartlets from the pans.

Sprinkle on the reserved green onions for garnish, if desired, and serve warm or at room temperature.

Food Lust People Love: These cheesy grilled corn tartlets boast grilled fresh corn, melty Saint Félicien cheese and a pretty slice of tomato on top, baked up in a flakey puff pastry crust. We ate these little beauties as a main course, alongside salad and green beans, but they would also be perfect for a special tea party or brunch.


This month my Baking Blogger friends are all sharing recipes that are perfect for a tea party. You can check them all out in the links below. Many thanks to our host this month, Sue of Palatable Pastime!

Baking Bloggers is a friendly group of food bloggers who vote on a shared theme and then post recipes to fit that theme one the second Monday of each month. If you are a food blogger interested in joining in, inquire at our Baking Bloggers Facebook group. We'd be honored if you would join us in our baking adventures.

Pin these Cheesy Grilled Corn Tartlets!


Food Lust People Love: These cheesy grilled corn tartlets boast grilled fresh corn, melty Saint Félicien cheese and a pretty slice of tomato on top, baked up in a flakey puff pastry crust. We ate these little beauties as a main course, alongside salad and green beans, but they would also be perfect for a special tea party or brunch.

.

Monday, April 29, 2019

Ham and Honey Mustard Muffins #MuffinMonday

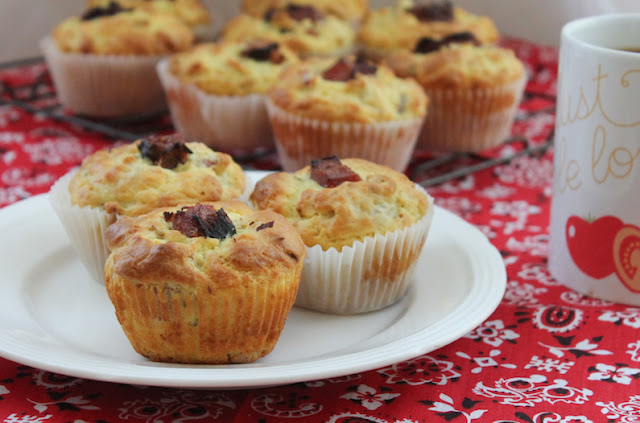
These ham and honey mustard muffins are the perfect breakfast or snack for anyone who loves honey mustard glazed ham at Christmas. Why not enjoy those flavors all year round, in muffin form?

Food Lust People Love: These ham and honey mustard muffins are the perfect breakfast or snack for anyone who loves honey mustard glazed ham at Christmas. The honey and mustard are the perfect complement to the smoky chunks of ham in these savory muffins. Use a good quality baked ham, not just sandwich slices for the best tasting muffins.

I almost didn’t participate in this month’s Muffin Monday. More than a month ago, before we moved away from Dubai, I baked these ham and honey mustard muffins. I figured that I would be so busy near the end of April that baking might not be possible. And I hate to miss Muffin Monday!

Sure enough, things have been crazy here. Our shipment arrived on Saturday and we are up to our ears in stuff to put away. This house is just not big enough! (Or more likely, we have too much stuff, but I'm trying not to think about that.) Finally last night I got around to writing this post and editing the photos. Much to my horror, the ham and honey mustard muffin folder was full of the wrong pictures! I had deleted the right ones by accident.

In the middle of the night it suddenly occurred to me that I needed to check the trash folder again, but with the sd card in the computer slot. And much to my relief, there they were! I am delighted to be able to share this recipe with you after all.

Ham and Honey Mustard Muffins

The sweet honey and sharp yellow mustard are the perfect complement to the smoky chunks of ham in these savory muffins. Use a good quality baked ham, not just sandwich slices for the best tasting muffins.

Ingredients
2 cups or 250g flour
1 tablespoon baking powder
1 teaspoon sea salt flakes or 1/2 teaspoon regular sea salt
Few good grinds fresh black pepper
7 oz or 200g smoked ham, diced
3/4 cup or 180ml milk
1/4 cup or 60ml canola oil
2 tablespoons yellow mustard
1 tablespoon honey
2 eggs

Method
Preheat your oven to 350°F or 180°C and grease your 12-cup muffin pan liberally with canola or butter or line with paper muffin cups.

Chop your ham into small chunks.  Put aside a small handful for topping the muffins before baking.


In a large bowl, mix together the flour, baking powder, salt, black pepper and stir well.

Fold in the larger pile of ham and stir again.


In another bowl, whisk your milk, oil, eggs, mustard and honey.


Pour your wet ingredients into the dry ingredients and fold them together until just mixed.


Divide the batter evenly among the muffin cups and top each with some of the reserved ham.

Food Lust People Love: These ham and honey mustard muffins are the perfect breakfast or snack for anyone who loves honey mustard glazed ham at Christmas. The honey and mustard are the perfect complement to the smoky chunks of ham in these savory muffins. Use a good quality baked ham, not just sandwich slices for the best tasting muffins.
Bake in your preheated oven about 20-25 minutes or until a toothpick inserted in the middle comes out clean.

Food Lust People Love: These ham and honey mustard muffins are the perfect breakfast or snack for anyone who loves honey mustard glazed ham at Christmas. The honey and mustard are the perfect complement to the smoky chunks of ham in these savory muffins. Use a good quality baked ham, not just sandwich slices for the best tasting muffins.


Cool on a rack for a few minutes and then remove the muffins from the pan to cool completely.

Food Lust People Love: These ham and honey mustard muffins are the perfect breakfast or snack for anyone who loves honey mustard glazed ham at Christmas. The honey and mustard are the perfect complement to the smoky chunks of ham in these savory muffins. Use a good quality baked ham, not just sandwich slices for the best tasting muffins.


Enjoy!

Make sure to check out all the other lovely muffins my Muffin Monday friends are sharing today!
Muffin Monday
#MuffinMonday is a group of muffin loving bakers who get together once a month to bake muffins. You can see all our of lovely muffins by following our Pinterest board. Updated links for all of our past events and more information about Muffin Monday can be found on our home page.


Pin these Ham and Honey Mustard Muffins!

Food Lust People Love: These ham and honey mustard muffins are the perfect breakfast or snack for anyone who loves honey mustard glazed ham at Christmas. The honey and mustard are the perfect complement to the smoky chunks of ham in these savory muffins. Use a good quality baked ham, not just sandwich slices for the best tasting muffins.
.