Wednesday, March 3, 2021

Torta di Rigatoni

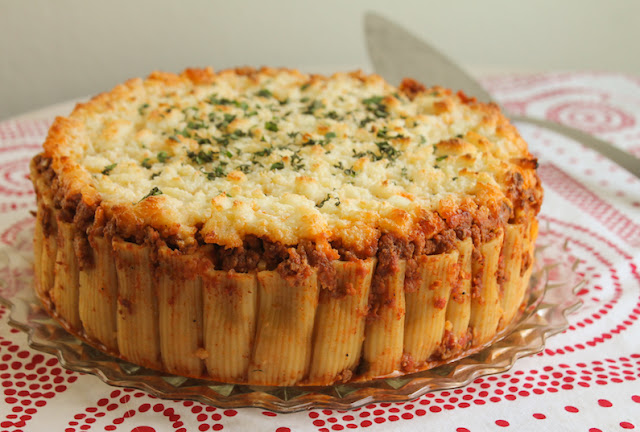
Torta di Rigatoni is a showpiece pasta dish with simple, delicious ingredients including a rich meaty Bolognese sauce and flavorful farmer’s cheese.

Food Lust People Love: Torta di Rigatoni is a showpiece pasta dish with simple, delicious ingredients including a rich meaty Bolognese sauce and flavorful farmer’s cheese.

I’ve adapted this recipe from one I read in delicious.uk magazine summer before last. I could have sworn I wrote down which issue I’ve found it in so I could share but I’ve found it online for you now so it’s all good. It’s one of Gennaro Contaldo’s from his cookbook, Gennaro’s Pasta Perfecto

In its original form, it’s vegetarian, made with a simple tomato sauce and cubes of mozzarella for the cheese, no meat involved. That would certainly have been easier but I'm always up for a challenge. 

Years ago, as Jamie Oliver was first starting out, Gennaro was one of his mentors when they worked together at Carluccio's, so I’ve come across his wonderful Italian recipes many times over my years of adoring Jamie. 

This may be one of my favorites with or without my adaptation of a meat sauce.

Torta di Rigatoni

For this dish I used a fresh milk farmer’s cheese because I love the flavor and richness, something like a dry, slightly saltier ricotta. Also it crumbles so nicely, the better to push it into the rigatoni. You could also use a milder grated cheese or cubed mozzarella, like in the original recipe, if you prefer. 

Ingredients
For the sauce:
2 tablespoons olive oil, plus extra for the pan
1 lb or 450g ground beef
3 cloves garlic
1/2 yellow onion
1 can (14.5oz or 411g) diced tomatoes
1 can (6oz or 170g) tomato paste
3 sprigs fresh oregano, plus extra minced leaves for garnish
1 bay leaf
1 teaspoon baking soda
Fine sea salt
Freshly ground black pepper

For the torta:
about 10 oz or 340g rigatoni
14.5oz or 411g fresh farmer’s cheese, crumbled

To serve:
Grated Parmesan

Method
In a large Dutch oven over a medium high heat, brown the ground beef in the olive oil, crumbling it into the smallest bits possible with a wooden spoon, as you do. 

Meanwhile, mince the garlic and onion. 

When the beef is nicely browned, even crunchy in places, turn the heat down and add in the garlic and onions. Cook until they are soft and translucent. 


Add in the canned tomatoes with any juice and another whole can of water. 


Stir in the tomato paste. Tuck the oregano and bay leaf into the sauce. 


Bring to the boil, then lower the heat. Simmer the sauce, covered, for about 30 minutes or until the diced tomatoes have fallen apart completely. 

Discard the bay leaf and the oregano stems. Stir in the baking soda. This helps neutralize some of the acid in the tomatoes, making the sauce a bit sweeter. Season to your liking with the salt and pepper. Set the sauce aside to cool.


I transferred mine to a bowl so I can use the same Dutch oven to boil the rigatoni. A quick rinse is good enough before boiling water. Because who wants to wash another pot?

To see about how much rigatoni you need to boil, line your springform pan (mine is 9 inch or 23cm in diameter) with foil that goes up beyond the sides and brush the inside with olive oil. I also like to add a circle of baking parchment to the bottom to guarantee I can remove the torta from the pan nicely. 

Now set one side of the pan on a cutting board or folded towel and fill it a little more than halfway with raw rigatoni noodles standing up. 


Cook these noodles according to package instruction in salted water till almost al dente. They need to be firm enough to still stand on their own still.

Drain the rigatoni and rinse with cool water. Preheat your oven to 350°F or 180°C. 

Cover the bottom of your lined pan with a couple of spoons of the sauce.


Tip the pan at slight angle and start stacking the drained, cooled rigatoni so that the ends will face up when the pan is level. 


Continue until the pan is completely full. If you have a couple of cooked rigatoni leftover, just eat ‘em. 


Crumble the farmer’s cheese with a fork. 


Push some of the crumbled cheese into the rigatoni with your clean fingers.


Then spoon over some of the sauce. 


Repeat this filling and saucing until half of your cheese is used and about two-thirds of the sauce.

Pour the remainder of the sauce over the tops of the rigatoni. 

Food Lust People Love: Torta di Rigatoni is a showpiece pasta dish with simple, delicious ingredients including a rich meaty Bolognese sauce and flavorful farmer’s cheese.

Lift the sides of the foil and sprinkle on the rest of the cheese. 

Food Lust People Love: Torta di Rigatoni is a showpiece pasta dish with simple, delicious ingredients including a rich meaty Bolognese sauce and flavorful farmer’s cheese.

Bake your torta di rigatoni in the preheated oven for about 30-35 minutes or until the top is golden brown and bubbly. 

Remove from the oven and leave to cool for about 10 minutes. Gently run a knife or spatula around the outside of the torta to loosen it from the foil. 

Food Lust People Love: Torta di Rigatoni is a showpiece pasta dish with simple, delicious ingredients including a rich meaty Bolognese sauce and flavorful farmer’s cheese.

Open the spring form pan and transfer the whole foil package to a cutting board. Remove the foil and put the torta on a serving platter. Sprinkle with the minced oregano.

Food Lust People Love: Torta di Rigatoni is a showpiece pasta dish with simple, delicious ingredients including a rich meaty Bolognese sauce and flavorful farmer’s cheese.

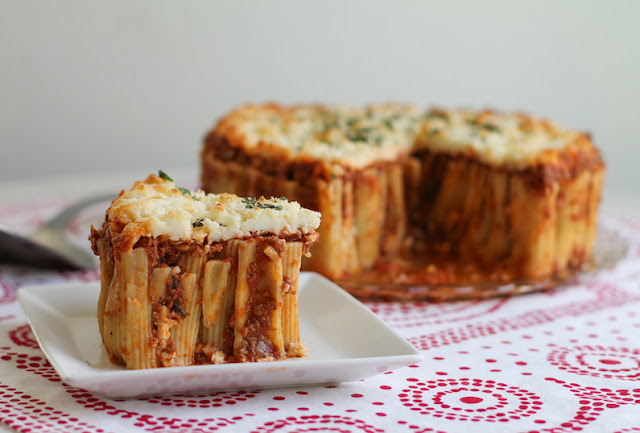
 Cut into wedges to serve with some freshly grated Parmesan.

Food Lust People Love: Torta di Rigatoni is a showpiece pasta dish with simple, delicious ingredients including a rich meaty Bolognese sauce and flavorful farmer’s cheese.

Enjoy!

This month my Foodie Extravaganza friends are sharing noodle dishes in celebration of National Noodle Month! Many thanks to our host, Sue of Palatable Pastime. Check out the other recipes below: 


Foodie Extravaganza is where we celebrate obscure food holidays by cooking and baking together with the same ingredient or theme each month. Posting day is always the first Wednesday of each month. If you are a blogger and would like to join our group and blog along with us, come join our Facebook page Foodie Extravaganza. We would love to have you! If you're a spectator looking for delicious tid-bits check out our Foodie Extravaganza Pinterest Board.


Pin this Torta di Rigatoni!

Food Lust People Love: Torta di Rigatoni is a showpiece pasta dish with simple, delicious ingredients including a rich meaty Bolognese sauce and flavorful farmer’s cheese.


 . 

Sunday, February 28, 2021

Saucy Pepperoni Roasted Chicken

These saucy pepperoni roasted chicken thighs are a quick but delicious meal for a busy night. Serve them with large green salad or over pasta for a complete main course. 

Food Lust People Love: These saucy pepperoni roasted chicken thighs are a quick but delicious meal for a busy night. Serve them with large green salad or over pasta for a complete main course.

We love crispy skin on roasted chicken so I was looking for a way to add in flavor without covering that gorgeous skin. One day, as I was examining the contents of my refrigerator and cupboards, this idea came to me. Tomato sauce with pepperoni, but only knee-deep so that chicken thighs can still turn a lovely golden brown. 

The chicken juices meld with the pepperoni and tomato sauce that cooks down as the liquid evaporates in the oven, making the most wonderful sauce for pasta. 

Saucy Pepperoni Roasted Chicken

I used Italian passata, which is uncooked tomato puree, but if you can’t find it in your local grocery store, by all means use regular tomato puree. Or, if you’d rather start with uncooked tomatoes, puree canned crushed tomatoes in a blender. I’ve given the weight of my chicken thighs below but if yours weighs a little more or a little less, no worries. 

Ingredients
4 chicken thighs (about 1 lb 14 oz or 850g)
2 cloves garlic
1-2 sprigs fresh oregano
2 cups or 500g Italian passata
3 1/2 oz or 100g spicy pepperoni, thinly sliced 
1 teaspoon sugar
fine sea salt
freshly ground black pepper
2 bay leaves

For garnish: fresh oregano leaves

To serve (optional): 
cooked pasta
crushed red pepper

Method
Preheat your oven to 350°F or 180°C. Line the bottom of your baking pan with the pepperoni. My package had 48 slices of pepperoni and I used every single one. 


Peel and chop the garlic. In a mixing bowl, combine the passata with the garlic, oregano leaves and sugar. 


Remove the excess fat from the chicken thighs and lightly salt and pepper them. You can also remove the bones if desired but that’s not absolutely necessary. I didn't remove the bones but I did open the thighs up so I could rub some salt and pepper inside.


Pour the prepared tomato sauce into the pepperoni-lined baking pan.


Nestle the seasoned chicken in the sauce, skin side up. Tuck in the bay leaves. 

Food Lust People Love: These saucy pepperoni roasted chicken thighs are a quick but delicious meal for a busy night. Serve them with large green salad or over pasta for a complete main course.

Roast in your preheated oven for about 40-45 minutes or until chicken thighs are golden brown and cooked through. 

Food Lust People Love: These saucy pepperoni roasted chicken thighs are a quick but delicious meal for a busy night. Serve them with large green salad or over pasta for a complete main course.

Discard the bay leaves. Sprinkle on a little fresh oregano for garnish. Serve over cooked pasta, if desired. 

Food Lust People Love: These saucy pepperoni roasted chicken thighs are a quick but delicious meal for a busy night. Serve them with large green salad or over pasta for a complete main course.

Enjoy!

It’s Sunday FunDay and I’m hosting with the theme “Chicken Delights.” Check out all the wonderful recipes everyone is sharing below:


We are a group of food bloggers who believe that Sunday should be a family fun day, so every Sunday we share recipes that will help you to enjoy your day. If you're a blogger interested in joining us, just visit our Facebook group and request to join.

Pin this Saucy Pepperoni Roasted Chicken!

Food Lust People Love: These saucy pepperoni roasted chicken thighs are a quick but delicious meal for a busy night. Serve them with large green salad or over pasta for a complete main course.

 .

Monday, February 22, 2021

Greek Yogurt and Honey Cornbread Muffins #MuffinMonday

In Greek they call this flavor combo yiaourti me meli, or yogurt and honey. It’s delightful in these yogurt and honey cornbread muffins. 

Food Lust People Love: In Greek they call this flavor combo yiaourti me meli, or yogurt and honey. It’s delightful in these yogurt and honey cornbread muffins.

You can make these for breakfast because, like all muffins, they come together quickly and your family can eat them warm just half an hour from when you start measuring out your ingredients. Or serve them as a snack anytime of the day. 

My mom likes to cut the muffins in half and warm them on a skillet with pats of butter but honestly, I think they are perfect just as is, especially with a cup of hot coffee or a cold glass of milk. 

Greek Yogurt and Honey Cornbread Muffins

You can use white or yellow cornmeal for the muffin batter, whichever you have on hand, but the yellow cornmeal makes prettier muffins. 

Ingredients 
1 cup or 180g cornmeal 
1 cup or 125ml all-purpose flour
1/4 cup or 50g granulated sugar
2 teaspoons baking powder
1 teaspoon salt
1/2 teaspoon baking soda
1 cup or 245g whole yogurt
2 eggs
1/2 cup or 113g butter, melted
1/2 cup or 120ml honey
 
Method
Preheat your oven to 375°F or 190°C and grease your 12-cup muffin pan or line it with paper liners.

Mix your cornmeal, flour, sugar, baking powder,  salt and baking soda into a large bowl. 


In a medium-sized bowl, whisk together your yogurt, eggs, melted butter and honey.


Pour the wet ingredients into the dry ingredients and whisk to combine.  


Divide the batter evenly between your muffin cups.


Bake the muffins in your preheated oven for about 20 minutes or until they are a nice golden brown around the edges.  Allow to cool briefly and then remove the muffins to a rack.

Food Lust People Love: In Greek they call this flavor combo yiaourti me meli, or yogurt and honey. It’s delightful in these yogurt and honey cornbread muffins.

These are delicious warm, plain or slathered with extra butter and/or honey. They are also fun to build pyramids with. I was just about giddy that Snowmageddon 2021 and freezing temperatures had finally passed though Texas. We got off easy with just a couple of broken pipes outside so I'm not complaining.

Food Lust People Love: In Greek they call this flavor combo yiaourti me meli, or yogurt and honey. It’s delightful in these yogurt and honey cornbread muffins.

Enjoy!

It’s Muffin Monday again! What are you baking? Check out all the lovely muffins my blogging friends are sharing: 
Muffin Monday 
 #MuffinMonday is a group of muffin loving bakers who get together once a month to bake muffins. You can see all of our lovely muffins by following our Pinterest board. Updated links for all of our past events and more information about Muffin Monday can be found on our home page.

Pin these Greek Yogurt and Honey Cornbread Muffins!

Food Lust People Love: In Greek they call this flavor combo yiaourti me meli, or yogurt and honey. It’s delightful in these yogurt and honey cornbread muffins.
 .

Sunday, February 21, 2021

Baked Grits with Sausage Gravy

Melt-in-your-mouth cheesy baked grits with sausage gravy are a true southern comfort food I’m sure the whole world would enjoy. You need to try them if you haven't already! 

Food Lust People Love: Melt-in-your-mouth cheesy baked grits with sausage gravy are a true southern comfort food I’m sure the whole world would enjoy. You need to try them if you haven't already!

Grits are a down home, stick-to-your-ribs kind of breakfast. The kind of easy comfort food I crave on a brisk winter morning or when things haven’t been going my way. They can be eaten sprinkled with sugar, or enriched by cheese. But if you really want them to be special, make these baked grits with sausage gravy. They are special enough to serve up for dinner. 

Though we think of them as southern fare, grits were eaten by the indigenous people in what became the United States (even up north) long before it was visited by European explorers. The corn or maize is soaked in an alkali solution which removes the hard hull. The resulting product is called hominy which can be eaten as-is in dishes like pozole or dried and ground to become grits. 

Grits come in several varieties, but I usually buy the iron-fortified quick grits because, as long as you are making one serving, they can even be cooked in the microwave. Talk about a fast healthy breakfast! The instructions on the box say: Cook with water, but for creamier grits, use milk instead.

For my money, the milk version wins every time. Milk not only makes creamier grits but it adds nutritional value as well. Milk contains several important nutrients; a glass of milk will give you calcium, protein, iodine, potassium, phosphorus and vitamins B2 and B12. If you use water, you are missing out on all that.

Baked Grits with Sausage Gravy

Great as a make-ahead morning meal, baked grits with sausage gravy are also perfect as breakfast-for-dinner. This recipe uses milk to make creamier grits. If you are watching your calories, you can use water or half milk/half water. But they won’t be as creamy! If you don’t have ramekins, this can also be baked in one larger pan and spooned out to serve. 

Ingredients
For the baked grits:
1 teaspoon fine sea salt
1 cup or 155g uncooked quick grits
4¼ cups or 1L milk
4 oz or 113g cream cheese
2 large eggs, beaten
Butter for greasing 6 ramekins

For the sausage gravy:
1 (16 oz or 454g) package breakfast sausage (We prefer hot but you can use mild.)
¼ cup or 60ml drippings from cooked sausage
1 cup or 125g flour
3 cups or 709ml milk
Freshly ground black pepper
Cayenne
Optional for serving: minced green onion tops

Method
Bring the milk for the grits to a boil in a large pot. Add the salt and slowly pour the quick grits in stirring constantly with a whisk. 


Bring the milk back to a boil and then reduce the heat. Cook for another 8-11 minutes or until the grits have thickened, stirring constantly.


Pour the grits into a mixing bowl and leave to cool for about 10 minutes, stirring occasionally to speed the process. Add in the cold cream cheese and mix well until combined.


Preheat your oven to 350°F or 180°C and butter 6 1-cup or 240ml ramekins. Set aside. Put a full kettle of water on to boil.

Whisk the two eggs in another bowl. Add small spoons of the warm grits to the eggs, whisking briskly, until you’ve added about ⅓ of the grits to the eggs and have a lovely homogeneous mixture.

Now add the egg/grits mixture to the cream cheese/grits bowl and stir well to combine. 


Divide the grits into the prepared ramekins. I had about 4½ cups total so each ramekin got about ¾ cup of grits. Place ramekins in a 13- x 9-inch pan, and add the hot water from your kettle to the pan halfway up the sides of ramekins. Cover the pan loosely with aluminum foil.


Bake in your preheated oven for 15 minutes covered. Uncover and bake 20 minutes more or until tops begin to brown. I wanted just a little more color, so I put mine under the broiler for another few minutes but you can skip this step if you can't be bothered. 

Food Lust People Love: Melt-in-your-mouth cheesy baked grits with sausage gravy are a true southern comfort food I’m sure the whole world would enjoy. You need to try them if you haven't already!

While the baked grits are in the oven, we’ll make the sausage gravy. In a large skillet, brown the sausage meat and break it into crumbles with your spoon. Keep browning until the sausage is completely cooked and you have some lovely crunchy pieces that are quite dark.

Turn the heat off and tip the pan to one side. Push the sausage crumbles up to the high side of the pan so you can spoon most of the drippings off, leaving about ¼ cup or 4 tablespoons behind.

Sprinkling the flour into the pan a little at a time, stirring the sausage and flour around until all of the flour is incorporated. Cook over a medium heat for just a few minutes to get rid of the floury taste.

Pour in the cold milk and stir well until the flour has been dissolved.


Cook, stirring almost constantly, until the gravy thickens to your desired consistency. I like it pretty thick. You can add more milk to loosen it up if you prefer thinner gravy. Season with freshly ground black pepper and a little cayenne, if desired. 


Once the baked grits are out of the oven, you can serve them immediately in the ramekins with the sausage gravy on top, or leave the grits to cool for about 10 minutes before unmolding them to plates. Depends on how fancy you want them to look. For this dish, I broke out the rarely-seen wedding china because it has a matching gravy boat.

Sprinkle with minced green onion tops, if desired.

Food Lust People Love: Melt-in-your-mouth cheesy baked grits with sausage gravy are a true southern comfort food I’m sure the whole world would enjoy. You need to try them if you haven't already!

Enjoy! 

This week my Sunday FunDay friends are sharing some of their favorite breakfast for dinner recipes. Check them out below! Many thanks to our host, Sue of Palatable Pastime. 
We are a group of food bloggers who believe that Sunday should be a family fun day, so every Sunday we share recipes that will help you to enjoy your day. If you're a blogger interested in joining us, just visit our Facebook group and request to join.

Pin these Baked Grits with Sausage Gravy!

Food Lust People Love: Melt-in-your-mouth cheesy baked grits with sausage gravy are a true southern comfort food I’m sure the whole world would enjoy. You need to try them if you haven't already!

 .

Friday, February 19, 2021

Lemon Garlic Butter Baked Scallops and Shrimp #FishFridayFoodies

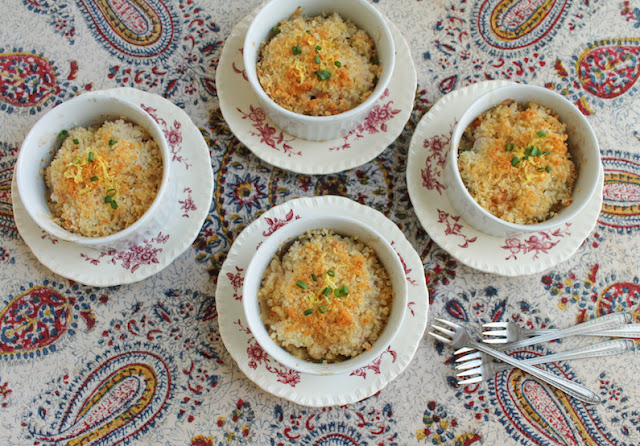
The perfect make-ahead appetizer, Lemon Garlic Butter Baked Scallops and Shrimp are a simple-to-prepare family favorite.

Food Lust People Love: The perfect make-ahead appetizer, Lemon Garlic Butter Baked Scallops and Shrimp are a simple-to-prepare family favorite.

This month I’m hosting Fish Friday Foodies and I challenged my fellow bloggers to use bivalves [i.e. clams (littlenecks, cherrystones, steamers, Atlantic and Pacific razors, quahogs, Manila, Geoduck etc.) oysters, cockles, mussels, and scallops] or gastropods (i.e. sea snails, limpets, winkles, whelks, abalone and conch) in recipes.

I am glad to say that many have done themselves proud and I am looking forward to seeing all of their recipes. We love all hard shelled seafood! 

Lemon Garlic Butter Baked Scallops and Shrimp

This recipe is adapted from one on The Lemon Bowl. It works well with small chunks of all sorts of seafood. If you don't have four 8 fl oz or 240ml ramekins, this can also be baked in one pan and spooned out to serve. 

Ingredients to serve four
4 slices brown bread
12 oz or 340g bay scallops
6 oz or 170g small peeled shrimp
2 tablespoons melted butter unsalted plus extra for the toast bases
Generous pinch lemon zest - save the rest for garnish
2 tablespoons fresh lemon juice
2 cloves garlic, minced
¼ teaspoon salt
¼ teaspoon cayenne

For the topping: 
½ cup or 40g panko breadcrumbs
¼ cup or 20g parmesan cheese, grated
1 tablespoon olive oil

For garnish:
green onions 
lemon zest

Method 
If you are using frozen scallops and shrimp, thaw and drain well. Place on paper towels to dry completely or as best you can. Preheat your oven to 400°F or 200°C. 
Toast the bread and cut out circles to fit the bottom of your four ramekins. Butter the toast generously and put it in the ramekins.


In a medium bowl, add the garlic to the lemon juice and set aside for a few minutes. Add in the melted butter along with a generous pinch of lemon zest, salt and cayenne. 


In a small bowl, mix together the panko, Parmesan and olive oil. 


Add the scallops and shrimp to the butter bowl. Stir to coat.

 
Divide the scallop/shrimp mixture evenly between the ramekins.


Divide the topping between the ramekins as well.

Food Lust People Love: The perfect make-ahead appetizer, Lemon Garlic Butter Baked Scallops and Shrimp are a simple-to-prepare family favorite.

At this point you can refrigerate the dishes to bake later or bake in your preheated oven until the topping is golden and the shrimp and scallops are cooked through, about 15-20 minutes. Garnish with green onions and another pinch of the lemon zest to serve. Extra points if you have tiny forks. 

Food Lust People Love: The perfect make-ahead appetizer, Lemon Garlic Butter Baked Scallops and Shrimp are a simple-to-prepare family favorite.

Enjoy!

Welcome to the bivalve/gastropod edition of Fish Friday Foodies! Check out the great recipes below. 


Are you a food blogger who would you like to join Fish Friday Foodies? We post and share new seafood/fish recipes on the third Friday of the month. To join our group please email Wendy at wendyklik1517 (at) gmail.com. Visit our Facebook page and Pinterest page for more wonderful fish and seafood recipe ideas. 


Pin these Lemon Garlic Butter 

Baked Scallops and Shrimp!

Food Lust People Love: The perfect make-ahead appetizer, Lemon Garlic Butter Baked Scallops and Shrimp are a simple-to-prepare family favorite.

 .