Monday, May 17, 2021

Italian Sausage and Chicken Ragù - Instant Pot

This Italian Sausage and Chicken Ragù is not only delicious stirred through with a fresh herby ricotta, thanks to the Instant Pot, it is also quick enough for a weeknight meal. 

Food Lust People Love: This Italian Sausage and Chicken Ragù is not only delicious stirred through with a fresh herby ricotta, thanks to the Instant Pot, it is also quick enough for a weeknight meal.

I honestly don’t know what took me so long to start using my Instant Pot. As I’ve mentioned before, it took a kitchen renovation to motivated me but, boy, howdy, do I love that thing now!

Anytime I see a slow cooker recipe that starts out by sautéing or browning something in a pan on the stove first, I think, HA. I can make that in the Instant Pot and skip the stove step. And I usually do. 

For anyone unfamiliar with the term ragù, it's just a fancy (Italian) way of saying meat sauce. Merriam-Webster defines ragù as "a hearty, seasoned Italian sauce of meat and tomatoes that is used chiefly in pasta dishes and that is typically made with ground beef, tomatoes, and finely chopped onions, celery, and carrots."

Italian Sausage and Chicken Ragù with Herby Ricotta

This recipe is adapted from a slow cooker one in the New York Times cooking section. The original took six hours to cook and contains only chicken. I highly recommend the addition of the hot Italian sausage to this dish you will make and serve in less than 30 minutes in your Instant Pot.

Ingredients
For the ragù:
19 oz or 538g hot Italian sausage
1 small carrot
1 small yellow or purple onion 
4 cloves garlic
2 large boneless, skinless chicken breasts (about 10 oz or 290g each)
1 can (14.5 oz or 411g) crushed or diced tomatoes 
3 tablespoons tomato paste
2 tablespoons olive oil
1 sprig fresh thyme (or 1/2 teaspoon dried thyme)
1 sprig fresh oregano (or 1/2 teaspoon dried oregano)
1 ½ teaspoons red-pepper flakes, plus more to taste
Fine sea salt and freshly ground black pepper

For the herbed ricotta topping: 
1 cup or 250g whole-milk ricotta
Heaping 1/4 cup chopped soft fresh herbs, such as chives, oregano, parsley or basil, or a mix
zest 1 medium lemon
1 teaspoon balsamic vinegar
1/4 teaspoon fine sea salt

To serve:
10 oz or 285g tagliatelle, fettuccine, linguine or other long, thick pasta, cooked al dente according to package instructions.

Method
Peel and chop the carrot, onion and garlic. 


Remove the casings from the Italian sausage and put it in the Instant Pot on sauté. Cook for several minutes using a wooden spoon to break the sausage into crumbles as it browns. 


Add in the carrot, onion and garlic. Sauté, stirring often, for a few minutes more until the vegetables soften. 


Nestle the chicken breasts into the sausage and vegetables. 


Top with the canned tomatoes, tomato paste, olive oil, thyme, oregano, crushed red pepper and a sprinkle of fine sea salt and freshly ground black pepper.


Secure the lid on the Instant Pot and set it manually to 9 minutes. 

When the time is up, safely release the pressure. Remove and discard the herb sprigs.


Transfer the chicken breast to a cutting board and use two forks to shred the chicken then return it to the Instant Pot and stir well. 


Bring a large pot of salted water to a boil and cook the pasta according to the package directions until al dente. 

While the pasta cooks, chop your herbs and combine them in a small bowl with the ricotta, lemon zest, balsamic vinegar and salt. 


Taste the sauce, adding more red-pepper flakes, if you like, and salt if needed.

Food Lust People Love: This Italian Sausage and Chicken Ragù is not only delicious stirred through with a fresh herby ricotta, thanks to the Instant Pot, it is also quick enough for a weeknight meal.

Divide the pasta among bowls. Top with ragu and a good spoon of the herby ricotta. 

Food Lust People Love: This Italian Sausage and Chicken Ragù is not only delicious stirred through with a fresh herby ricotta, thanks to the Instant Pot, it is also quick enough for a weeknight meal.

Enjoy! 

It’s MultiCooker Monday! Check out the variety of small appliance recipes my friends are sharing today. Many thanks to our host and organizer, Sue of Palatable Pastime. 


Multicooker Monday is a blogger group created by Sue of Palatable Pastime for all of us who need encouragement to make better use of our small appliances like slow cookers, Instant Pots, Air Fryers, rice cookers and sous vide machines. We get together every third Monday of the month to share our recipes. If you are a food blogger who would like to post with us, please request to join our Facebook group. 

Pin this Italian Sausage and Chicken Ragù!

Food Lust People Love: This Italian Sausage and Chicken Ragù is not only delicious stirred through with a fresh herby ricotta, thanks to the Instant Pot, it is also quick enough for a weeknight meal.

 .

Sunday, May 16, 2021

Chorizo Chickpea Tomato Pasta

This Chorizo Chickpea Tomato Pasta is a flavorful one-pot meal that the whole family will love. Dish it up and sprinkle on the feta!

Food Lust People Love: This Chorizo Chickpea Tomato Pasta is a flavorful one-pot meal that the whole family will love. Dish it up and sprinkle on the feta!

Today my Sunday FunDay friends are sharing recipes made with ingredients that add umami, the fifth taste our taste buds detect. It is usually associated with meat, seafood, tomatoes, mushrooms and cheese so this dish has umami to spare with chorizo, tomatoes and feta.

Make sure to scroll down to see the links to the other umami-rich recipes. 

Chorizo Chickpea Tomato Pasta

My can of tomatoes were fire-roasted (hence the specks of black in the photo of the simmering pot) but any crushed tomatoes will do. This recipe is adapted from Delicious.co.uk.  I'm not a fan of the dill in the original and just happened to have some chorizo in the refrigerator. If you do not or if you want to make this vegetarian, substitute some lovely oil-cured olives, which add loads of umami as well. 

Ingredients
1 tablespoon olive oil
4 oz Spanish-style chorizo
1 onion
2 cloves garlic
1/2 teaspoon crushed red pepper, plus extra to serve
1 1/2 teaspoon brown mustard seeds
7 1/2 oz or 215g ditalini or other small pasta shape
14.5 oz or 411g can crushed tomatoes
15 oz or 425g canned chickpeas, drained and rinsed
2 cups or 480ml chicken or vegetable stock
1/2 teaspoon baking soda
Fine sea salt to taste

For topping:
3 1/2 oz or 100g feta, crumbled
crushed red pepper

Optional for garnish: parsley 

Method
Finely dice the onion and garlic and cut the chorizo into small cubes. 


Heat the oil in a deep pot and add the cubed chorizo and fry for a few minutes which will release the gorgeous red oil. Add in the onion and garlic. Sauté gently for 6-8 minutes until softened but not colored.


Turn up the heat slightly, and make a little space in the middle of the pan. Pour the mustard seeds in the space and sprinkle the crushed red pepper over the chorizo and vegetables. Fry for 1-2 minutes more until the mustards seeds begin to pop. 


Pour in the pasta and stir to coat.  


Add the tomatoes, stock and chickpeas. 


Give the whole thing a good stir. 


Bring to the boil then turn the heat down and simmer for 20 minutes, stirring frequently, until the sauce has thickened and the pasta is tender. 

Add in the baking soda and stir well. 


It will bubble up as the soda neutralizes some of the acid in the tomato sauce. This is a secret I learned from an Italian-American nonna and I use it every time I make tomato sauce of any kind. It makes the sauce a little bit sweeter.

Season with salt to taste but keep in mind that feta can be quite salty and you will be stirring some through to serve. 

Serve in bowls sprinkled with feta and more crushed red pepper and parsley, if desired.  

Food Lust People Love: This Chorizo Chickpea Tomato Pasta is a flavorful one-pot meal that the whole family will love. Dish it up and sprinkle on the feta!

Enjoy! 

Need more recipes with umami? Click on the links below! Many thanks to our host, Sue of Palatable Pastime.


We are a group of food bloggers who believe that Sunday should be a family fun day, so every Sunday we share recipes that will help you to enjoy your day. If you're a blogger interested in joining us, just visit our Facebook group and request to join.

Pin this Chorizo Chickpea Tomato Pasta!

Food Lust People Love: This Chorizo Chickpea Tomato Pasta is a flavorful one-pot meal that the whole family will love. Dish it up and sprinkle on the feta!
 .

Tuesday, May 11, 2021

Cinnamon Apple Surprise Bread #BreadBakers

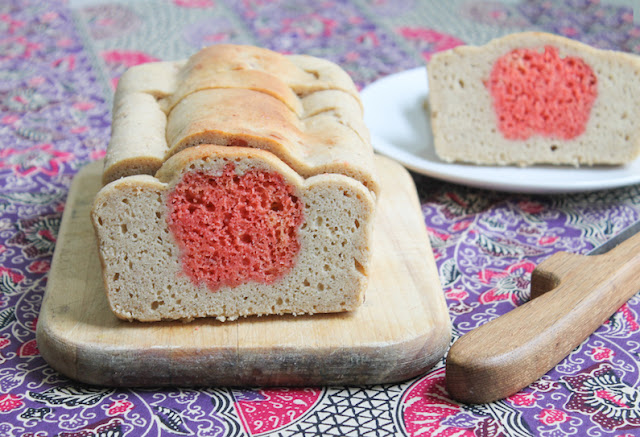
Cinnamon apple surprise bread is made with two batters, one cinnamon and one flavored with applesauce. Together they make a fun and tasty sweet loaf! 

Food Lust People Love: Cinnamon apple surprise bread is made with two batters, one cinnamon and one flavored with applesauce. Together they make a fun and tasty sweet loaf!

If you love apples and cinnamon together in a sweet bread, pick a day when you are lounging at home and are not in a rush to make this. It’s baked in two parts. First comes the apple bread, which I colored with no-taste red to make sure the apple shapes would pop out. 

The second batter is then spooned around the apple bread cutouts to create the surprise. Is it a bit of a production? Absolutely. Was I super pleased with the effect? You betcha! 

One great thing is that you get to snack on the leftovers of the apple bread part way through. We all decided that I should make that part again, just to eat plain. So good. 

Cinnamon Apple Surprise Bread

This bread took a bit longer than I thought it would to bake because I guess the already baked, chilled “apples” in the middle delayed the baking of the cinnamon batter. Just be patient and if yours starts to brown before it’s baked through, cover it with foil. 
 
Ingredients
For the apple bread:
3/4 cup or 94g all-purpose flour
1 teaspoon baking powder
1/2 teaspoon baking soda
1/2 teaspoon ground nutmeg
1/4 teaspoon salt
1/4 cup or 56g butter, softened
1/2 cup or 100g granulated sugar
1/4 cup packed or 50g brown sugar
2 oz or 56g ricotta, at room temperature
1/4 cup or 60ml sour cream
1 egg
1/2 cup or 130g thick applesauce
1/2 teaspoon no-taste red food gel (optional but necessary for the surprise effect) 

For the cinnamon bread:
2 1/4 cups or 280g all-purpose flour
1 1/2 teaspoons cinnamon
1 1/2 teaspoons baking powder
1/2 teaspoon salt
1 cup or 200g granulated sugar
1/2 cup or 113g butter, softened
2 eggs
8 oz or 225g ricotta
1/4 cup or 60ml milk

Method
Preheat your oven to 350°F or 180°C. Line a 8x8 in or 20x20cm baking pan with baking parchment. I like to put a little butter in the corners and a smear of butter in the middle because it helps anchor the parchment. 

To make the apple quick bread, whisk together the flour, baking powder, baking soda, nutmeg and salt. Set aside.

In another bowl cream the sugars and butter together with a mixer on medium until fluffy. Add in the egg, ricotta, sour cream, applesauce and food coloring and beat again until combined. 


Add the wet ingredients to the dry and fold well to combine. 


Pour the batter into the prepared pan and smooth it out with a spatula. 


Bake 18-20 minutes in your preheated or until a wooden skewer comes out clean. 

Cool completely in pan on wire rack. 


Freeze for 15 minutes.

Meanwhile, for the cinnamon quick bread, prepare a 9x5 in or 13x23cm loaf pan by lining it with baking parchment. 

In a large bowl whisk together the flour, baking powder, baking soda, cinnamon and salt. 

In a large bowl beat the sugars and butter together with a mixer until fluffy and pale yellow. Add in the eggs, ricotta and milk and beat till combined.


Add the wet ingredients to the dry and fold well to combine. 


Using a 2 1/2-inch apple cookie cutter, cut 9 apples out of the chilled apple bread. Remove the extra bits around the apples. These make an excellent mid-bake snack. 


Spread about 1 inch or 2cm deep of the cinnamon batter in the bottom of the prepared loaf pan. 


Stand the apple cutouts close together lengthwise down the center of the loaf pan. I ended up using only eight of them to leave room for the cinnamon batter at both ends. 


Carefully spoon remaining cinnamon batter on the sides and gently spread it over the “apples” in loaf pan. I found this easier to do with a damp spatula since the batter is pretty thick. 


Bake about 45-50 minutes or till the loaf sounds hollow when tapped on the bottom. Cool in the pan on a wire rack for 10 minutes. 


Loosen sides and remove from pan. Cool completely. 

Wrap and chill overnight before slicing.

Food Lust People Love: Cinnamon apple surprise bread is made with two batters, one cinnamon and one flavored with applesauce. Together they make a fun and tasty sweet loaf!

Enjoy! 

This month my Bread Baker friends are sharing bread with surprises inside at the instigation of our host, Kelly of Passion Kneaded. Check out all the creative recipes we are sharing below. Many thanks to Kelly for this fun theme and her behind the scenes work! 

BreadBakers

#BreadBakers is a group of bread loving bakers who get together once a month to bake bread with a common ingredient or theme. You can see all our lovely bread by following our Pinterest board right here. Links are also updated after each event on the #BreadBakershome page. We take turns hosting each month and choosing the theme/ingredient.


Pin this Cinnamon Apple Surprise Bread! 

Food Lust People Love: Cinnamon apple surprise bread is made with two batters, one cinnamon and one flavored with applesauce. Together they make a fun and tasty sweet loaf!
.

Monday, May 10, 2021

Garlic Browned Butter Parmesan Roasted Asparagus

This Garlic Browned Butter Parmesan Roasted Asparagus is a most wonderful side dish or even appetizer. Set the dish out and let guests help themselves to spear after spear. They'll be gone in a jiffy. 

Food Lust People Love: This Garlic Browned Butter Parmesan Roasted Asparagus is a most wonderful side dish or even appetizer. Set the dish out and let guests help themselves to spear after spear. They'll be gone in a jiffy.

According to Miss Manners and Emily Post, asparagus is legitimately finger food. One of my favorite ways to eat it is cooked but still crunchy to dip in a soft-boiled egg. Runny egg yolk and buttered asparagus with lemon = yum! It’s like deconstructed Hollandaise sauce. (Make a note now and try it!) Who needs toast soldiers? 

These days asparagus seems to be available year round, flown in from somewhere (mostly Peru, it seems, which makes sense since they terrace-farm up the mountain sides so it's like a different temperature/season as the altitude changes) but I do particularly enjoy buying it during springtime when it comes from farms closer to home. 


Garlic Browned Butter Parmesan Roasted Asparagus

You can use the Parmesan that comes in the plastic shaker container for this dish but I don’t think it melts as effectively the kind freshly grated from a wedge. Either way, keep a close eye on in as it browns. 

Ingredients
1 lb or 450g asparagus spears, woody ends trimmed
Olive oil
Salt and pepper to taste
3 tablespoons butter
2 cloves garlic, mashed then minced
1 tablespoon fresh squeezed lemon juice
2 oz or 56g freshly grated Parmesan

Method
Preheat your oven to 425°F or 220°C.

Arrange asparagus in a single layer on a baking pan. Drizzle with a little olive oil and season with salt and freshly ground black pepper. 


Roast in preheated oven until vibrant in color and tender-crisp, about 10 minutes).

While the asparagus is in the oven, brown the butter. Melt the butter in a small pot over medium heat, stirring constantly. The milk solids will separate and then start to brown. Cook, still stirring, until the butter is golden colored with browned bits at the bottom. 


Take it off the heat and quickly stir in the minced garlic. 


Add the lemon juice and stir to combine. 


Remove the asparagus pan from the oven and turn the oven to broil (grill) on high. 

Spoon the garlicky browned butter over the asparagus and toss to coat. 


Cover with the grated Parmesan. 


Return the pan to the oven for a few minutes, watching it carefully so it doesn’t burn. You just want to see the cheese and asparagus turned a little golden in places. 

Food Lust People Love: This Garlic Browned Butter Parmesan Roasted Asparagus is a most wonderful side dish or even appetizer. Set the dish out and let guests help themselves to spear after spear. They'll be gone in a jiffy.

Enjoy!

Food Lust People Love: This Garlic Browned Butter Parmesan Roasted Asparagus is a most wonderful side dish or even appetizer. Set the dish out and let guests help themselves to spear after spear. They'll be gone in a jiffy.

This month my Baking Bloggers are sharing asparagus recipes and I want to make them ALL. Check out the links below. Many thanks to our organizer and host, Sue of Palatable Pastime

Baking Bloggers is a friendly group of food bloggers who vote on a shared theme and then post recipes to fit that theme one the second Monday of each month. If you are a food blogger interested in joining in, inquire at our Baking Bloggers Facebook group. We'd be honored if you would join us in our baking adventures.

Pin this Garlic Browned Butter Parmesan Roasted Asparagus!

Food Lust People Love: This Garlic Browned Butter Parmesan Roasted Asparagus is a most wonderful side dish or even appetizer. Set the dish out and let guests help themselves to spear after spear. They'll be gone in a jiffy.


 .

Sunday, May 9, 2021

Easy Pickled Beets

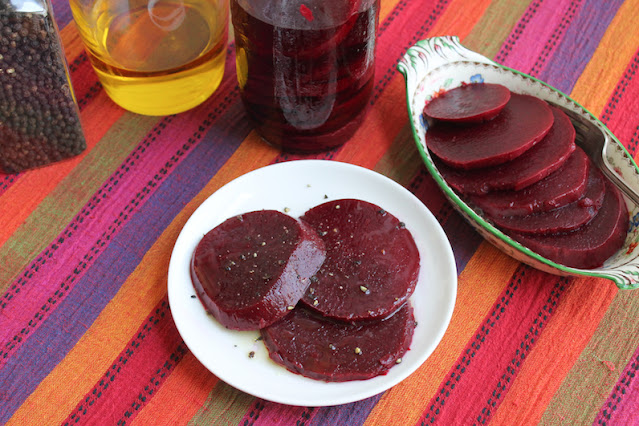
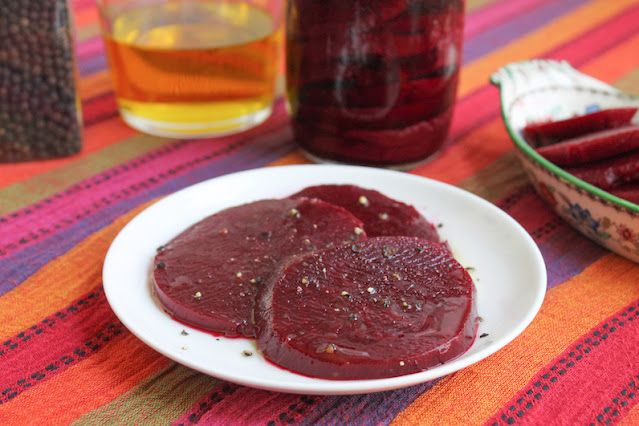
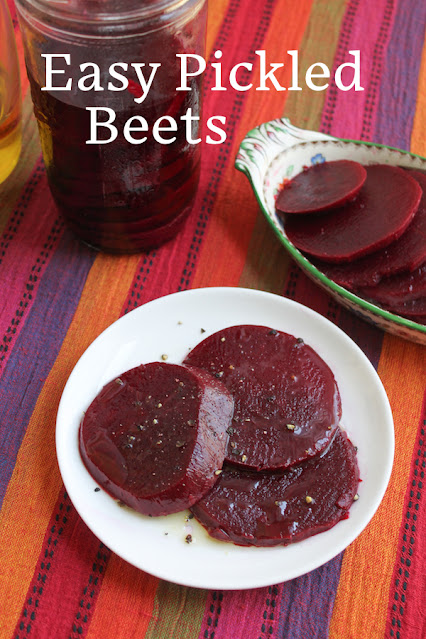
These easy pickled beets are ready to eat in hours or will keep well chilled for weeks! Enjoy them straight from the jar or drizzled with olive oil and a sprinkle of black pepper, salad style. 

Food Lust People Love: These easy pickled beets are ready to eat in hours or will keep well chilled for weeks! Enjoy them straight from the jar or drizzled with olive oil and a sprinkle of black pepper, salad style.

I have a confession to make and at the same time, a warning. I made these pickled beets one year ago, popped them into our laundry room refrigerator and promptly forgot about them. I think we can all agree that May 2020 was a bit fraught and I guess I had other things on my mind. 

When the Sunday FunDay theme of beets was announced, I suddenly thought, “Hey, I made pickled beets! Did I ever eat them?” The auxiliary refrigerator was searched and lo and behold, the quart jar of pickled beets turned up. 

The question remained, would they be edible? I am here to tell you that they were fabulous. I could not have told you that they were a year old! In fact, they tasted just like the ones I’ve made then eaten within a week or two. Did I just get lucky? Who knows? So here’s the warning: If you go off and leave yours in the fridge for more than a few weeks, your results may vary. 

Easy Pickled Beets

My top tip for making these pickled beets is to choose ones that about the size of your quart jar in the middle so that they fit fairly snugly. Smaller beets may need more vinegar to fill the space and ensure that the beet slices are completely covered. For the pickling to work well, the beets do have to be completely covered.

Ingredients for 1 quart jar of pickled beets
2 medium beets 
2/3 cup or 156ml white vinegar (or more to cover the beets, if needed)
3/4 teaspoon fine sea salt

Equipment
1 wide-mouthed quart jar or other tight sealing container

Method
In a large pot, cover the whole beets with water and cook until a knife slides in easily to the middle. Remove the beets from the pot and set aside until they are cool enough to handle. 

Use your fingers to press the peels off of the beets and cut any hard ends or bad spots off with a sharp knife. The peels will slide right off. If beet stains bother you, use gloves for this step 


Use the same knife to slice the beets into circles.


Stack the beet circles in the wide-mouthed quart jar, tucking the smaller ends down the side.


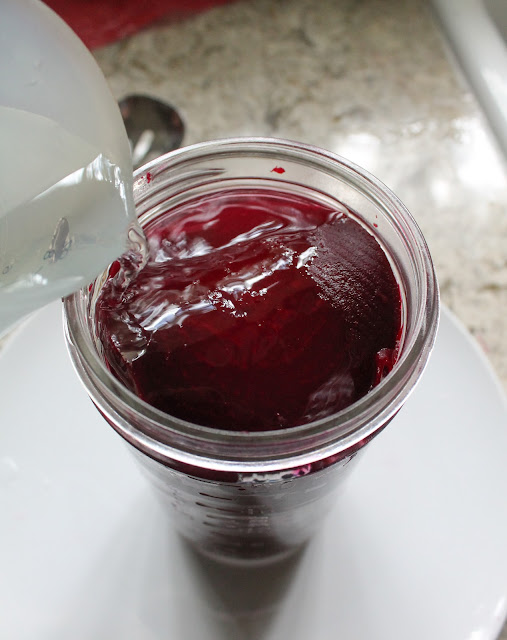
Heat the white vinegar with the salt until it reaches about 130°F or 54°C. 

Pour the vinegar carefully into the jar so it can seep slowly down filling up all the spaces between the beets. Check around the sides. If there are air bubbles, you can run a wooden skewer or chopstick down the inside of the jar, allowing the vinegar to flow down and the trapped air bubbles to escape up. 

Food Lust People Love: These easy pickled beets are ready to eat in hours or will keep well chilled for weeks! Enjoy them straight from the jar or drizzled with olive oil and a sprinkle of black pepper, salad style.

When the jar is completely full, put the lid on tightly and refrigerate the pickled beets for at least several hours before serving. These will keep for several weeks in the refrigerator. 

Food Lust People Love: These easy pickled beets are ready to eat in hours or will keep well chilled for weeks! Enjoy them straight from the jar or drizzled with olive oil and a sprinkle of black pepper, salad style.

Enjoy! 

Food Lust People Love: These easy pickled beets are ready to eat in hours or will keep well chilled for weeks! Enjoy them straight from the jar or drizzled with olive oil and a sprinkle of black pepper, salad style.


As I mentioned before, this week's Sunday FunDay theme is beets, one of my favorite vegetables. Check out all the links below! Many thanks to our host, Mayuri of Mayuri's Jikoni.

We are a group of food bloggers who believe that Sunday should be a family fun day, so every Sunday we share recipes that will help you to enjoy your day. If you're a blogger interested in joining us, just visit our Facebook group and request to join.


Pin these Easy Pickled Beets!

Food Lust People Love: These easy pickled beets are ready to eat in hours or will keep well chilled for weeks! Enjoy them straight from the jar or drizzled with olive oil and a sprinkle of black pepper, salad style.

 .