Monday, July 12, 2021

Toasted Eggplant Crust Mini Pizzas

These Toasted Eggplant Crust Mini Pizzas are as delicious as they are adorable with quick tomato sauce and toppings baked on toasted eggplant slices.

Food Lust People Love: These Toasted Eggplant Crust Mini Pizzas are as delicious as they are adorable with quick tomato sauce and toppings baked on toasted eggplant slices.

We went through a phase a while back of attempting to eat keto, that is to say, without carbs or very low carb. It did not go well. I didn’t lose any weight, for one, and I can’t imagine the increased fat in the cheese, meat and bacon I consumed did my cholesterol any good. Nevertheless, I did create a couple of recipes we loved so I’ll call that part of the experiment a win. 

The first used leftover pork roast slices and eggplant to make stuffed cheesy rolls covered in a rich tomato sauce then baked. Seriously, so good! Most canned tomatoes are not considered keto because of the added sugar so the secret appears to be making your sauce from scratch with fresh tomatoes. 

The second recipe was for rice-free cabbage rolls made with both beef and smoked sausage. I don't know that I'll ever make traditional cabbage rolls again because the smoked sausage adds so much flavor and who needs the rice really?

These toasted eggplant mini pizzas were the third keeper. They kind of remind us of our favorite eggplant Parmigiana but with a lot less trouble. Also: pepperoni - always a welcome addition in my book. 

Toasted Eggplant Crust Mini Pizzas

These would be a great appetizer for any crowd, with the added bonus of being naturally gluten free and keto-friendly.

Ingredients
1 large eggplant (about 19 oz or 535g, but a little bigger or smaller won't matter too much.)
fine sea salt

For the fresh tomato sauce:
2 ripe medium sized tomatoes
2 cloves garlic, minced
1 teaspoon dried oregano
1/4 teaspoon baking soda
1/8 teaspoon fine sea salt 

Suggested toppings:
Mozzarella or your favorite pizza cheese, shredded
Pepperoni (get the mini ones if you can, so cute!)
Black olives, pitted and sliced
Sliced jalapeƱos
Anchovies
Crushed red pepper 

To garnish after baking: fresh basil

Method
Trim the stem of your eggplant and cut it into 1/2 in or 1 cm slices (I got 16.) If you look closely, you'll see the little pokes of the knife I made at the appropriate intervals using a measuring tape because I'm anal like that. Eyeball it if you want to. 


Sprinkle the eggplant slices lightly with salt and stack them in a colander and set aside in your sink or on a plate to catch any liquid that drips out so it doesn't make a big mess.


Peel your tomatoes. I find the easiest way to peel tomatoes is to cut a cross in the skin with a sharp knife and then use a fork to dip the tomato into just boiled water for about 10-15 seconds. The skin will then slip off easily. 


Core and finely chop the peeled tomatoes.


Combine them in a pan with the minced garlic, oregano, baking soda and salt. 


Cook over medium heat for about 17-20 minutes, or until the tomatoes and garlic are softened and most of the liquid has evaporated. Set aside to cool. 


By this time, your eggplant should have released some juice. Dry the slices off with a tea cloth or paper towels. 

Toast them on a non-stick griddle pan over a medium high heat until they are browned on both sides. This takes just 4-5 minutes a side. Unless you’ve got a really large pan, this is going to have to be done in batches. 

Keep a careful eye on the eggplant slices so they don’t burn, especially if you’ve cut some of them a bit unevenly and some edges are thinner than others. I use a spatula to press them down occasionally, to make sure the eggplant and the pan are making a good connection and shift them around the griddle so they brown evenly. 

When one batch is golden on both sides, remove it to a dry tea cloth or layer of paper towels on a clean work surface. The slices should be laid on in a single layer. If you stack the eggplant slices, they’ll continue cooking and steaming. We want them to cool off once they are toasted. 


At this point, if you are ready to bake the mini pizzas, preheat your oven to 400°F or 200°C.

Place your toasted eggplant circles on a baking pan lined with baking parchment or a silicone liner and top them with a small spoon of the tomato sauce, cheese and your favorite other toppings. I made one pan of 12 and the other of four.

Food Lust People Love: These Toasted Eggplant Crust Mini Pizzas are as delicious as they are adorable with quick tomato sauce and toppings baked on toasted eggplant slices.

Bake in the preheated oven until the cheese is melted and bubbling, just 6 -7 minutes. 

Food Lust People Love: These Toasted Eggplant Crust Mini Pizzas are as delicious as they are adorable with quick tomato sauce and toppings baked on toasted eggplant slices.

Garnish with fresh basil leaves and serve with extra crushed red pepper, if desired. Enjoy!

Food Lust People Love: These Toasted Eggplant Crust Mini Pizzas are as delicious as they are adorable with quick tomato sauce and toppings baked on toasted eggplant slices.

It’s high summer now in the northern hemisphere so tomatoes and basil are flourishing in gardens everywhere. To celebrate the season, my Baking Blogger group has chosen to showcase tomatoes and basil for today’s theme. Check out all the recipes below. Many thanks to our organizer and host, Sue of Palatable Pastime

Baking Bloggers is a friendly group of food bloggers who vote on a shared theme and then post recipes to fit that theme one the second Monday of each month. If you are a food blogger interested in joining in, inquire at our Baking Bloggers Facebook group. We'd be honored if you would join us in our baking adventures.

Pin these Toasted Eggplant Crust Mini Pizzas!

Food Lust People Love: These Toasted Eggplant Crust Mini Pizzas are as delicious as they are adorable with quick tomato sauce and toppings baked on toasted eggplant slices.
 .


Sunday, July 11, 2021

Amaretto Sour Mocktails

Nicely tart, these Amaretto sour mocktails are made with pineapple, maraschino cherry and lemon juice. They are deliciously refreshing on a hot summer day. 

Food Lust People Love: Nicely tart, these Amaretto sour mocktails are made with pineapple, maraschino cherry and lemon juice. They are deliciously refreshing on a hot summer day.

I have this funny thing with raw eggs. I have absolutely no problem with eating them in cookie dough or cake batter (who doesn’t want to lick the chocolate cake beaters?!) but I draw the line in cocktails. That just seems a little too raw and risky for me. 

I know, I know, according to the CDC, the risk of salmonella is exactly the same so that’s why I bought pasteurized liquid egg whites for this recipe. I suggest you do the same, just to be safe. And you should probably buy pasteurized eggs if you want to eat cookie dough. No one wants salmonella. 

But everybody’s going to want one of these mocktails as soon as you turn the blender on! 

Amaretto Sour Mocktails

The average volume of one large egg white is 2 tablespoons or 30ml. You will need only one tablespoon to make two mocktails. This recipe is adapted from one I found in the BBC Good Food magazine along with some tips from bartender Jeffrey Morganthaler.

Ingredients - for 2 Amaretto Sour Mocktails
1/2 cup or 120ml pineapple juice
1/4 cup or 60ml fresh lemon juice
1 tablespoon egg white
10ml syrup from a jar of maraschino cherries
1 tablespoon simple syrup
2-3 drops almond extract
1 small shake Angostura bitters

To garnish: 1 lemon slice and 2 maraschino cherries

Method
Use a sharp knife to cut one nice slice out of a lemon and then cut the slice in half. Juice the rest of the lemon. 

Using a sharp cocktail stick, pierce the lemon peel on one side, slide a cherry onto the stick and then pierce the other side of the lemon peel to create the garnish. 


Put all the drink ingredients into a blender and pulse until well combined, pale in color and fluffy on the top.

If your blender is powerful enough, add 5-6 ice cubes and pulse again to chill the mocktail. If not, put the concoction in a cocktail shaker with the ice and shake until chilled. 

Strain out the ice and divide the mocktail between two glasses and garnish them with the lemon-cherry cocktail sticks.  

Food Lust People Love: Nicely tart, these Amaretto sour mocktails are made with pineapple, maraschino cherry and lemon juice. They are deliciously refreshing on a hot summer day.

Enjoy! 

It's Sunday FunDay again and this week we are all sharing Marvelous Mocktails. Check out the links below. Many thanks to our host Kalyani of Sizzling Tastebuds and her able assistant, Wendy of A Day in the Life on the Farm


We are a group of food bloggers who believe that Sunday should be a family fun day, so every Sunday we share recipes that will help you to enjoy your day. If you're a blogger interested in joining us, just visit our Facebook group and request to join.


Pin these Amaretto Sour Mocktails!

Food Lust People Love: Nicely tart, these Amaretto sour mocktails are made with pineapple, maraschino cherry and lemon juice. They are deliciously refreshing on a hot summer day.
 .

Wednesday, July 7, 2021

Homemade Pub-Style Pickled Onions

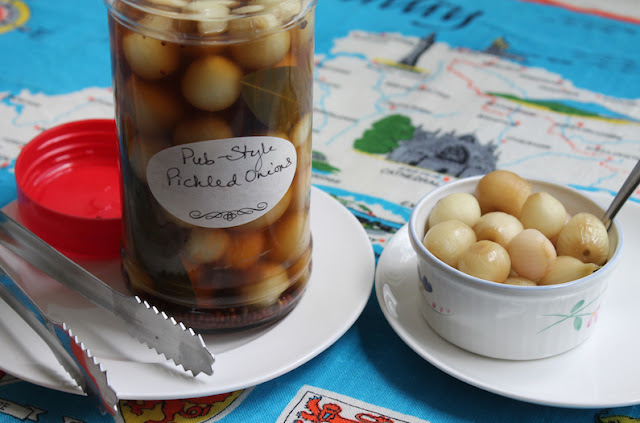
Homemade pub-style pickled onions are easy to make, crunchy and sour with a hint of sweetness, perfect with sharp cheddar cheese or in a dirty martini. 

Food Lust People Love: Homemade pub-style pickled onions are easy to make, crunchy and sour with a hint of sweetness, perfect with sharp cheddar cheese or in a dirty or dry martini.

Any pub in the UK worth its salt will have jars of pickled onions to serve with a ploughman’s lunch of cheese, bread and ham. The better ones will offer you pickled onions they’ve made themselves. Honestly, it’s so easy, they really all should. 

The only fiddly thing is peeling the tiny onions and that is made easier by covering them in boiling water and then refreshing them in iced water. The skins just slip right off. Save them to throw in your next stockpot so they don’t go to waste. 

Homemade Pub-Style Pickled Onions

Ideally, you should make this using genuine Sarson’s Malt Vinegar or, failing that here in the States, at least make sure you use malt vinegar. This recipe is adapted from one on the Sarson’s website.

Ingredients
2 cups or 475ml malt vinegar
1 lb or 450g small pickling onions 
2 tablespoons fine sea salt
1/2 cup or 100g granulated sugar
10 peppercorns
2 teaspoons mustard seeds
1 teaspoons coriander seeds 
2 bay leaves

Method
Put the onions in a large heatproof bowl. Cover them with boiling water and stir for about 30 seconds. Drain them in a colander them return them to the bowl and cover with iced water. Drain again. 


To peel them cut off the stem end and squeeze the little onion out of its peel. Or if you tend to lose another layer of onion this way, you can cut off both end and use a sharp knife to remove the skins. 


Once the onions are peeled, put them in non-reactive bowl and sprinkle them with the salt. Cover the bowl with a upturn plate or some cling film and leave overnight or up to 24 hours. When you think about it, give the onions a good shake to make sure they are all equally as salted.


Meanwhile pour the vinegar and sugar into a large saucepan with the peppercorns, mustard seeds and bay leaves. My bay leaves are fresh but you can certainly use dried ones. The Sarson recipe didn't specify. 


Put the lid on the pan, bring to the boil then remove from the heat and set aside to allow the spices to infuse.


The following day rinse the onions with cool running water and then pat them dry.

Pack the onions into a sterilized 20 oz or 600ml jar with the bay leaves. 


Pour over the vinegar, along with the mustard, peppercorns and coriander. Completely cover the onions with the liquid. Seal and leave to pickle in a cool place for 6 weeks. Since it’s a warm summer where I am right now, I left mine to pickle in the kitchen for three days and then refrigerated the jar for the rest of the time. 

Food Lust People Love: Homemade pub-style pickled onions are easy to make, crunchy and sour with a hint of sweetness, perfect with sharp cheddar cheese or in a dirty or dry martini.

Enjoy these pub-style pickled onions with cheddar and ham or in a dry martini. 

It’s the first Wednesday of the month and that means it’s time for our Foodie Extravaganza party. This month we are celebrating National Pickle Month. Check out of the great pickle recipes below. Many thanks to our host, Camilla of Culinary Adventures with Camilla


Foodie Extravaganza is where we celebrate obscure food holidays by cooking and baking together with the same ingredient or theme each month. Posting day is always the first Wednesday of each month. If you are a blogger and would like to join our group and blog along with us, come join our Facebook page Foodie Extravaganza. We would love to have you! If you're a spectator looking for delicious tid-bits check out our Foodie Extravaganza Pinterest Board.

Pin these Homemade Pub-Style Pickled Onions!

Food Lust People Love: Homemade pub-style pickled onions are easy to make, crunchy and sour with a hint of sweetness, perfect with sharp cheddar cheese or in a dirty or dry martini.
 .

Monday, June 28, 2021

Cheerios Banana Muffins #MuffinMonday

Cheerios Banana Muffins are made with crushed Cheerios or, I suppose, their store-brand equivalent and sweet ripe bananas. Bake a batch for someone you love. 

Food Lust People Love: Cheerios Banana Muffins are made with crushed Cheerios or, I suppose, their store-brand equivalent and sweet ripe bananas. Bake a batch for someone you love.

Almost every morning, my father has a bowl of Cheerios with fruit and yogurt (also wheat bran!) which is a very healthy breakfast and possibly the reason he has made it to the great age of 85 years old. It certainly doesn’t hurt. 

When he was planning to visit last year I bought a box in readiness and then COVID hit and the trip was canceled. For 15 months that box has languished in my pantry until finally I couldn’t take it anymore. It had to be opened and used!

I started looking for recipes with Cheerios and was surprised by how many there are. Who knew? It occurs to me that they would also work great in Uncle Hector’s 100 Cookies so a batch of those is next on the to-be-baked list.

This is touted on the Cheerios website as the perfect breakfast on the go since it already has cereal baked right in. I cannot disagree. Equally, these muffins make a great snack for your tea or coffee break. 

Cheerios Banana Muffins

This recipe is adapted from the one on the actual Cheerios website. They want you to put a whole cup of raisins as well but I knew that wouldn’t be popular at my house because, and I quote my younger daughter, people like plain things. Raisins do not qualify. 

Ingredients
2 cups or 54g Cheerios cereal, plus a little extra for decoration
1 1/4 cups or 156g all-purpose flour
1/2 cup or 100g packed brown sugar
2 1/2 teaspoons baking powder
1/4 teaspoon salt
3 medium very ripe bananas (about 195g, peeled weight)
2/3 cup or 156ml milk
3 tablespoons canola or other light oil
2 teaspoons vanilla
1 egg

Method
Preheat your oven to 400°F or 200°C.  Prepare a 12-cup regular-size muffin pan by greasing the cups or lining them with paper muffin liners.

Crush the cereal with a rolling pin in a Ziploc bag or with a small food processor until fairly fine. One comment on another blog that shared a similar recipe said that the muffins were gritty because the Cheerios weren’t crushed finely enough so I did mine in the food processor. No one wants gritty muffins.

In large bowl, whisk together the Cheerios crumbs, flour, brown sugar and baking powder and salt. 


In another mixing bowl, mash the bananas with a fork. 


Add in the milk, oil, vanilla and egg. Whisk till well combined. 


Pour the wet ingredients in the dry and fold just until moistened. 


Divide batter evenly among muffin cups. Sprinkle with a few Cheerios for decoration, if desired. 

Food Lust People Love: Cheerios Banana Muffins are made with crushed Cheerios or, I suppose, their store-brand equivalent and sweet ripe bananas. Bake a batch for someone you love.

Bake for 18 to 22 minutes or until golden brown. Remove from the oven and cool on a wire rack. 

Food Lust People Love: Cheerios Banana Muffins are made with crushed Cheerios or, I suppose, their store-brand equivalent and sweet ripe bananas. Bake a batch for someone you love.

I must confess that while they look fun and are crunchy when first baked, the Cheerios on top got chewy after a day in an airtight container. My husband didn’t mind them. My younger daughter picked them off. You do you. The important thing is that everyone liked the muffins themselves!

Food Lust People Love: Cheerios Banana Muffins are made with crushed Cheerios or, I suppose, their store-brand equivalent and sweet ripe bananas. Bake a batch for someone you love.

Enjoy! 

It's Muffin Monday! Check out all the lovely muffins by blogger friends are sharing.

Muffin Monday
 

#MuffinMonday is a group of muffin loving bakers who get together once a month to bake muffins. You can see all of our lovely muffins by following our Pinterest board. Updated links for all of our past events and more information about Muffin Monday can be found on our home page.

Pin these Cheerios Banana Muffins! 

Food Lust People Love: Cheerios Banana Muffins are made with crushed Cheerios or, I suppose, their store-brand equivalent and sweet ripe bananas. Bake a batch for someone you love.
.

Sunday, June 27, 2021

Spicy Grilled Leg of Lamb

This spicy grilled leg of lamb is butterflied, marinated with garlic, lemon zest and za’atar and cooked up juicy and tender, perfect for a barbecue party!

Food Lust People Love: This spicy grilled leg of lamb is butterflied, marinated with garlic, lemon zest and za’atar and cooked up juicy and tender, perfect for a barbecue!

Everybody loves a good leg of lamb roast but when it’s grilling season, who wants to be indoors with the oven on? This spicy grilled leg of lamb starts with a butterflied leg, making it quicker to cook that a traditional roast. And all those seasonings and the touch of flame from the grill make it more delicious. 

In case you haven’t figured it out by now, our family loves lamb. We eat it in stews, roasts for family, roasts for only two, in shish kebabs and murtabak and stuffed naan, just to mention a few of our favorites. We are also fond of slow cooked lamb shoulder and rack of lamb. Honestly, there’s nothing that says Sunday supper at our house like a beautiful rosemary and garlic spiked leg of lamb roasted to a golden brown with roasted potatoes.

But when temperatures start to rise and I am loath to turn the oven on, this spicy grilled leg of lamb is our favorite way to cook it. Removing the bones, in other words, creating a butterflied leg of lamb, opens the meat up so you can add marinade both inside and out. The result is a perfect spicy grilled leg of lamb. 

Spicy Grilled Leg of Lamb

I’ve made this recipe several times with lamb legs of varying sizes. If yours is bigger, simply increase the ingredient amounts for the marinade accordingly. I only give the weight of my most recent leg as a guide. The one before this was twice this weight! 

Ingredients
1 leg of lamb (about 2.6 lbs or 1.2 kg) - bone, sinews and gristle removed

For the marinade:
2 large cloves garlic
1 teaspoon kosher or coarse grained sea salt
1/2 teaspoon whole peppercorns
2 tablespoons za’atar (a Middle Eastern spice mix)
Juice and zest one lemon or lime
2 tablespoons olive oil

Method
Crush the peeled garlic with a mortar and pestle, along with the salt, peppercorns, za’atar and lemon (or lime, I use either depending on what's in the fridge) zest, until you have a fine paste. 


Add in the lemon (or lime) juice and olive oil and whisk to combine. 


Spread the marinade over your butterflied leg of lamb on both sides.


Pop it into a Ziploc bag and try to squeeze all the air out before sealing. Refrigerate for at least one hour or until you are ready to grill the lamb. This step can even be done the day before if you are prepping for a barbecue party. 


When you are about ready to grill, remove the lamb from the refrigerator and get the grill fired up and ready to go. We have a charcoal grill so, once lit, it takes about 20 minutes for the coals to start turning grey.

Cook the spicy grilled leg of lamb to your desired degree of doneness. We like it pretty pink inside so that takes about 12-15 minutes a side. My apologies for no actual grilling photos. In the dark outside, when we finally got around to grilling this time, they would not have been helpful. Plus only YOU know how rare (or not) you like your lamb. 

Leave to rest for about 10 minutes then slice the spicy grilled leg of lamb thinly to serve. 


Since it's summer, I suggest a side salad as an accompaniment. If you really need potatoes, how about a pumped up potato salad? (I wanted to call this Pimp My Potato Salad but my daughter wouldn't let me. It's so good!)

Enjoy! 

Food Lust People Love: This spicy grilled leg of lamb is butterflied, marinated with garlic, lemon zest and za’atar and cooked up juicy and tender, perfect for a barbecue!


It's Sunday FunDay and I am hosting! Our theme is Summer Grilling because who doesn't love a little smoky flavor and cooking outside. Check out the great recipes we are sharing below: 
We are a group of food bloggers who believe that Sunday should be a family fun day, so every Sunday we share recipes that will help you to enjoy your day. If you're a blogger interested in joining us, just visit our Facebook group and request to join.


Pin this Spicy Grilled Leg of Lamb!

Food Lust People Love: This spicy grilled leg of lamb is butterflied, marinated with garlic, lemon zest and za’atar and cooked up juicy and tender, perfect for a barbecue!

 .

Sunday, June 20, 2021

Chocolate Pixies

Chocolate Pixies are a magical combination of chewy, crunchy, chocolatey and nutty, baked with a light coating of powdered pixie dust aka icing sugar.

Food Lust People Love: Chocolate Pixies are a magical combination of chewy, crunchy, chocolatey and nutty, baked with a light coating of powdered pixie dust aka icing sugar.

Years ago I came across a recipe in Gourmet magazine for baked treats they called “chocolate crackle cookies.” The actual magazine belonged to a friend so I photocopied it and stuck it in my recipe binder. 


As you can see from the photo, that recipe has been well used over the years. It’s a fun one to make with children because they love rolling the dough into the requisite balls. Never mind that they also tend to get powdered sugar everywhere, that’s part of the sweet fun. 

Which brings me to the recipe I’m sharing today. Our Sunday FunDay host today is Sue of Palatable Pastime. She chose the theme of Midsummer Night’s Dream and encouraged us to celebrate by sharing recipes that would delight the faerie folk. 

I immediate started researching recipes online and found MANY for chocolate pixies. About 110,000,000 Google results, if you can imagine. That’s a lot of pixie cookie recipes! Turns out that I’ve been making a sort of chocolate pixie cookie for 26 years, just by another name. Who knew? 

Chocolate Pixies

This recipe makes four dozen cookies and was adapted from one on Big Oven. The dough freezes beautifully, if you don’t want to bake them all in the same day. 

Ingredients
For the cookie dough:
1/4 cup or 57g butter
4 oz or 113g unsweetened chocolate
2 cups or 250g flour
2 teaspoons baking powder
1/2 teaspoon salt
2 cups or 400g sugar
1/2 cup, finely chopped, or 53g pecans
3 eggs, lightly beaten

To coat dough before baking:
1 cup or 125g icing sugar

Method
Use a sharp knife to finely chop the pecans. 


In a microwavable bowl, melt butter and chocolate in the microwave in 15-20 seconds zaps, stirring in between, until both are completely melted and the mixture is smooth.


Sift in the flour, baking powder and salt and stir to combine.  


Add in the sugar, chopped pecans and eggs. 


Stir till well combined. It will be quite a stiff dough and a good workout for your stirring arm. 


Cover the dough with cling film and press it down to make sure no air is touching the dough and refrigerate at least 1 hour for easier handling.

When you are ready to bake, preheat your oven to 300°F or 149°C and prepare two cookie sheets by lining them with baking parchment or silicone liners. 

Use a spoon or scoop to divide the dough into small pieces, a little smaller than a ping pong ball. 


Shape each piece into a ball and roll it in the icing sugar. 


Put them on a clean plate to catch the icing sugar that inevitably falls off as you transfer them. You don’t want that much on your cookie sheet. 

Place the balls 2 inches apart on your prepared cookie sheets. Still a little sugar on the pan, just not as much.


Bake in the preheated oven for 15-18 minutes or until edges are set, rotating the cookie sheets halfway through so they cook evenly.


Remove the chocolate pixies from the cookie sheets and place on wire racks to cool completely. 

Food Lust People Love: Chocolate Pixies are a magical combination of chewy, crunchy, chocolatey and nutty, baked with a light coating of powdered pixie dust aka icing sugar.

Repeat the process until all the dough is rolled, sugared and baked into cookies.

Enjoy!

Food Lust People Love: Chocolate Pixies are a magical combination of chewy, crunchy, chocolatey and nutty, baked with a light coating of powdered pixie dust aka icing sugar.

It’s Sunday FunDay and, as previously mentioned, we are celebrating A Midsummer Night’s Dream. Check out all the recipes below. Many thanks to our host, Sue of Palatable Pastime


We are a group of food bloggers who believe that Sunday should be a family fun day, so every Sunday we share recipes that will help you to enjoy your day. If you're a blogger interested in joining us, just visit our Facebook group and request to join.

Pin these Chocolate Pixies!

Food Lust People Love: Chocolate Pixies are a magical combination of chewy, crunchy, chocolatey and nutty, baked with a light coating of powdered pixie dust aka icing sugar.

.