Tuesday, September 14, 2021

Tiger Biting Pig Buns - 老虎咬猪包子 - Lǎohǔ Yǎo Zhū Bāozi #BreadBakers

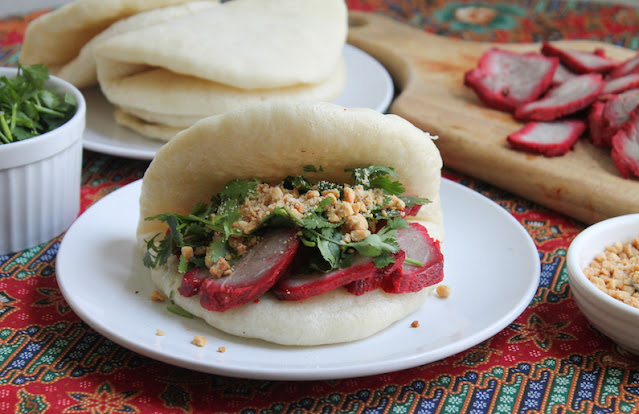
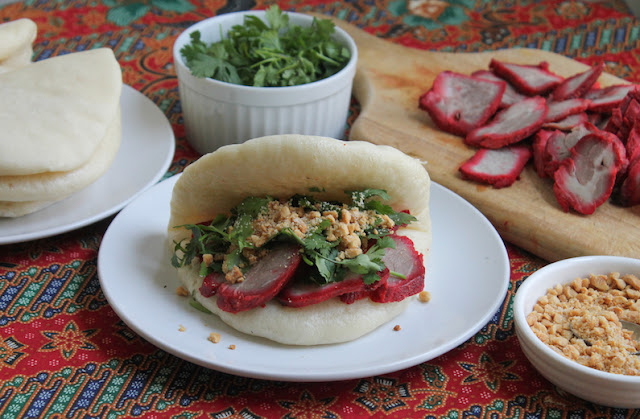
Tiger Biting Pig Buns are soft, steamed bread filled with slices of rich char siu pork, fresh cilantro and roasted peanuts with a little sugar. Each bite is more delectable than the next! 

Food Lust People Love: Tiger Biting Pig Buns are soft, steamed bread filled with slices of rich char siu pork, fresh cilantro and roasted peanuts with a little sugar. Each bite is more delectable than the next!

According to many websites these filled buns are a famous and popular snack in Taiwan. I'm not sure why they think the bun looks like a tiger but it's definitely got a mouthful of pig. While pork is the most traditional filling, nowadays you can find versions with fried chicken, fried fish or even beef. 

I chose to make traditional pork buns in celebration of the fact that one of my favorite Asian grocery stores - Hong Kong Food Market – has reopened the section that sells char siu pork and roasted duck. It’s been shut since COVID took hold in Houston early last year and we really missed it. Whenever I’m there I buy char siu pork, wrap it really good and freeze it for use in stir-fried noodles. So good!

Tiger Biting Pig Buns

This recipe was adapted from one on HiLove. If you are not fortunate enough to be able to buy char siu pork already made, there are many recipes online that are quite simple. I can also recommend a real shortcut that works beautifully: Use the Noh brand marinade mix. We love it and it’s sold at many supermarkets. Hopefully one near you. It's been one of my usual suitcase items wherever we've lived in the world for many years.

Ingredients
For the 4 steamed buns:
1 1/4 teaspoons active dry yeast
1 1/2 teaspoons sugar
1/2 cup or 120ml warm water
2/3 cup or 80g plain flour
2/3 cup or 80g bread flour

For the filling:
1/2 lb or 225g char siu pork (Chinese barbecue pork)
1/4 cup or 35g roasted peanuts
1 teaspoon sugar
Small bunch cilantro

Method
In a large bowl, combine the yeast and sugar with water until dissolved. Set aside for a few minutes to activate the yeast. 

When it starts to bubble and froth, add the flours and knead into a smooth dough. 


It’s quite a sticky dough but try not to add much more flour as you knead because you do want the buns to be soft and fluffy. Cover the dough with a clean damp cloth or plastic wrap. 


Set aside for 30-40 minutes to allow the dough to rise. Cover a pan with baking parchment and set aside, ready for the dough when it’s rolled out.

When the dough rises, cut it into four equal portions (about 70g each) and roll them each into a ball. 


On a lightly floured work surface, use a rolling pin to flatten each ball into an oval shape, about 4x7 in or 10x18cm.

Use the rolling pin to press the middle a little thinner then brush some oil on the flat dough. 


Transfer the dough ovals to the prepared tray. Continue until all the buns are shaped and ready to steam.


Cover with cling film and leave to rest for another 10 minutes.

Meanwhile, prepare your steamer by adding water and bringing it to the boil. This is also an excellent time to crush your roasted peanuts and add the sugar. Stir to combine.


Use a sharp knife to cut the pork into thin slices.


Cut around the baking parchment with scissors to remove one bun at a time. 


 Place it in the steamer. 


Cook for 10 minutes or until the bun bounces back when you press on it lightly. 


Two caveats: 
1. Do not open the lid to check on the bun before 10 minutes or it will deflate and never puff back up. I made that mistake on the first bun and I am forever sad about it. 
2. Be careful not to drip water on the bun while removing the steamer lid. It’s not a huge deal but it will cause your bun to fall a bit where the water lands. Witness this photo. That little crater was from a drip of water. The bun was still fluffy so it's all good, but do try. 


Add more water to your steamer pot if necessary and continue until all four buns are steamed. When you remove them from the steamer, lay them on a towel to absorb any moisture.


 Fold them over gently so they are ready to fill. 


To assemble the tiger biting pig buns, put several slices of pork in each. Top with a small handful of chopped cilantro along with a couple of teaspoons of the peanuts and sugar.

Food Lust People Love: Tiger Biting Pig Buns are soft, steamed bread filled with slices of rich char siu pork, fresh cilantro and roasted peanuts with a little sugar. Each bite is more delectable than the next!

Enjoy!

It’s the second Tuesday of the month which means that it’s time for my Bread Bakers group to share recipes. Our theme today is Chinese bread! Many thanks to our host Wendy of A Day in the Life on the Farm

BreadBakers
#BreadBakers is a group of bread loving bakers who get together once a month to bake bread with a common ingredient or theme. Follow our Pinterest board right here. Links are also updated each month on this home page. We take turns hosting each month and choosing the theme/ingredient.

Pin these Tiger Biting Pig Buns!

Food Lust People Love: Tiger Biting Pig Buns are soft, steamed bread filled with slices of rich char siu pork, fresh cilantro and roasted peanuts with a little sugar. Each bite is more delectable than the next!

 .

Monday, September 13, 2021

Turkey Zucchini Feta Meatballs

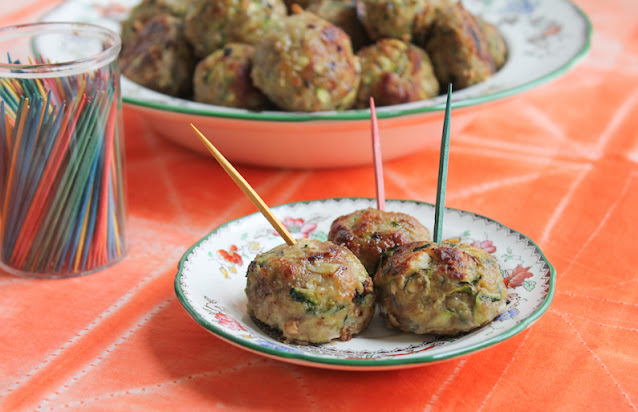
These Turkey Zucchini Feta Meatballs are delicious just as they are, baked till golden, as an appetizer or add them to a sauce to serve with pasta. It's kind of magical how the zucchini seems to disappear as they bake so objectors likely won't even notice it. 

Food Lust People Love: These Turkey Zucchini Feta Meatballs are delicious just as they are, baked till golden, as an appetizer or add them to a sauce to serve with pasta. It's kind of magical how the zucchini seems to disappear as they bake so objectors likely won't even notice it.

I know that summer is the time when zucchini is meant to grow in abundance and people complain when neighbors leave baskets of it on their porches. Or supposedly that happens. It has never actually happened to me! 

But I got a bit of a giggle out of the sign at my nearby Sprouts Farmers Market that declared the produce I know as zucchini was Italian squash. Is this like rebranding prunes to dried plums? I have to admit, Italian squash sounds just a bit nicer and certainly more sophisticated than zucchini. (Or we could go all British and call them courgettes.) 

The results of multiple web searches seem to agree they are the same vegetable. Let’s take a poll in the comments. Do you call them zucchini or Italian squash? Or courgettes?

Turkey Zucchini Feta Meatballs 

This recipe is adapted from one in the New York Times Cooking section.  If you don’t have ground turkey, substitute chicken or pork. 

Ingredients
2 medium Italian squash or zucchini (approx. weight 11 oz or 312g)
1/2 large shallot
1/2 cup or 40g panko bread crumbs
1 1/2 teaspoons ground cumin
1/2 teaspoon red pepper flakes
1/2 teaspoon fine sea salt
2 oz or 57g feta, crumbled
1 lb or 450g ground turkey
1 large egg
Olive oil

Method
Preheat your oven to 425°F or 218°C and line a baking pan with baking parchment or a silicone liner. 

Cut the stem ends off of the zucchini and discard. Line a plate or cutting board with two paper towels and grate the zucchini onto the paper towels with the large holes of your grater. 


Push the zucchini around till it covers the paper towels completely to allow as much moisture as possible to be absorbed. Roll the zucchini up in the paper towels and set aside. 


Add the panko, cumin, red-pepper flakes, salt and feta to a large mixing bowl. Peel then grate the shallot and add it in as well.


Gently use the tines of a fork to toss until combined. Tip in the grated zucchini and mix again. 


Add the turkey and stir gently until combined. 


Pop the egg in the middle and break it up with the tines of your fork. Now mix it in with the fork until thoroughly combined. 


Use a spoon or small cookie dough scoop to divide the mixture into about 32 pieces, around 2 tablespoons each. Use wet hands to form them into round meatballs and place them on the prepared baking sheet. I use a two-tablespoon scoop which makes short work of this part of the job.

Rolled smooth at the top and right, merely scooped for the rest of them

Drizzle the meatballs with olive oil and bake for 20-25 minutes or until the meatballs are cooked through. 


For more browned meatballs, broil (grill) for a few minutes at the end, if desired. It's not necessary for cookedness (I wasn't sure that was a word but spellcheck is on board!) but they do look nicer, especially as we are using turkey, a lighter colored meat. 

Food Lust People Love: These Turkey Zucchini Feta Meatballs are delicious just as they are, baked till golden, as an appetizer or add them to a sauce to serve with pasta. It's kind of magical how the zucchini seems to disappear as they bake so objectors likely won't even notice it.

Enjoy! 

Food Lust People Love: These Turkey Zucchini Feta Meatballs are delicious just as they are, baked till golden, as an appetizer or add them to a sauce to serve with pasta. It's kind of magical how the zucchini seems to disappear as they bake so objectors likely won't even notice it.

It’s time for my Baking Bloggers to share recipes again! This month’s theme is ground meats aka mince to the Brits among us. Many thanks to our host and organizer, Sue of Palatable Pastime. Check out all the recipe links below. 


Baking Bloggers is a friendly group of food bloggers who vote on a shared theme and then post recipes to fit that theme one the second Monday of each month. If you are a food blogger interested in joining in, inquire at our Baking Bloggers Facebook group. We'd be honored if you would join us in our baking adventures.

Pin these Turkey Zucchini Feta Meatballs!

Food Lust People Love: These Turkey Zucchini Feta Meatballs are delicious just as they are, baked till golden, as an appetizer or add them to a sauce to serve with pasta. It's kind of magical how the zucchini seems to disappear as they bake so objectors likely won't even notice it.

.

Sunday, September 12, 2021

Homemade Ginger Ale

Homemade ginger ale is a refreshing treat in hot weather, cooling you down even as it sort of warms you up inside. Make some and pour yourself a glass! 

Food Lust People Love: Homemade ginger ale is a refreshing treat in hot weather, cooling you down even as it sort of warms you up inside. Make some and pour yourself a glass!

I am a pure chili pepper eater from way back. When I was eight years old, my party trick was to eat whole pickled jalapeños, much to the amazement of friends and classmates. Raw ginger, on the other hand, I just can’t do. It burns! My mother-in-law is the opposite. Ginger - yes, chili pepper - no!

When she was living in Singapore and I would visit, we frequented an outdoor eatery that specialized in Chinese cooking. There was one dish - stir-fried vegetables with bits of chicken - that I had to eat with caution. 

Sometimes that slice of vegetable was an innocent bamboo shoot, sometimes it was a take-my-head-off piece of fresh, crunchy ginger. When I’d get one between my teeth by accident, my nose felt like it did when I was a kid and got chlorinated pool water all up it. Not nice. Horseradish and hot English mustard in more than small quantities have the same effect on me. 

I’d watch agog, as my mother-in-law ate not just the slices of ginger on her plate but the ones I pushed aside on mine! 

Ah, but cooked ginger. That is a whole ‘nother animal. Along with garlic and onions, it is the base of my favorite Burmese curry paste. Spicy sweet tomato chutney would not be the same without it. Not to mention ginger ale and gingerbread and ginger lemon snaps. Cooked ginger is one of my favorite things!

Homemade Ginger Ale

If you are a scale user (and I hope you are!) you will find it helpful to know that the weight of the ginger before peeling is 7 3⁄4 oz or 300g. This recipe makes about 1 1/4 cups or 300ml syrup. 


Ingredients
For the ginger syrup:
1 1/2 cups or 220g ginger, chopped and peeled 
2 cups or 480ml water
3/4 cup or 150g sugar
Pinch salt

To make one serving of ginger ale:
2-3 tablespoons ginger syrup
3/4 cup or 165ml chilled seltzer or club soda (half a can)
1 1/2 teaspoons fresh lime juice
Ice

To garnish:
Lime slices (optional)

Method
To make the syrup: Bring water with ginger to a gentle boil then lower the temperature to simmer and continue cooking, covered for 45 minutes. 

When your timer rings (you did set a timer, right?) remove the pot from the stove and leave the ginger in to steep for another 20 minutes. 

Strain the ginger out through a sieve and squeeze the ginger to get as much juice as possible out. Discard the ginger. 

Pour the strained ginger water back into the pot along with the sugar and pinch of salt. Cook over a medium heat until the sugar dissolves and the liquid has reduced to about 1 1/4 cups or 300ml. 

Pour the hot syrup into a heatproof vessel and chill before using. Keeps for up to one week in the refrigerator or freeze in an ice cube tray for longer storage. 

To assemble the ginger ale, put two or three ice cubes in a glass. Add in the lime juice and a slice of lime, if desired. Pour in the ginger syrup then top up with seltzer or club soda. 

Food Lust People Love: Homemade ginger ale is a refreshing treat in hot weather, cooling you down even as it sort of warms you up inside. Make some and pour yourself a glass!

Stir gently to mix the juice and syrup in. 

Food Lust People Love: Homemade ginger ale is a refreshing treat in hot weather, cooling you down even as it sort of warms you up inside. Make some and pour yourself a glass!

Enjoy!

If you are a fan of ginger, this is the perfect Sunday FunDay for you! Check out all the great recipes we are sharing today with ginger. Many thanks to our host, Kalyani of Sizzling Tastebuds.

We are a group of food bloggers who believe that Sunday should be a family fun day, so every Sunday we share recipes that will help you to enjoy your day. If you're a blogger interested in joining us, just visit our Facebook group and request to join.

Pin this Homemade Ginger Ale!

Food Lust People Love: Homemade ginger ale is a refreshing treat in hot weather, cooling you down even as it sort of warms you up inside. Make some and pour yourself a glass!
.

Sunday, September 5, 2021

Spiced Chickpea Flour Gnocchi with Coconut Spinach Sauce

These spiced chickpea flour gnocchi are deliciously savory bites, tender on the inside and golden on the outside, served on a divine coconut spinach sauce so good you will want to lick the plate not to miss a single drop. 


When I first saw the delicious. magazine recipe from which mine is adapted, I questioned calling these little squares gnocchi because they were unlike any gnocchi I’d ever seen before. Gnocchi dough is rolled into a long sausage then cut in bits and boiled, right? If you are French, you might cook it à la poêle, in a pan browned in butter, but it's still little ovals of potato pasta.

But just a couple of weeks later, I was researching Roman recipes for another blogger event and I came across many for gnocchi that reminded me of my crispy polenta. Case in point, Serious Eats' Gnocchi alla Romana. It is indeed very similar in method to this chickpea flour version, aside from the shape. 

So I guess the potato gnocchi I’ve been making all these years is Italian, not Roman, but my crispy polenta is! Who knew?

Anyhoo, name aside, you are going to want to make these guys. We absolutely loved them and the spiced coconut spinach sauce as well. I'm not kidding when I say you'll want to lick the plate. It looks like a lot of ingredients and many steps but they are all super easy. Give this a try! You will not regret it. 

Spiced Chickpea Flour Gnocchi with Spinach Coconut Sauce

Here in the States, bags of spinach generally come measured in ounces and/or pounds. If you live elsewhere and can get a one kilo bag, go ahead and use the whole thing. This recipe is adapted from one in delicious. magazine, the UK edition, from the talented Chef Vivek Singh of The Cinnamon Club in London.

Ingredients
For the gnocchi:
3 cups or 735g Greek yogurt (sub a non-dairy yogurt to make this vegan friendly)
1 3/4 cups or 210g chickpea (gram) flour plus extra for dusting
1 1/2 cups + 4 teaspoons or 375ml water
1 piece (about 1 in or 2.5cm) fresh ginger
4 small hot red chili peppers
1 teaspoon salt
1/2 teaspoon ground turmeric
1/2 teaspoon asafetida (if you can't find this, skip it. I'm addicted to the aroma of asafetida but I can't say I notice much of a flavor difference when it's added to a recipe)
1/2 teaspoon nigella seeds aka kalongi 
1/2 teaspoon fennel seeds
1/2 teaspoon sugar

Plus canola or other light oil for pan frying

For the coconut spinach sauce:
28 oz or 794g young leaf spinach
3 tablespoons vegetable oil
1/2 teaspoon cumin seeds
1 clove garlic, minced
1 tablespoon gram flour
1 teaspoon minced fresh ginger
4 hot red chili peppers, minced
3/4 cup or 180ml coconut cream (not milk - we want the thick stuff for extra flavor!)
1 teaspoon salt
1/2 teaspoon sugar
1/2 teaspoon garam masala

For the tempering:
3 tablespoons vegetable oil
1/2 teaspoon mustard seeds
2 whole dried red chili peppers, broken into small pieces
2-3 sprigs fresh curry leaves

Method
Line a 9x9 in or x 23x23cm pan with baking parchment. 

Peel the ginger and cut the stems off of the chili peppers. Chop the ginger roughly. Use a small food processor to mince both finely. Alternatively, you can use a pestle and mortar to grind them into a paste. 


Use a little of the water measure to rinse the processor or mortar to make sure you don’t leave any ginger/pepper behind. 

Mix all the gnocchi ingredients together in a pan and whisk to combine.


Cook gently for 12-15 minutes until thickened and shiny, whisking, then stirring as it thickens, all the while.


Transfer to the prepared pan and spread it out evenly to cool. Cover well with cling film and chill for up to 24 hours. 


When you are ready to complete the dish, put a 1/4 cup or 60ml water in your largest pot that has a lid. Bring it to the boil then add the spinach. Pop the lid on. If you don't have a pot this large, put as much as you can in, then add handfuls as the spinach shrinks and makes room until it's all been added.


Cook for 1-2 minutes or until wilted. Tip it into a bowl with ice water. 


Drain in a colander. Put a bowl under the colander when most of the water has drained and push down on the spinach so even more water drains and collects in the bowl. 

Purée the spinach in a food processor, adding a little of the spinach water, if necessary to get it moving. Set aside. (yield: 2 3/4 cups spinach purée)


Heat the oil for the coconut spinach sauce in a medium sized pot over a medium heat. Add the cumin seeds, then the garlic and stir until the garlic is golden. Add the chickpea flour and stir until it gives off a roasted aroma about 1-2 minutes. 


Add the spinach puree to the pan and bring to a slow boil, stirring often. Turn down the heat, add the ginger and chili peppers.


Simmer for 15 minutes. Stir in the coconut milk, add the salt and sugar then sprinkle in the garam masala. Keep warm. 


For the tempering, strip the curry leaves off of the stems then heat the oil in a frying pan over a medium heat. When hot, add the red chili peppers, mustard seeds and curry leaves. 


Once the spices crackle, stir till dry and remove from the heat. 

Cut the cooled gnocchi into 36 squares. Lightly dust the gnocchi with a little more gram flour. I find using a small sieve for this most helpful. 


Drizzle a little oil into a non-stick frying pan over a medium heat then fry the gnocchi in batches, turning them until they are browned on all sides. 


Remove them to a pan in a warm oven, with a wire rack and paper towels to absorb any oil as you finish each batch. Keep warm. 


Divide the coconut spinach sauce between plates then top with the golden gnocchi and sprinkle with the tempered spice mix to serve.


Enjoy!

It’s Sunday FunDay and today we are sharing recipes made with chickpea flour, also known as gram flour or besan. It’s commonly used in many Asian cuisines, predominantly in the subcontinent, for savory dishes and baking. According to Wikipedia, it contains a high proportion of carbohydrates as well as higher fiber and protein relative to other flours. It is naturally gluten free, making it a healthy choice for many. Check out all the recipe links below! Many thanks to our host, Renu of Cook with Renu for hosting today and for this wonderful theme.

We are a group of food bloggers who believe that Sunday should be a family fun day, so every Sunday we share recipes that will help you to enjoy your day. If you're a blogger interested in joining us, just visit our Facebook group and request to join.

Pin these Spiced Chickpea Flour Gnocchi
 with Coconut Spinach Sauce!


 .