Friday, October 15, 2021

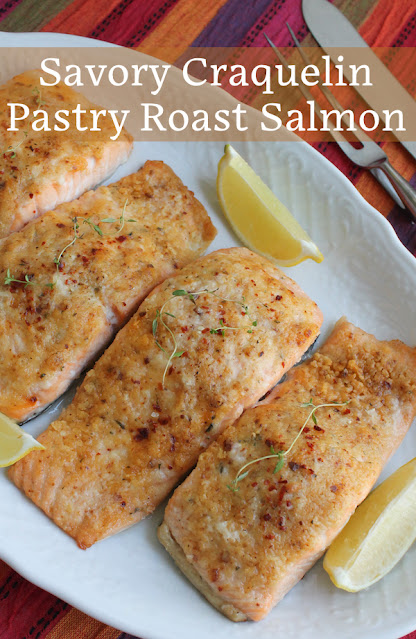
Savory Craquelin Pastry Roast Salmon

The topping on this Savory Craquelin Pastry Roast Salmon is a great way to add flavor and also make sure roast salmon doesn’t dry out in the oven. It's flavored with garlic, thyme, smoked sea salt flakes, aleppo pepper and just a sprinkle of nutmeg. 

Food Lust People Love: The topping on this Savory Craquelin Pastry Roast Salmon is a great way to add flavor and also make sure roast salmon doesn’t dry out in the oven. It's flavored with garlic, thyme, smoked sea salt flakes, aleppo pepper and just a sprinkle of nutmeg.

If you’ve seen my recipe for pineapple buns, you are already familiar with what craquelin pastry is, although to be fair, I never called it that. That thin topping I added to the buns - the one that baked up crunchy and shiny - is a craquelin. Indeed typically craquelin pastry is sweet. And it’s usually baked on a bread or pastry of some kind. 

The word itself is French, naturalment, and translates to “cracker.” I presume the topping was so named because it is crunchy like a cracker when baked, although I must warn you that that does not hold true when you bake it on top of fish.  It gets a little crunchy but certainly not cracker crisp!

Since craquelin pastry is usually sweet I was intrigued when I saw the recipe for savory craquelin in delicious. magazine and couldn’t wait to try it. Was it good? Suffice to say, I'll be making this again! The topping was flavorful and delightful and the salmon below was tasty and cooked to perfection.

Savory Craquelin Pastry Roast Salmon

As mentioned above, this recipe was adapted from one in the UK magazine delicious. March 2021 issue but you can also find it online. You can mix the craquelin by hand but it’s much easier to get it nice and smooth with an electric mixer and I promise you want it nice and smooth. 

Ingredients
4 salmon fillets, about 1.5 lbs or 800g altogether, at room temperature
Juice of 1/2 lemon, plus wedges for serving

For the craquelin pastry topping:
2 slightly rounded tablespoons unsalted butter (about 30g), at room temperature
1/2 teaspoon demerara sugar
1 teaspoon smoked sea salt flakes (I used Maldon.)
Sprinkle freshly grated nutmeg
1/2 teaspoon pul biber (aleppo pepper) or substitute 1/4 teaspoon cayenne pepper, plus extra to serve, if you like
1 fat clove garlic, crushed and minced
2 sprigs fresh thyme, leaves picked off and chopped, plus extra sprigs to serve
3 tablespoons plain flour

Method
Preheat your oven to 425°F or 218°C and prepare your baking pan by lining it with baking parchment.

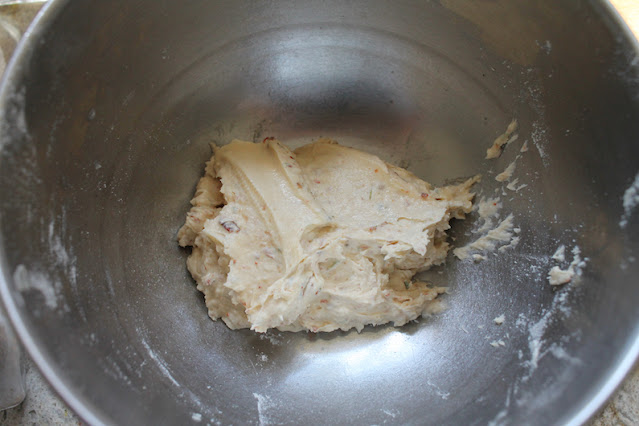
Use electric beaters to make the craquelin pastry topping by creaming the butter and sugar together until light and fluffy. Add in the salt, nutmeg, pul biber, garlic, thyme and flour.


Beat again until it’s thoroughly combined and spreadable.


Put the salmon on the lined baking pan, skin-side down. Dry the tops thoroughly with a paper towel. If the fish is wet, it’s a challenge to get the craquelin to stick and spread. 

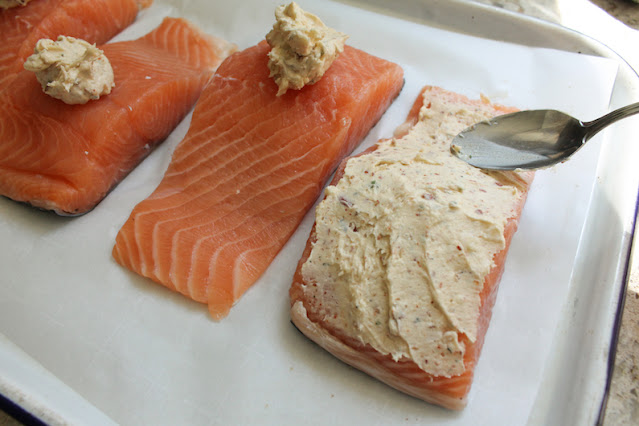
Divide the craquelin dough between the salmon fillets. Spread each over the top of the fish using the back of a spoon. 


Pop the pan in your preheated oven and bake for 15 minutes. Finish it off under the broiler for 1-2 minutes or until the top is golden and the fish is just cooked through.


Sprinkle the fillets with the lemon juice, then add an extra sprig of thyme to each and a pinch more aleppo pepper or cayenne, if desired. 


Enjoy!


It's the second Friday of the month so that means it's time for my Fish Friday Foodie friends to share recipes with you. Our theme today is Salmon Chanted Evening 🤣   but feel free to make these for lunch as well! Many thanks to our host, Sue of Palatable Pastime for the fun theme name and all her behind the scenes work! 


Would you like to join Fish Friday Foodies? We post and share new seafood/fish recipes on the third Friday of the month. To join our group please email Wendy at wendyklik1517 (at) gmail.com. Visit our Facebook page and Pinterest page for more wonderful fish and seafood recipe ideas.

Pin this Savory Craquelin Pastry Roast Salmon!

Food Lust People Love: The topping on this Savory Craquelin Pastry Roast Salmon is a great way to add flavor and also make sure roast salmon doesn’t dry out in the oven. It's flavored with garlic, thyme, smoked sea salt flakes, aleppo pepper and just a sprinkle of nutmeg.

 .

Tuesday, October 12, 2021

Sourdough Tangzhong Bread #BreadBakers

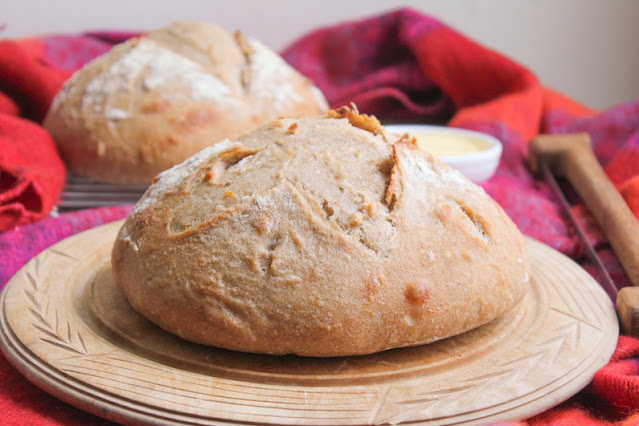
This Sourdough Tangzhong Bread is flavorful with a wonderful texture, perfect for eating on its own or toasted with butter and jam. Start a day or two ahead of when you want to bake for the best flavor.

Food Lust People Love: This Sourdough Tangzhong Bread is flavorful with a wonderful texture, perfect for eating on its own or toasted with butter and jam. Start a day or two ahead of when you want to bake for the best flavor.

Like many of us, I took the lockdown days of this pandemic as an opportunity to create a sourdough starter. I did have one before we left Dubai but I am not a dedicated enough owner to try to transport it in an airplane. The more devoted among you will probably be horrified to hear that I tipped my unnamed starter out, washed the jar and didn’t even feel guilty. 

That said, I’ve been enjoying this one in a variety of recipes. You might want to try my sourdough pancakes or sourdough chocolate Bundt cake. Both delicious. Still haven’t named my starter yet though, just in case it needs to go at some point. Or I kill it. 

As for the tangzhong, I learned all about it when I made my first loaf with the method, a rye bread where it came in very handy to add structure and substance. When the flour you are using is low in gluten, like rye, knowing how to make a tangzhong is a very good thing! Making it in the microwave was such a breeze that I’ll never do it any other way now. 

N.B. An accurate thermometer is essential for this recipe. 

Sourdough Tangzhong Bread

This recipe is adapted from one on Food Geek. The author says his is not a recipe for beginners so I simplified it. While I didn’t get as airy a loaf as he did, we were super pleased with the flavor and texture. 

Ingredients for two round loaves
For the tangzhong:
1/2 cup or 64g bread flour
1 cup + 2 1/2 tablespoons or 275ml water

For the dough:
4 1/4 cups or 540g bread flour
1 1/3 cups or 170g whole-grain wheat flour
2 1/2 teaspoons salt
1 2/3 cups or 380ml water
Tangzhong 
3/4 cup or 170g sourdough starter

Method
Make tangzhong by mixing the flour and water with a whisk in a microwaveable bowl. 


Microwave on high until the mixture is above 149°F or 65°C. It took about 1 minute and 40 seconds in my 1000W microwave. Whisk halfway through then whisk again at the end. Your tangzhong will be thick and glossy. 


Set the tangzhong aside to cool to at least 86°F or 30°C.

To make the dough, add 4 1/4 cups or 531g bread flour, 172g whole-grain wheat flour, and 16g salt to the bowl of your stand mixer. 

Add 1 2/3 cups or 380ml of water to the bowl along with the cooled tangzhong.


Incorporate all the water into the flour mixture using your paddle beater or bread hook. Just keep mixing until there's no dry flour left. Cover the bowl with a little cling film or a damp towel and set it aside for 30 minutes. 


Add 170g of the sourdough starter on top of the dough and use the bread hook to incorporate it. 


Cover the bowl again with cling film or a damp towel and let it rest again for another 30 minutes. 

Rather than traditional kneading, the gluten strands are formed and stretched in this dough by performing three sets of coil folds spaced out by 30 minutes. I’m going to save us all a long explanation by including this YouTube video that shows you exactly what to do. Here's the link in case the video isn't working. https://youtu.be/6JQm2n4aVZc


You want to do this once, wait 30 minutes, do it again, wait 30 minutes, then do the final coil fold for a total of three times in all.

Cover the bowl again with cling film or a damp towel and set it somewhere warm for about an hour or until it has doubled in size. 


Put the bowl in a refrigerator for 24-48 hours. 

On the day you are ready to bake, remove the dough from the refrigerator and divide and shape the dough by cutting it in half with a bench scraper.


Shape each half into a ball. Stretch each side out and fold it up and over the ball until you’ve done that from all four sides. Pinch the ends together. 


Use the scraper to flip the ball over onto a square of baking parchment. Sprinkle on flour liberally and use the scraper to tuck the edges of the dough into a snug circle. Repeat for the other dough ball.


Transfer the dough balls on the baking parchment to your baking pan. 

Sprinkle the dough balls with extra flour and put the whole pan inside a plastic bag. To make sure it doesn’t stick to the dough balls, I like to blow it full of air and secure the opening with a clip. Set aside in a warm place to rise for about 1 hour.


About half way through the rising time, put an empty baking pan or iron skillet on the bottom rack and preheat your oven to 450°F or 232°C.

Carefully remove the baking pan from the plastic bag. Put the kettle on now because you are going to need one cup or 240ml boiling water when you put the loaves in the oven. 

Use a sharp knife or lame to score the dough. This will allow the loaves to rise and expand as they bake. 


When your oven is sufficiently preheated, put the bread pan on the middle rack of your oven and carefully pour about 1 cup or 240ml boiling water into the empty pan or skillet on the bottom rack. Quickly close the oven door. 

Bake the loaves for about 35-40 minutes or until they are golden and sound hollow when thumped.


Take the bread out and put it on a wire rack. Let the loaves cool completely before slicing. 

Food Lust People Love: This Sourdough Tangzhong Bread is flavorful with a wonderful texture, perfect for eating on its own or toasted with butter and jam. Start a day or two ahead of when you want to bake for the best flavor.

Enjoy!

This month my Bread Bakers are all sharing bread recipes using a tangzhong. Check out the links below! Many thanks to our host, Karen of Karen’s Kitchen Stories!

BreadBakers
#BreadBakers is a group of bread loving bakers who get together once a month to bake bread with a common ingredient or theme. Follow our Pinterest board right here. Links are also updated each month on this home page. We take turns hosting each month and choosing the theme/ingredient.

Pin this Sourdough Tangzhong Bread!

Food Lust People Love: This Sourdough Tangzhong Bread is flavorful with a wonderful texture, perfect for eating on its own or toasted with butter and jam. Start a day or two ahead of when you want to bake for the best flavor.

 .


Sunday, October 10, 2021

Golden Briami Tart

This golden briami tart features eggplant, onion, tomatoes, bell pepper and, of course, garlic, pan-fried till golden then baked in puff pastry crust.

Food Lust People Love: This golden briami tart features eggplant, onion, tomatoes, bell pepper and, of course, garlic, pan-fried till golden then baked in puff pastry crust.

Some of the best advice about growing older and still keeping an active mind is the recommendation to learn something new each day. A few days ago, the new word and dish briami was mine. I came across it while searching for Greek recipes. 

Many recipe sites called briami Greek ratatouille so I knew we would love it. Ratatouille is one of our favorite dishes, although I don’t roast my vegetables, preferring to brown them in a hot pan rather than turn the oven on. It takes a little longer but the result is so worth it!

Since I was being untraditional with my cooking method, I decided to go one step farther and bake the briami in puff pastry. It turned out so pretty and delicious as well. 

Golden Briami Tart 

Traditional briami also has potatoes but I didn’t have any on hand. If you want to include a few new potatoes or cubed potato in the vegetable line-up, those would be a lovely addition. 
 
Ingredients
1 sheet puff pastry (8.6 oz or 245g)
1 large eggplant
1/2 large onion
18 cherry or grape tomatoes
1/2 green bell pepper
2 cloves garlic
Extra virgin olive oil
Fine sea salt 
Freshly ground black pepper

For garnish, if desired:
Chopped green onion tops

Method
Trim the stem off of your eggplant and cut it into chunks. No need to peel it if the skin is not hard or bitter. 

Heat a non-stick skillet and cook the eggplant in batches in the hot pan, turning the pieces occasionally till they are browned on all sides. 


Drizzle in a little of the olive oil and fry for a few minutes more until the eggplant is a deeper brown and the oil has all been absorbed. Tip each batch of cooked eggplant into a large bowl when it’s done and season with a sprinkle of salt and a few grinds from a black peppermill.  


Cut the onion into thick slices, making sure to have a little of the core in each slice to hold the layers together. Remove the seeds from the bell pepper and cut it into slices as well. 

In the same hot skillet you used for the eggplant, brown first the onions and then the bell pepper, adding a drizzle of olive oil to each when done. Put the onion and bell pepper on a plate to cool. 


Finally, add the small tomatoes to the pan and cook them for a few minutes, until they are a little scorched all round. Tip them into the bowl with the seasoned eggplant, add the garlic and stir gently. Leave all the vegetables to cool. 


Cut a large enough piece of baking parchment to line a large baking pan. 

When the vegetables are cool, unroll the puff pastry sheet onto the baking parchment and gently use a rolling pin to stretch the pastry till it’s about 10 x 14 inches or 26 x 36cm. Move the baking parchment to your baking pan. 

Fold the edges of the pastry in once and try to get the sides to stand up by pinching the corners together. 

Use the tines of a fork to dock the base of the pastry. Spoon the eggplant and tomatoes onto the puff pastry.


Distribute the onions and bell pepper around decoratively. 


Pop the whole pan into the refrigerator to chill while you preheat your oven to 400°F or 200°C (convection) or 425°F or 218°C (normal oven.) 

Bake the tart in your preheated oven for about 20-25 minutes or until the puff pastry is risen and golden. - Remove from the oven and leave to cool for a few minutes before cutting to serve. Sprinkle on some chopped green onions for garnish, if desired. 


This makes a lovely lunch or dinner for six, if you add on a side salad.

Enjoy! 

Food Lust People Love: This golden briami tart features eggplant, onion, tomatoes, bell pepper and, of course, garlic, pan-fried till golden then baked in puff pastry crust.

It’s Sunday - hurrah! -so that means my Sunday FunDay group is sharing recipes again. This week the theme is Greek food! Check out the list below. Many thanks to our host, Amy of Amy’s Cooking Adventures


We are a group of food bloggers who believe that Sunday should be a family fun day, so every Sunday we share recipes that will help you to enjoy your day. If you're a blogger interested in joining us, just visit our Facebook group and request to join.

Pin this Golden Briami Tart!

Food Lust People Love: This golden briami tart features eggplant, onion, tomatoes, bell pepper and, of course, garlic, pan-fried till golden then baked in puff pastry crust.
 .

Wednesday, October 6, 2021

Meatball, Spinach and Tortellini al Brodo

This bowl of warm comfort is called Meatball, Spinach and Tortellini al Brodo and each spoonful is a light yet cozy delight on a chilly night.

Food Lust People Love: This bowl of warm comfort is called Meatball, Spinach and Tortellini al Brodo and each spoonful is a light yet cozy delight on a chilly night.

It’s not cold here in Texas yet but I am anticipating those days with soup! The traditional Italian dish of tortellini al brodo – that is to say, cooked in broth – doesn’t have meatballs or spinach but I couldn’t resist the urge take it up a notch by adding both. 

Meatball, Spinach and Tortellini al Brodo

If you don’t have ground turkey, by all means substitute another light ground meat like pork or chicken. You can also skip the meatballs altogether but why would deprive yourself like that?

Ingredients
For the meatballs:
1 lb or 450g ground turkey
1 egg
1 green onion, white and green, minced
3/4 teaspoon fine sea salt
1/2 teaspoon crushed red pepper
freshly ground black pepper
1/4 cup or 20g panko
olive oil

For the tortellini: 
8 cups or 1.9L chicken stock
1 lb 4 oz or 567g fresh tortellini (I used one Buitoni family-size pack.)

To serve: 
Grated Pecorino Romano cheese

Method
Preheat your oven to 350°F or 180°C and line the bottom of a baking pan with foil or silicone liner to make clean up easier.

In a large bowl, mix the ground turkey, egg, green onion, sea salt, red pepper and a few generous grinds of black pepper together until well combined. 


Add in the panko and mix again. 


Use a small poon or melon baller to divide the mixture into little portions. 


Wet your hands so the mixture doesn’t stick to them and rolls the portions into balls. Drizzle the meatballs with a little olive oil. 


I made 64 mini meatballs. You can make yours bigger, of course, but they won’t be as cute. 

Bake them 20 minutes in the preheated oven. Turn your oven to broil for 5 minutes to brown them. 


Add the meatballs to a large pot along with the chicken stock. Bring the stock to a simmer. 


Add tortellini and cook until just before al dente according to package directions.


Tip in the spinach and stir. You may have to add it in batches to get it all to fit. 


Divide the broth, tortellini and meatballs among bowls and top with grated Pecorino Romano. 

Food Lust People Love: This bowl of warm comfort is called Meatball, Spinach and Tortellini al Brodo and each spoonful is a light yet cozy delight on a chilly night.

If you have any leftovers, I suggest you store the broth and the tortellini in separate containers or the tortellini will absorb all of the broth!

Enjoy! 

Today my Foodie Extravaganza friends are all sharing pasta recipes in celebration of National Pasta Month. Check out the links below. Many thanks to our host, Camilla of Culinary Adventures with Camilla.


Foodie Extravaganza is where we celebrate obscure food holidays by cooking and baking together with the same ingredient or theme each month. Posting day is always the first Wednesday of each month. If you are a blogger and would like to join our group and blog along with us, come join our Facebook page Foodie Extravaganza. We would love to have you! If you're a spectator looking for delicious tid-bits check out our Foodie Extravaganza Pinterest Board.


Pin this Meatball, Spinach and Tortellini al Brodo!

Food Lust People Love: This bowl of warm comfort is called Meatball, Spinach and Tortellini al Brodo and each spoonful is a light yet cozy delight on a chilly night.
 .

Creamy Lima Beans with Bacon and Mustard

Posh beans on toast! These Lima Beans with Bacon and Mustard are creamy and soft and utterly more-ish. Plus they take hardly any time at all to make. 

Food Lust People Love: Bacon and Mustard are creamy and soft and utterly more-ish. Plus they take hardly any time at all to make.

Do you write in cookbooks or is writing in books verboten in your house? I must confess that while I wouldn’t write in a novel, I do make notes in my cookbooks, in pencil. How else am I going to remember what I actually did since I have a hard time following a recipe word for word? 

Cookbooks, even my favorite ones by my favorite authors, are jumping off points to improving a dish and making it suit our palates and available ingredients. 

Case in point is the recipe I’m sharing today, adapted from Nigel Slater’s The 30-Minute Cook. The first time I made it, I added the following pencil scrawl to the bottom:

“Very good over crusty bread. Next time: add more wine & cream. Serve over rice.” 

And the next time, I did just that! And it was so good! The orange on top is my homemade habanero sauce and extra Parmesan was also a good decision. If you don’t have this cookbook, I can highly recommend looking for a secondhand copy online

Food Lust People Love: Bacon and Mustard are creamy and soft and utterly more-ish. Plus they take hardly any time at all to make.

Creamy Lima Beans with Bacon and Mustard

This recipe serves two but is easily scaled up for more. It’s perfect for a weeknight or a light lunch, on its own or with a small salad on the side. 

Ingredients
1 can (14 oz or 400g) lima beans
4 slices smoked bacon
1 tablespoon canola or other light oil
1 shallot or small onion
1/2 cup or 120ml dry white wine
1/4 cup or 60m heavy cream
1 tablespoon wholegrain mustard
1 tablespoon Dijon mustard
2 1/2 oz or 70g extra sharp cheddar, grated

To serve: 2 slices crusty bread, toasted (and buttered, if desired)

Method
Pour out the liquid from the can of lima beans and rinse them with cool water. Set them aside in the sieve to drain. 

Cut the bacon into small strips and finely dice the onion. 


In a large frying pan, cook the bacon in the oil until the bits are crispy. Add the onion and cook, stirring often, until it softens and turns translucent. 


Spoon out any excess fat and add the beans to the pan, along with the white wine. 


Bring the liquid to a boil and then turn the heat down to simmer. Simmer until the liquid has reduced by half. 

Add in the cream and the mustards. Give it a good stir and turn the heat back up to get it just boiling again.


Then simmer for a couple of minutes. Stir in the grated cheese and simmer till it melts into the sauce. 


To serve, spoon over toasted crusty bread, buttered, if desired. 

Food Lust People Love: Bacon and Mustard are creamy and soft and utterly more-ish. Plus they take hardly any time at all to make.

Enjoy!

Today I’m joining my Festive Foodie friends to celebrate National Cookbook Month by sharing recipes from our favorites. Check out the links below. Many thanks to our host, Jolene of Jolene’s Recipe Journal.

Pin these Lima Beans with Bacon and Mustard!

Food Lust People Love: Bacon and Mustard are creamy and soft and utterly more-ish. Plus they take hardly any time at all to make.
 .