Thursday, June 21, 2012

Sunny Scottish Strawberry Cake


When strawberries have been in the refrigerator a while and are "past their best," I always make this strawberry cake with ground almonds. It's beautiful with a glaze or just a sprinkling of powdered sugar. 

Every summer that I am able, since the year 2000, I have visited my friend, Jacky, in Aberdeen, Scotland.  I’ve missed the occasional year and, sadly, this is my second year in a row to miss this time.  Which makes me very sad.  Despite its usually gloomy weather, even in Summer, Aberdeen is one of my favorite places because Jacky is one of those upbeat people who radiate sunshine.   We met in 1996 when we were both living in the little oilfield town Macaé, Brazil and she confessed years later that I scared her initially and she thought to herself that she could never be friends with me.  I can be a bit overwhelming at first, it’s true, but I guess I didn’t turn out to be so frightening after all.  We’ve been fast friends ever since.

Way back in the Summer of 2005, I was sitting around in Jacky’s lovely warm kitchen, reading the daily newspaper, the Aberdeen Press and Journal, or the P&J as we (almost locals) like to call it, and found this recipe.  Scottish strawberries are some of the best in the world (my other Scottish friend, Gillian, says they are THE VERY BEST and I have learned not to argue with Gillian, who can also be a little scary at first.) during their short season so we had been buying them and eating them in a frankly prodigious manner.  This recipe for strawberry cake was supposedly the answer to what to do if you have some strawberries that haven’t been eaten but were getting “past their best.”   Of course, we had to go out and buy some more to bake this cake! 

Since then, I have made it with various berries in different stages of ripeness (read: over ripeness) always with great success.  The buttery crumb of the cake, heightened by the natural richness of the almond meal is superbly and perfectly complemented by a cup of tea or coffee or a glass of cold milk.  And, if you are using berries that are slightly past their best, you can feel virtuous for not wasting them. Win-win. 

Ingredients
3 tablespoons plain flour (for coating baking pan)
6.35 oz or 180g ground almonds
3/4 cup or 180g soft unsalted butter
3/4 cup or 180g caster sugar
1 1/2 cups or 180g self-raising flour (or the same amount of plain flour plus a scant 2 teaspoons of baking powder and a good pinch of salt)
2 medium eggs
2 tablespoons milk
14 oz or 400g strawberries, plus a few for decoration, if you like.
(Raspberries, blueberries, blackberries or a combination can be substituted for the strawberries.)
To serve: Icing or powdered sugar

Method
Preheat your oven to 350°F or 180°C.  Spray your baking pan of choice with non-stick spray or butter it well.  Tip in the plain flour and turn the pan all around, shaking carefully to make sure that it is well-coated with flour.  This is not as important in a regular, flat baking pan where just buttering would probably work as well, but in a Bundt pan, this is essential to get the cake to come out nicely, without leaving bits stuck to the pan.


Hull your strawberries with a sharp knife by cutting into the berry just under the green hull.  Press your thumb on the knife and the hull and pull the hull out of the strawberry.  This leaves more strawberry behind to eat that cutting the whole top off would do.  


Rinse the strawberries well and let them drain. Cut the berries into smaller pieces.   Set aside.


Place all the ingredients except the strawberries in a mixer and mix to combine.


Carefully stir the cut strawberries through the batter. 


Spoon the batter into the pan, leveling off the top.  


Place the tin in the middle of the oven for an hour, checking after 40 minutes and covering with tin foil if it is getting too brown.


Remove from the oven, cool slightly then loosen the edges with a knife and turn out onto a serving plate.  

Serve warm or cold, decorated with extra strawberries, if desired, or sprinkled with confectioner’s sugar.


Enjoy!


Monday, June 18, 2012

Sheila’s Mexican Cornbread Muffins #MuffinMonday

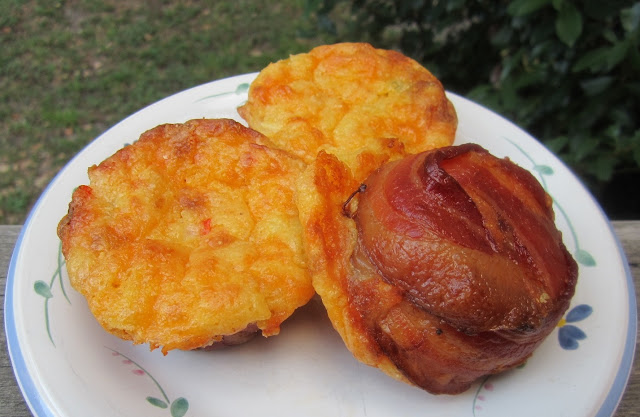
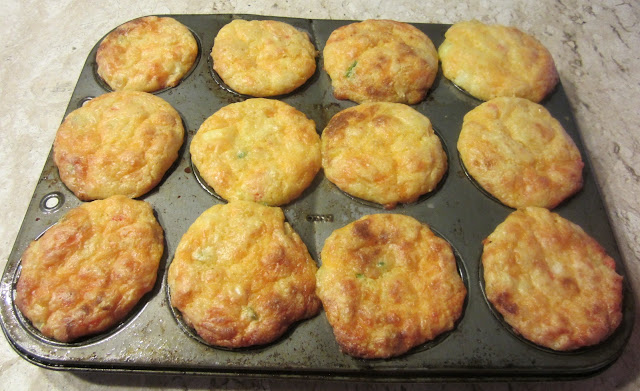
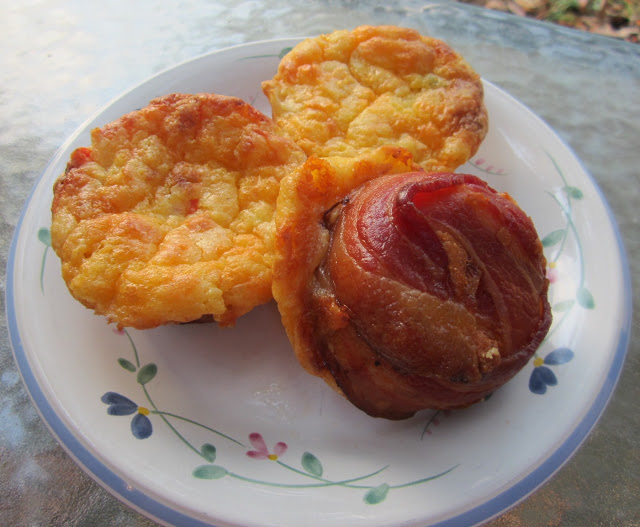
Sheila's Mexican Cornbread Muffins are baked up with cheesy cornbread batter flecked with red and green jalapeños, baked in muffin cups made of bacon. Yes, bacon!

Food Lust People Love: Sheila's Mexican Cornbread Muffins are baked up with cheesy cornbread batter flecked with red and green jalapeños, baked in muffin cups made of bacon.  Yes, bacon!

I have always been free and easy about sharing recipes.  Perhaps it was my upbringing but good food is meant to be shared, right?  By the same token, I am not shy about asking you to share yours.  I met someone years ago (in a ladies' Bible study group no less!) who refused to share recipes.  I can’t even remember what she had made that I expressed an interest in knowing how to make, but she flat out said, “I don’t share my recipes.”  I was sure she was kidding and tried to make a joke.  She was dead serious.  I was flabbergasted.  Seriously?  I had never met anyone who refused to share before (or since.)

Fortunately, my friend Sheila was also raised in the Southern Louisiana tradition and, when I asked her to share the recipe for her succulent, cheesy spicy cornbread, she sent me an email right away.  She is the best kind of friend because she never hesitates to share other information as well.  She was the one who first took me around Cairo and showed me the important things like where to get Fritos and Karo, where the Community Services Association is and she gave me the name of a good vet who makes house calls.  Look in the dictionary under Helpful, Knowledgeable Expat and you will see a photo of Sheila.  Because she is among the very best of our ilk. 

Ingredients
1 cup or 6 oz or 170g yellow cornmeal
1/2 teaspoon baking soda
1 teaspoon salt
1 cup or 226g sour cream
1 1/4 cups or 12 oz or 275g creamed corn
2 eggs
1/2 cup canola oil
1 medium onion
2-4 jalapeño peppers or chili peppers (Sheila said: I like red and green.  I agree!)
12 oz or 340g extra sharp cheddar

Method
Preheat your oven to 350°F or 180°C.   Grease a 9in X 13in or 33cm X 23cm cake pan or line a 12-cup muffin tin with awesomely delicious bacon cups.  Or muffin liners.  But I promise bacon cups are worth the trouble.  They are not only pretty but add such flavor to the cornbread.  Your mouth will be doing a happy dance with the cornbread alone.  The bacon cups add a pirouette to every bite.

Chop your onion pretty finely.  My father-in-law won’t eat onions if he can see them so I was careful with this step. 


Dice your chosen peppers and add as much as you like, depending on their hotness and your potential eaters.  Peppers vary greatly in heat and so it’s worthwhile to give yours a taste to judge how spicy they are before you add them.  If greater heat is desired, also leave in the membranes and seeds.


Mix all of the ingredients.


Pour or spoon the batter into your prepared pan.  As you can see, I chose the bacon cups!


For the cake pan, bake for about 45-55 minutes - or 25-30 minutes for muffins - or until golden brown.  If you are using bacon cups, coax them out gently with a spoon while still warm.  In any case, allow them both to cool before cutting.

Food Lust People Love: Sheila's Mexican Cornbread Muffins are baked up with cheesy cornbread batter flecked with red and green jalapeños, baked in muffin cups made of bacon.  Yes, bacon!

Food Lust People Love: Sheila's Mexican Cornbread Muffins are baked up with cheesy cornbread batter flecked with red and green jalapeños, baked in muffin cups made of bacon.  Yes, bacon!

Enjoy!

Food Lust People Love: Sheila's Mexican Cornbread Muffins are baked up with cheesy cornbread batter flecked with red and green jalapeños, baked in muffin cups made of bacon.  Yes, bacon!
Divine cheesy spicy deliciousness.  And also bacon.  

Sunday, June 17, 2012

Crispy Cups of Bacon Joy


All my friends and family know that my favorite food item has to be bacon, hands down.  Since we live in Egypt most of the year round (at least since last January) bacon is not readily available and I find that just makes my longing stronger.  Since I am in Houston for a few weeks this summer, I am delighting in the availability of pork, alcohol and also, THAT I CAN DRIVE.   I am enjoying Cairo, don’t get me wrong, and I have a lovely gentleman that drives me around and knows everything there is to know about getting places in an expeditious manner and even where to shop for most things.   But I am reveling in the ability to wield my own car keys and steer my own vehicle where I want to go at any time of the day or night.  Captain of my own ship.  FREEDOM! 

Here’s a little item that I hesitate to call a recipe since it has but one ingredient, you guessed it, bacon.  So let’s just call it instructions for crispy cups of bacon joy that you can fill as you see fit.

Ingredients
BACON (Please keep up.)  
For 12 crispy cups of bacon joy you will need 18 slices of normal (not thick cut) streaky bacon.

Method
Preheat your oven to 400°F or 200°C.  

Put your muffin tin upside down in a bigger pan.  This will catch the bacon grease and prevent an oven fire while the bacon cups bake.  


Cut six of your bacon slices in half.  Fold the half slices in half again in a V, draping them over the top of each upside down muffin cup, trying as hard as you can to get total coverage, while still leaving a little bit of the bacon hanging over the edge.


Cover the rest of the muffin tin with a full slice of bacon, starting near the base of the muffin cup and working your way up till the final circle covers the overhanging bacon from the top.


Press the top down to make a nice neat upside down cup.


Bake in your preheated oven until the cups are crispy.  This should take about 20-25 minutes but could take longer, depending on your oven.  Just keep an eye on them. 


Remove from the oven and prop the bottom cooking pan up on one side with a towel or oven mitt to allow the grease to run off into the bottom pan.  (I save this bacon grease for future cooking adventures like Yorkshire puddings or even green beans.)

See the blue towel on the right?  It's under the bottom pan on one side. 
When the muffin tin is cool enough to handle, gentle wiggle the bacon cups free using a teaspoon to push up all around the sides.


Some of them will have holes in the bottom but this does not prevent them from being filled with much deliciousness.   (Or you could just eat some of them as is, which doesn’t make sense because of the time involved, but that didn’t stop me from doing it.  If you are not judging, I want to be your friend. ) 


Two suggestions:  Baked eggs (Sprinkle with salt and pepper and bake in a 350°F or 180°C oven for about 10-12 minutes or until white is just set.  Serve with buttered toast to dip.) 

I just made two of these.  They were the PERFECT dinner. 


Or my friend Sheila’s Cheesy Mexican Cornbread.  But, oh, my goodness!  Cheesy, spicy and succulent beyond belief baked in a crispy cup of bacon joy. )

Cheesy Mexican cornbread batter, going in!


\
I think quiche filling would be divine in these too! 

Enjoy!

Hey, see that little green Facebook symbol up in the right hand column?  If you click on it and then hit LIKE when Facebook opens, you will never miss a post because they are automatically updated to my Facebook page.  I mean, just if you want to.  Thanks!