Thursday, September 12, 2013

Porcupine Balls


I open the deep freezer with a big sucking whoosh.  I peer into its disorganized shelves and start rooting around for something that looks like it might want to be dinner.  Ah, ground beef.  We haven’t had Salisbury steaks in a while.  “Come with me, my minced friend,” I say.  Now for a starch and a veg.  The veg is easy because I have salad fixings.  But starch-wise, we just had potatoes last night and pasta the night before, so that leaves couscous – a possibility but, nah – or rice.  But rice would require gravy.  And if you are making Salisbury steak with gravy, you gotta have mushrooms in it.  Hey, I don’t make these rules up.  They just are.  And I have no mushrooms.  So.  So.  Let’s think.  And then suddenly, it pops into my head.  A meal I haven’t made or eaten or even thought of for a very long time.  Where it came from, I do not know.  Porcupine balls!   They are relatively quick and certainly easy.  They are a great weeknight meal and I almost always have all the ingredients on hand.  And kids love them.  More’s the pity, I have no kids left at home.  But never mind.  You might.  Porcupine balls, it is!

Disclaimer:  No actual porcupines were harmed in the making of this dish.  

Photo credit: Michael Richert 

Yay for all you organized types who plan ahead, but this is often how the dinner menu gets decided at our house.  Raise your hand if you do the same.  Ha!  I knew I liked you!

Ingredients
For the porcupine balls:
About 1 lb or 500g ground beef
1/2 small purple onion – about 1 1/4 oz or 35g
1 egg
1 beef stock cube
A few good grinds of fresh black pepper
1 cup or 180g white Basmati or other long grained rice

For the cooking sauce:
1 14 oz or 400g can chopped tomatoes in juice
2 generous tablespoons or 60g tomato paste
2 tablespoons Worcestershire sauce
1 teaspoon sugar
1/2 -1 teaspoon crushed red pepper (depending on your taste)
1 large clove garlic

For optional garnish:  chopped parsley or cilantro

Method
Using a hand blender, purée the onion and beef cube with the egg.  Add in the black pepper.


Pour the puréed mixture into the ground beef and mix well.  Then tip in the rice and mix thoroughly.


Roll the meat/rice mixture into small balls.  I divide these using my cookie dough scoop and then roll them smooth.   Set aside.


Put the first five sauce ingredients into a heavy pan with a tight fitting lid, along with some water.  If you use the tomato can to measure the water, about half a can will do.  Grate the garlic into the pan.


With the pan over a medium flame, bring the sauce to a boil.  Stir occasionally.  This should take just a few minutes.

Carefully immerse the meatballs in the sauce.  Do not burn yourself!  Give the pan a little shake so the meatballs will work their way to the bottom.


Top up with more water, until meatballs are almost covered.


Bring to a boil once more and then simmer, covered tightly for 30 minutes.  Set a timer.  During the first 10-15 minutes of the cooking time, pick the pot up with oven mitts occasionally and give it a gentle shimmy.  Do NOT open the lid.

When the timer goes off, turn off the stove and leave the lid on until you are ready to serve but another 15-20 minutes would be good.  NO peeking.

When you finally open the lid, the rice will have cooked and swollen out of the meatballs, turning them into, voilà, porcupine balls.  Your starch and meat all in one neat package.  Serve with salad or the vegetable of your choice.


Enjoy!


Note:  My backdrop material was created by my talented younger daughter.  It can be seen in its almost entirety here.  


Monday, September 9, 2013

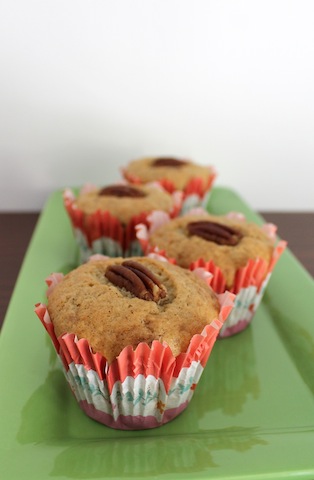
Browned Butter Pecan Banana Muffins #MuffinMonday

If you have never browned butter to use in a recipe, you are in for a real treat! These browned butter pecan banana muffins are made with browned butter soaked pecans which I've swirled into rich banana muffins. They are a great breakfast or snack. Or, in fact, anytime!

Food Lust People Love: If you have never browned butter to use in a recipe, you are in for a real treat! These browned butter pecan banana muffins are made with browned butter soaked pecans which I've swirled into rich banana muffins. They are a great breakfast or snack. Or, in fact, anytime!
I fear I may have a problem, friends.  In fact, an intervention may be necessary already.  Our muffin ingredient for today is banana.  But somehow, all I could think to add was browned butter.  Oh, sure, you say, lots of things go with banana.  Peanut butter and bacon.  Chocolate.  Caramelized sugar and rum.  Walnuts.  Apples and carrots.  Even honey. 

All of which I’ve done.  Because those are all awesome combinations.  So I added my new love, browned butter and a healthy helping of pecans.  The result was a rich, delicious muffin.  Because it’s impossible to make a bad banana muffin and that’s the truth.

Ingredients
2 1/4 cups or 280g flour
1 cup or 225g sugar
1/2 teaspoon salt
1/2 teaspoon baking soda or bicarbonate of soda
2 1/2 teaspoons double-acting baking powder
2 well-ripened bananas
1/2 cup or 120ml milk
1/2 cup or 115g butter
1 cup or 130g whole pecans
2 eggs, preferably room temperature
1 teaspoon vanilla extract

Method
Preheat your oven to 350°F or 180°C and prepare your large 12-cup muffin pan by greasing lightly or lining with muffin papers.  This batter will fill more than your standard muffin pan.  Either use a larger one or tall muffin cups that will hold their shape, like the ones pictured.

Brown your butter, following these instructions, right here, from The Cooking Actress:  How to brown butter.   When the butter is browned,  pour your pecans into the hot pot and stir like crazy and then turn it off.  Leave the pecans in the browned butter as it cools.


Once it has cooled, take out 12 pecan halves for decorating the muffins before baking.  

Yes, I took out 13.  I like to have a spare.


In a large mixing bowl, whisk together your flour, sugar, salt, baking soda and baking powder.


Mash your ripe bananas with a fork.


Add in the eggs, vanilla extract and milk and whisk with the fork.


Pour in the cooled browned butter and pecans and whisk again.  I kept using the fork for this because a normal whisk didn’t work so well with the pecans.


Pour your wet ingredients into your dry ones and stir a couple of times.


Divide the batter between the muffin cups.


Top with the reserved buttery pecan halves.


Bake in your preheated oven for about 25-30 minutes or until the muffins are golden and a toothpick inserted comes out clean.

Allow the muffins to cool for a few minutes in the pan then remove them to a wire rack to cool completely.

Food Lust People Love: If you have never browned butter to use in a recipe, you are in for a real treat! These browned butter pecan banana muffins are made with browned butter soaked pecans which I've swirled into rich banana muffins. They are a great breakfast or snack. Or, in fact, anytime!

Enjoy!

Pin these Browned Butter Pecan Banana Muffins! 


Food Lust People Love: If you have never browned butter to use in a recipe, you are in for a real treat! These browned butter pecan banana muffins are made with browned butter soaked pecans which I've swirled into rich banana muffins. They are a great breakfast or snack. Or, in fact, anytime!
.

Sunday, September 8, 2013

Snorker and Spicy Slaw Sandwiches

Snorker and spicy slaw sandwiches are made with grilled sausages topped with spicy coleslaw in bread rolls. They make a delicious, portable meal.


I had a perky, isn’t-expat-life-jolly post planned for this recipe, because it originated with my friend David, who takes grilled sausages, or snorkers as he likes to call them, in a Thermos to rugby games when he is back home in England.  He says sometimes when it’s cold, you just want something hot to eat and a normal sandwich won’t do.  We also take snorkers, just like this, when we go out sailing with him.

A couple of months back, I was in charge of catering for our Friday sail and I made this spicy coleslaw to heap upon grilled snorker sandwiches, and the combination was wonderful.  Best of all, with a little preparation ahead, like slicing your buns, you will only need some tongs and paper plates or napkins to serve.  A simple but delicious fuss-free meal that travels well.

But last night was rough and I'm asking myself this question:  When does the purported glamorousness of being an expat wear off?  I'll tell you, it’s right about now.  When it seems that all the other parents are sending their children off to universities a couple of hours away by car and we are putting ours on an airplane with almost 20 hours of travel ahead of her.  When you can only go so far in the airport and you have to say final goodbyes in front of the hordes clamoring to get through security and onto their own flights. When she says, “I don’t want to go.” And you say, “I don’t want you to go.” But you both know it has to happen. And everyone tries not to start crying because it’s only going to get ugly.  That’s when this life of overseas living loses a bit of its charm.

Deep down, I know that even if we lived in the US, we probably wouldn’t be near the girls.  But for a day or two, I'm just going to wallow in the misery of being so far away. Can anyone relate?  Meanwhile, I comfort myself with snorkers and spicy slaw on Portuguese rolls.  (And, later, there may have to be dark chocolate too.)

Ingredients
For the sandwiches:
8 good quality sausages – I use Cumberland pork ones.
8 bread rolls
Optional – Ketchup (I like the spicy one) and yellow mustard

For the coleslaw:
(These amounts are just what I used.  Feel free to substitute other vegetables that you love or eliminate ones that you don’t care for.  This is just a guide and I encourage you to use whatever’s fresh and crunchy in your vegetable drawer or back garden.)
Half small head purple cabbage (8+ oz or 250g when shredded, core cut out)
Half small head green cabbage (8+ oz or 250g when shredded, core cut out)
1 large carrot (sorry – forgot to weigh him)
Couple of handfuls snow peas (2 3/4 oz or 75g after de-stringing)
3 medium radishes (3 oz or 85g)

For the dressing:
1 large clove garlic or 2 normal ones
Half medium purple onion
1 hot red chili pepper
1 teaspoon sea salt flakes
1 teaspoon sugar
Few grinds fresh black pepper
1/4 cup or 60ml white balsamic
1/4 cup or 60ml extra virgin olive oil

Method
Cut your chili pepper lengthwise and then mince.  Slice the onion as thinly as you can.  Mince the garlic.


Put all three in a mixing bowl and add in the salt, black pepper, sugar and balsamic vinegar.  Let those hang out together for about 10 minutes.  The vinegar will temper the sharpness of the onion and garlic.


Add in the olive oil and whisk with a fork to combine.  Set aside.


Remove the chewy strings from the snow peas and slice them thinly on the diagonal.


Cut the hard core out of the cabbages and slice them thinly.  Cut the ends off the radishes, slice them thinly and then cut them into little sticks.  Peel then cut your carrots into little sticks.  If you have a handy tool like mine, this is easy.  If not, you can also grate the carrot.


Toss all of your vegetables together in a large mixing bowl.


Add in the dressing and toss again.  Put the slaw in a leak-proof container for travel.


Slice your buns in half and pack them up for travel.


About 20 minutes before you are ready to go, pour boiling water into your Thermos to heat it.


Grill your snorkers in a grill pan on the stove top or under the grill (broiler) in the oven.


When they are cooked through, pour out the hot water and stuff them into the Thermos.

Close tightly.  You will be amazed with how long these stay hot and delicious.  Make sure you pack the tongs.

To serve, use tongs to extract the snorkers from the Thermos.  Break each in half and lay on the bottom of a bun.  Folks who want to can add ketchup or mustard as well.  (Being of the more-is-more mentality, I always do.)


Heap on the spicy coleslaw and pop on the top of the bun.


And, yes, I did assemble these in the back of my Pathfinder, so you can see how easy it is!


Snorker and spicy slaw sandwiches go great with a cold beer!  Enjoy!