Monday, November 11, 2013

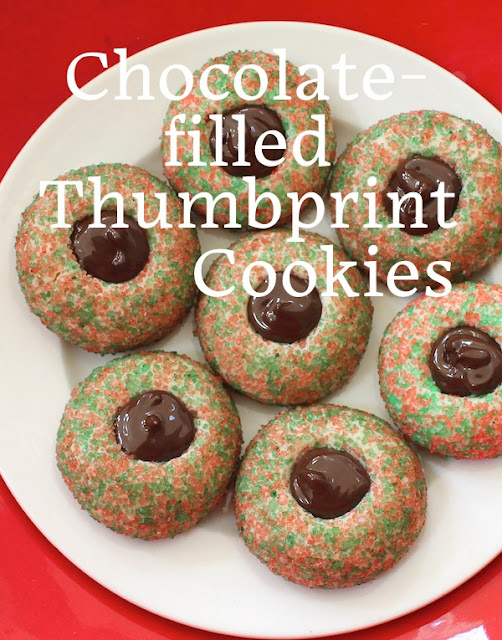
Chocolate-Filled Christmas Thumbprint Cookies

These pretty little chocolate-filled Christmas thumbprint cookies are a mouthful of wonderful on a Christmas plate. Roll the dough into balls and coat them with sprinkles or colored coarse sugar, then bake and fill with melted chocolate when cool. Santa and his helpers will love these!

Food Lust People Love: These pretty little chocolate-filled Christmas thumbprint cookies are a mouthful of wonderful on a Christmas plate. Roll the dough into balls and coat them with sprinkles or colored coarse sugar, then bake and fill with melted chocolate when cool. Santa and his helpers will love these!


Chocolate-Filled Christmas Thumbprint Cookies

This recipe is adapted by one from Juanita’s Cocina. Many thanks to Jen for the inspiration to create this Christmas cookie. It was published originally as part of an organized group called Christmas Week. Scroll down to see the list of recipes from the other participants.

Ingredients for two dozen cookies
For the cookie:
1 cup or 225g unsalted butter, softened to room temperature
1 cup or 125g powdered sugar
2 teaspoons vanilla
2 1/2 cups or 315g flour
1/2 teaspoon salt
Red and green sugar or red and green sprinkles (I used about a 1/4 cup of each color, mixed together.)

For the filling:
3 1/2 oz or 100g semi sweet or dark chocolate – I prefer to use bars rather than chips because the chips don’t melt as nicely.

Method
Preheat your oven to 350°F or 180°C. Grease two cookie sheets or line them with parchment paper with just a dab of butter to keep the parchment from sliding around.

Put your sprinkles in a small bowl and set aside.

Sift your powdered sugar into a large mixing bowl. Add in the butter and vanilla and beat until light and fluffy. This takes just a few minutes.


Add in the salt and about a quarter of the flour and beat until smooth. Keep adding the flour a quarter at a time and mixing well, until you have soft dough. 


Scoop out tablespoons of the dough and roll them into balls. 

Roll them around one at a time in your bowl of red and green sprinkles, until they are fully coated. Place them on a cookie sheet with a couple of inches between them. 


Press a small indentation in the top of each ball with your thumb or forefinger.


Bake the first pan for 10 minutes in your preheated oven.

Remove the pan from the oven and use the end of a wooden spoon or a pastry brush to enlarge the indentation in the cookie. 


Bake for another seven or eight minutes, then remove from the oven. You want them to be just set but not browned. I pushed the indentation down again, just gently. Allow the cookies to cool and repeat the process with the second pan of dough balls.

Leave the cookies to cool.

Meanwhile, melt your chocolate in a microwaveable bowl, by zapping it for 15 seconds at a time and stirring in between, until it is of pourable consistency. 


When the cookies are completely cool, put your melted chocolate in a piping bag with a small decorating tip and fill each cookie indentation with chocolate. 


The chocolate will set firm when it cools. 

Food Lust People Love: These pretty little chocolate-filled Christmas thumbprint cookies are a mouthful of wonderful on a Christmas plate. Roll the dough into balls and coat them with sprinkles or colored coarse sugar, then bake and fill with melted chocolate when cool. Santa and his helpers will love these!
Enjoy!

Check out the beautiful cookies all my fellow bakers have for you today:

Pin these Chocolate-Filled Christmas Thumbprint Cookies!

Food Lust People Love: These pretty little chocolate-filled Christmas thumbprint cookies are a mouthful of wonderful on a Christmas plate. Roll the dough into balls and coat them with sprinkles or colored coarse sugar, then bake and fill with melted chocolate when cool. Santa and his helpers will love these!
 .

Friday, November 8, 2013

Strawberry Lemon Bundt with Strawberry Jam Glaze for #BundtaMonth

Adding lemon juice to butter cake brightens whatever other flavor you’ve chosen and cuts through the richness, while increasing the rise as the juice interacts with the baking soda, creating a lighter crumb.  Whatever fruit or jam you decide to use, always add a bit of fresh lemon. 

This month’s BundtaMonth theme is a favorite of mine because it’s jam, something I always have in the cupboard or refrigerator.  Sometimes homemade, sometimes store bought but always at the ready to add variety and flavor to any baked good.  I started out with a simple pound cake recipe, switching milk and lemon juice for buttermilk and adding a filling of strawberries and jam.  The bottom of the Bundt didn’t brown very much in the oven I’m using, so I ended up leaving it right, as it baked in the pan, so you’ll notice a nice layer of filling at the bottom.  As it turned out, that balanced nicely with the jam on top so you had strawberries coming and going.  We took the cake out to play Pokeno a couple of nights ago, so the extra strawberries I meant to decorate it with didn’t happen.  I forgot them at home.  But, as my friend Gillian does say, “Small matter.”  The cake was just fine without them.

Ingredients
For the cake:
1/2 cup or 115g unsalted butter, at room temperature
1 cup or 225g sugar
2 eggs, at room temperature
2 cups or 250g flour
1/2 teaspoon baking powder
1/2 teaspoon baking soda
1/2 teaspoon salt
1/3 cup or 80ml milk
1/8 cup or 30ml fresh lemon juice
Zest 1 medium lemon
1 teaspoon pure vanilla extract

For the filling:
3/4 cup or 125g chopped strawberries
4 tablespoons good strawberry jam

For the glaze: 3-4 tablespoons good strawberry jam
Optional:  Extra sliced strawberries to decorate the top

Method
Preheat the oven to 350°F or 180°C.  Grease and flour your Bundt pan.

Zest your lemon and then juice it.  Add the lemon juice and vanilla to the milk and set aside.


In a medium bowl, combine the flour, baking powder, baking soda, salt and lemon zest.  Set aside.


In a large mixing bowl, beat the cream and butter until light and fluffy.


Add the eggs one at a time, beating well in between.


It might look like it’s curdling a little bit but don’t that alarm you.  That look will go away when you start adding the flour mixture.


Add the flour and milk mixtures alternately to the batter, in two lots, mixing in between.


In a small bowl, mix your chopped strawberries with the jam for the filling.


Put half of the batter in the bottom of the prepared pan and spread it around.

Spoon in the strawberry filling.


Spoon the balance of the batter on top of the filling and spread it out to cover the filling.


Bake for about 40-45 or until a toothpick comes out clean.


Allow to cool on a rack then turn out.

While it is still just a little warm, spoon the extra jam for glaze on the top of the cake (or on the bottom in the case of mine that didn’t brown) and spread it around with the spoon.


Enjoy!


For all fans of jammy cakes, we have a great round up of Bundts for you this month!

                                                       BundtaMonth


Here's how you can be a part of #BundtaMonth:


Simple rule: Bake us a bundt using your favorite jam.
Post it before November 30, 2013.
Use the #BundtaMonth hashtag in your title. (For ex: title could read – #BundtaMonth: Raspberry Jam Bundt with Peanut Butter Glaze
Add your entry to the Linky tool below.
Link back to our announcement posts.


Monday, November 4, 2013

Caramel Apple Muffins #MuffinMonday


Apple muffins are wonderful plain, but they are kicked up several notches with the addition of caramel.  Add some cinnamon and you’ve got the perfect fall snack.

When I am counting my blessings, friends in Kuala Lumpur are right near the top of the list, along with family and health.  There are a few things in life that keep me sane, and getting together with folks who share my stories and complete my memory is among them.

I am fortunate to be staying with a dear friend and baking in her KL kitchen this week.  It was like old times as we discussed the muffin recipe and decided on caramel and apples.  She put out the paper muffin cups and I was delighted when I saw her choice because, now, I will always remember where I was and with whom I baked these lovely muffins when I see the photos.  Our friendship goes back to my arrival in KL almost 12 years ago, from the time my younger daughter was in third grade and I volunteered to help with the Girl Scout troop.  That baby girl is now finishing the first semester of her third year at university, to give you some perspective.  That’s a long, long time in a mother’s life!  We all did a lot of laughing and crying and loving and growing up in those many years.  It’s been wonderful to refresh our memories and tell stories on each other and to catch up on all the news.  And bake some muffins.

Ingredients
2 cups flour
1/2 cup sugar
2 teaspoons baking powder
2 teaspoons ground cinnamon
1/2 teaspoon salt
1 egg
1 cup or 240ml milk
1/4 cup or 60ml canola or other light oil
1 Granny Smith or other green tart apple
24 square or 200g caramels, divided

Method
Preheat your oven to 350°F or 180°C and prepare your 12-cup muffin pan by greasing it thoroughly or spraying with non-stick spray or lining it with paper muffin cups.

In a large bowl, mix together the flour, sugar, baking powder, salt and cinnamon and stir well.


In another bowl, whisk together the milk, oil and egg.


Cut half of your caramels into smaller pieces making sure to set aside 12 whole caramels.  Put the cut caramels into the flour mixture and mix so that the caramel pieces are coated with flour and won’t stick together.


Peel and chop your apple into small pieces.


Pour your wet ingredients into the dry ingredients and fold them together until just mixed.


Fold in the apple pieces.


Divide half of the batter evenly among the muffin cups.  Put one caramel in each and push down slightly.

Evenly divide the rest of the batter among the muffins cup, making sure to cover the caramel.


Bake in the preheated oven about 20-25 minutes or until a toothpick inserted just next to the middle comes out clean.  (The middle should have a sticky soft melted toffee, remember.)

Cool on a rack for a few minutes and then remove the muffins to cool completely.


These are the perfect snack or breakfast with a cup of coffee or tea.  Or even a cold glass of milk.


Enjoy!

I even have a helper dog here.  His name is Max.