Wednesday, November 13, 2013

Chewy Cocoa Fudge Cookies #CookieWeek

Using coconut oil instead of butter or canola gives these fudgy cookies a wonderful rich flavor. The jury’s still out on whether they are healthier but I can tell you they are delicious.


This is day three of #CookieWeek and we have a whole other group of beautiful cookies for you.  In fact, many of my fellow cookie bakers posted recipes yesterday as well, bring our total cookie recipes to date to 44!  And we’ll be here all week, friends!


If you’ve just joined us you should know that Susan of The Girl In The Little Red Kitchen and Kim of Cravings of a Lunatic have joined together this week with 23 of their blog friends (including me!) with a week of cookie treats for you! We have every type of cookie you can imagine listed this week, including something for our furry friends! Now is the time to bookmark these recipes for the upcoming holidays and cookie swaps or simply follow our Pinterest board!

Credit for this great recipe goes to Soni at Soni’s Food.   I shifted the sugar amounts and added mini M&Ms but the rest is all her.    

Ingredients
2 cups or 250g flour
1/2 teaspoon baking soda
1/4 teaspoon salt
6 tablespoons or 90ml coconut oil
2/3 cup or 53g unsweetened cocoa
1 cup or 225g granulated sugar
1/2 cup packed or 100g brown sugar
2/3 cup or 160g plain low-fat yogurt
2 teaspoons vanilla extract
1/4 cup or 60g mini M&Ms

Method
Preheat oven to 350°F or 180°C.  Prepare your cookie sheet by greasing it with non-stick spray or lining it with parchment paper.

In a medium-sized mixing bowl, combine your flour, soda, and salt.  Set aside.


In a microwaveable measuring cup, warm your coconut oil for about 20 seconds in the microwave.  This step might be unnecessary if you are in a warm climate.  My coconut oil was already quite liquid straight out of the bottle.

Put your sugars in a large mixing bowl, add the coconut oil and stir well.


Add in the cocoa powder and stir again.

Now add in the yogurt and vanilla and stir again until well combined.

Dark and chocolately! 


Add your flour mixture and your baking M&Ms, stirring until all the flour has been incorporated.


Scoop balls of dough or drop by level tablespoons onto your prepared baking sheet.   

You can either leave them in balls which will give you round even chewier cookies, or press down gently to flatten the dough before baking.   I made one batch round and one batch flat.


Bake in the preheated over for 10 -14 minutes or until almost set.

Allow to cool on pan for a few minutes or until firm then remove with a spatula and cool completely on a wire rack.  


Enjoy! 

Check out all the beautiful recipes my fellow bakers have for you today:


Tuesday, November 12, 2013

Snickers Muffins


Got leftover Halloween candy?  Make muffins!  This simple muffin batter is happy to accommodate a wide variety of candy and turn it into a delicious snack or breakfast treat.  Candy for breakfast?  Anybody?

Happy Muffin Tuesday, lovely people! It doesn’t have quite the same ring to it, does it? But yesterday was the launch of CookieWeek so Muffin Monday had to be moved along to make room for it. Have you seen the first CookieWeek post?  We have 22 wonderful cookie recipes plus great giveaways from KitchenAid, OXO, King Arthur Flour, Silpat and Zulka Pure Cane Sugar.  Make sure you enter!  And check back all week for more cookies.

But meanwhile, make these muffins with Snickers or whatever leftover Halloween candy you’ve got going.

Ingredients
2 cups or 250g all purpose flour
1/2 cup or 115g sugar
1 tablespoon baking powder
1/2 teaspoon salt
1 cup or 240ml milk (or 1/2 cup whipping cream and 1/2 cup water)
1/2 cup canola oil
2 large eggs
8 mini Snickers candy bars (about 5 oz or 145g altogether)

Method
Preheat oven to 350°F or 180°C.

Generously grease cups and top of 12-cup muffin tin or line with paper muffin cups.

Cut your mini Snickers into small chunks.  I cut mine lengthwise and then sliced the two long halves into five pieces each.  Separate the chunks into two piles, one about two Snickers big for adding to the top of the batter before baking, the rest for mixing into the batter.


In a large mixing bowl, combine flour, sugar, baking powder and salt together.


In another smaller bowl, whisk together milk, oil and eggs.  (I did indeed substitute the cream and water because I didn’t have any milk and it worked beautifully.)


Add the wet mixture to the flour mixture.


Gently stir just until dry ingredients are moistened.   Now fold in the larger pile of Snickers pieces.


Divide your batter relatively evenly between the 12 muffin cups.

Add a couple of pieces of Snickers to the batter in each cup and bake 20-25 minutes or until a toothpick comes out clean.


Remove from oven and let cool for a few minutes.


If any Snickers bits have melted out on to the muffin pan, push them back on the muffin with a spoon while they are still warm.  Remove the muffins from the pan and cool on a wire rack.


Enjoy!


Monday, November 11, 2013

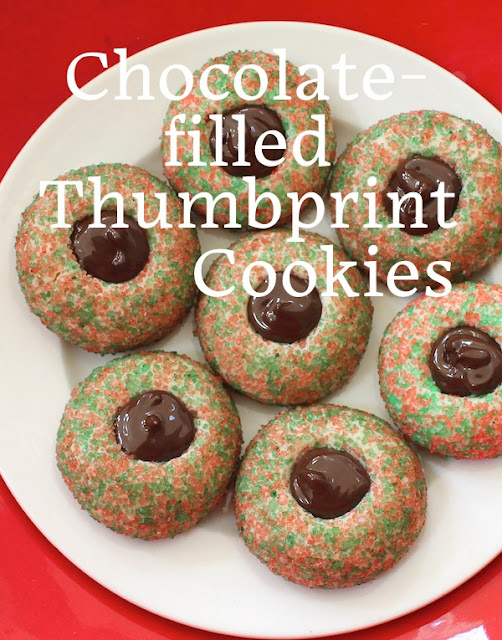
Chocolate-Filled Christmas Thumbprint Cookies

These pretty little chocolate-filled Christmas thumbprint cookies are a mouthful of wonderful on a Christmas plate. Roll the dough into balls and coat them with sprinkles or colored coarse sugar, then bake and fill with melted chocolate when cool. Santa and his helpers will love these!

Food Lust People Love: These pretty little chocolate-filled Christmas thumbprint cookies are a mouthful of wonderful on a Christmas plate. Roll the dough into balls and coat them with sprinkles or colored coarse sugar, then bake and fill with melted chocolate when cool. Santa and his helpers will love these!


Chocolate-Filled Christmas Thumbprint Cookies

This recipe is adapted by one from Juanita’s Cocina. Many thanks to Jen for the inspiration to create this Christmas cookie. It was published originally as part of an organized group called Christmas Week. Scroll down to see the list of recipes from the other participants.

Ingredients for two dozen cookies
For the cookie:
1 cup or 225g unsalted butter, softened to room temperature
1 cup or 125g powdered sugar
2 teaspoons vanilla
2 1/2 cups or 315g flour
1/2 teaspoon salt
Red and green sugar or red and green sprinkles (I used about a 1/4 cup of each color, mixed together.)

For the filling:
3 1/2 oz or 100g semi sweet or dark chocolate – I prefer to use bars rather than chips because the chips don’t melt as nicely.

Method
Preheat your oven to 350°F or 180°C. Grease two cookie sheets or line them with parchment paper with just a dab of butter to keep the parchment from sliding around.

Put your sprinkles in a small bowl and set aside.

Sift your powdered sugar into a large mixing bowl. Add in the butter and vanilla and beat until light and fluffy. This takes just a few minutes.


Add in the salt and about a quarter of the flour and beat until smooth. Keep adding the flour a quarter at a time and mixing well, until you have soft dough. 


Scoop out tablespoons of the dough and roll them into balls. 

Roll them around one at a time in your bowl of red and green sprinkles, until they are fully coated. Place them on a cookie sheet with a couple of inches between them. 


Press a small indentation in the top of each ball with your thumb or forefinger.


Bake the first pan for 10 minutes in your preheated oven.

Remove the pan from the oven and use the end of a wooden spoon or a pastry brush to enlarge the indentation in the cookie. 


Bake for another seven or eight minutes, then remove from the oven. You want them to be just set but not browned. I pushed the indentation down again, just gently. Allow the cookies to cool and repeat the process with the second pan of dough balls.

Leave the cookies to cool.

Meanwhile, melt your chocolate in a microwaveable bowl, by zapping it for 15 seconds at a time and stirring in between, until it is of pourable consistency. 


When the cookies are completely cool, put your melted chocolate in a piping bag with a small decorating tip and fill each cookie indentation with chocolate. 


The chocolate will set firm when it cools. 

Food Lust People Love: These pretty little chocolate-filled Christmas thumbprint cookies are a mouthful of wonderful on a Christmas plate. Roll the dough into balls and coat them with sprinkles or colored coarse sugar, then bake and fill with melted chocolate when cool. Santa and his helpers will love these!
Enjoy!

Check out the beautiful cookies all my fellow bakers have for you today:

Pin these Chocolate-Filled Christmas Thumbprint Cookies!

Food Lust People Love: These pretty little chocolate-filled Christmas thumbprint cookies are a mouthful of wonderful on a Christmas plate. Roll the dough into balls and coat them with sprinkles or colored coarse sugar, then bake and fill with melted chocolate when cool. Santa and his helpers will love these!
 .