Tuesday, April 14, 2020

Russian Kulich - Easter Bread #BreadBakers

The traditional Russian kulich is baked in multiplies for family gatherings to celebrate Easter and is often eaten on Easter Monday as picnic fare. It's a lovely sweet bread made with either raisins or chocolate chips.

Food Lust People Love: The traditional Russian kulich is baked in multiplies for family gatherings to celebrate Easter and is often eaten on Easter Monday as picnic fare. It's a lovely sweet bread with either raisins or chocolate chips.


This month our Bread Bakers host is Camilla from Culinary Adventures with Camilla and she chose international Easter breads for our theme. I must confess that I really didn’t pay attention to whether the second Tuesday fell before or after Easter because I loved the theme so much.

Turns out that it is after Easter for those of us who follow the Gregorian (new) calendar, which is much of the western world. For those who follow the Julian (old) calendar, we are right on time with Easter bread recipes, as they will celebrate next Sunday.

That said, as Camilla rightly pointed out, most of us all over the world are still staying home to stay safe so many family Easter celebrations have been postponed until we can all be together. If that’s you, dear reader, please bookmark or pin your favorite recipes from our list, found below my recipe.

Russian Kulich - Easter Bread

This recipe is adapted from several I found online. Traditionally, Russian kulich would be baked with raisins instead of chocolate chips, but I did find one recipe by an actual baker with a Russian grandma who added chocolate, so I am feeling pretty good about my choice. I’ll be honest. My daughter is home and she is not a fan of raisins. I wanted to bake sweet bread that she would eat!

Ingredients
For the kulich:
1/2 cup or 120ml warm milk (I used 2% milk)
1/2 cup or 100g sugar
1 teaspoon active dry yeast
1 whole egg, room temp
1 egg yolk
1/4 cup or 56g butter, melted and cooled
good pinch salt
2 tablespoons sour cream
1/4 teaspoon vanilla
2 1/4 cups or 281g all-purpose flour
3/4 cup or 140g raisins or for a less traditional bread, substitute chocolate chips (I used semi-sweet chocolate.)

To bake the kulich:
2 1-lb coffee cans
parchment paper
butter

For the glaze:
1/2 cup or g 62 icing sugar
2 teaspoons fresh lemon or orange juice

Optional to decorate: colored sprinkles

Method
In a large mixing bowl, whisk together the warm milk, sugar and yeast. Set aside to prove. The yeast should start to get a little foamy on top.

Whisk in the egg and egg yolk, melted butter, sour cream, salt and vanilla.


Whisk in half of the flour. Your batter will be very thick, mounding briefly when you let it drip off the whisk back into the bowl.


Cover the bowl with cling film and let it rise in a warm place, ideally 100°F or 39°C for about an hour. I achieve this by filling a larger bowl with hot water from the sink and set the batter bowl in it. Occasionally check the temperature and add more hot water as needed.


Using a wooden spoon or a stiff spatula, add the rest of the flour a little at a time.


The dough will be quite soft. Stir in the raisins or chocolate chips. Cover and let dough rise another hour in a warm place, again ideally at 100˚F or 38°C. Use the hot water bowl trick again for best results.


Butter your clean coffee cans then line them with baking parchment.

Spoon the dough into the two prepared coffee cans, trying not to mix it too much. We want to keep as many of the bubbles in the dough as possible. Mine were filled about halfway, which is hard to see in this photo. Trust me.


Again, leave the dough to rise uncovered in a warm place for an additional hour or until the coffee cans are almost full. I put my two cans back in the big bowl and added more hot tap water then covered the bowl with cling film and a folded towel.

If you do this, do be careful getting them out of the bowl when you are ready to bake. One of mine tipped over a bit as I tried to get them out and I lost some height on the rise.


Towards the end of the hour rising time, preheat your oven to 350˚F or 180°C.

Bake the kulich for 30-35 minutes until the top is golden brown. If they start browning too quickly, you can cover the tops with foil.


Cool for about 10 minutes on a wire rack then gently loosen the edges with a knife and turn the kulich out of the coffee cans. Leave them to cool completely, bottom side down on the wire rack.

Food Lust People Love: The traditional Russian kulich is baked in multiplies for family gatherings to celebrate Easter and is often eaten on Easter Monday as picnic fare. It's a lovely sweet bread with either raisins or chocolate chips.


To make the glaze, stir just enough of the lemon or orange juice into the powdered sugar to get a drizzling consistency. Pour the glaze over each cooled kulich. Top with sprinkles, if desired.


Food Lust People Love: The traditional Russian kulich is baked in multiplies for family gatherings to celebrate Easter and is often eaten on Easter Monday as picnic fare. It's a lovely sweet bread with either raisins or chocolate chips.


Enjoy!


Check all the lovely Easter breads from around the world! If you don't bake one this month, you'll be glad to have the recipes for another special occasion. Many thanks to Camilla of Culinary Adventures with Camilla for hosting this month!
BreadBakers
#BreadBakers is a group of bread loving bakers who get together once a month to bake bread with a common ingredient or theme. You can see all our of lovely bread by following our Pinterest board right here. Links are also updated after each event on the Bread Bakers home page.

We take turns hosting each month and choosing the theme/ingredient.

Pin this Russian Kulich Easter Bread!

Food Lust People Love: The traditional Russian kulich is baked in multiplies for family gatherings to celebrate Easter and is often eaten on Easter Monday as picnic fare. It's a lovely sweet bread with either raisins or chocolate chips.
.

Monday, April 13, 2020

Tomato Salad Topped Baked Spinach Frittata

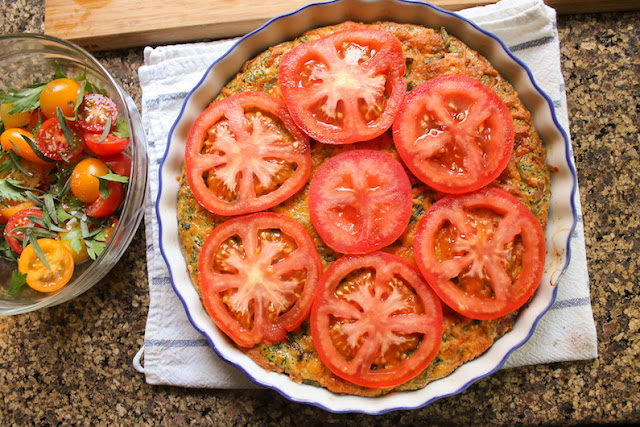
This tomato salad topped baked spinach frittata is a delicious combination of richness from the eggs, ham and cheese and the sharp sweetness of the tomatoes with herbs. It makes a wonderful brunch, lunch or dinner dish!

Food Lust People Love: This tomato salad topped baked spinach frittata is a delicious combination of richness from the eggs, ham and cheese and the sharp sweetness of the tomatoes with herbs. It makes a wonderful brunch, lunch or dinner dish!


Frittatas can be made on your stovetop in a skillet or baked in the oven. I created this one a while back when we were trying a low carb diet. I was craving quiche but crust was, of course, not on the plan. This frittata is basically a crustless quiche with a fancy Italian name.

You can adapt this recipe to use different cooked veggies or meat instead of the spinach and ham. Or change up the cheddar for your favorite semi-hard flavorful cheese. It’s all good.

Here’s a question for you: Am I the only one who buys ham that the family eats for two or three days and then abandons it? What do you do with it? I pop it in the freezer when it’s still in date and, while you cannot thaw it and still make decent sandwiches, it is perfect for quiche or omelets.

Tomato Salad Topped Baked Spinach Frittata

This recipe was inspired by a photo I saw in delicious.uk magazine for a ricotta tart. The mixed tomato salad that topped the tart was so pretty! Mine doesn’t have the green tomatoes because I couldn’t find any but I’m sure it is just as tasty.

Ingredients
For the frittata:
3 ounces or 85g sliced ham
2 ounces or 55g frozen spinach
4 large eggs
3/4 cup or 180ml cream
1/2 cup or 120ml milk
4 1/2 ounces or 125g sharp cheddar
2 tablespoons chopped fresh basil
1/2 teaspoon fine sea salt
several good grinds of black pepper

To butter the baking dish or pan:
1 tablespoon butter

For baked topping:
2 oz or 57g sharp cheddar
Small handful green onion tops, chopped

For the herby salad:
1 lb or 450g mixed tomatoes, ripe but firm
Herbs of your choice  - I used a mix of flat-leaf parsley, tarragon and basil
Drizzle extra virgin olive oil
Drizzle white balsamic
Good pinch flaky sea salt
Few generous grinds of black pepper

Method
Preheat your oven to 400°F or 200°C and liberally butter your 9 in or 23cm quiche pan or baking dish.

Fry the chopped ham in a nonstick pan until it dries out a little and gets some browned crispy place. Remove from the pan and set aside to cool.


Thaw your spinach, then drain it and squeeze it as dry as possible.

In a large mixing bowl, whisk together the eggs, cream and milk. Stir in spinach and chopped basil.

 Next add the grated cheese, ham, sea salt and black pepper. Stir until well combined.


Pour the mixture into your buttered pan or dish.

Put it in the preheated oven and immediately turn the temperature down to 350°F. Bake for about 20-25 minutes or until it is almost set.

Remove the frittata from the oven and sprinkle on the topping cheese and green onions.

Return the pan to the oven for another 10 minutes or until the cheese is browning and the frittata is set.


Meanwhile, slice your large tomato and set the slices on a paper towel to dry them a little. Halve the smaller tomatoes and mix them with the other salad ingredients.

When the frittata is baked, remove it from the oven and leave to cool for at least 15-20 minutes before topping it first with the sliced tomatoes.

Food Lust People Love: This tomato salad topped baked spinach frittata is a delicious combination of richness from the eggs, ham and cheese and the sharp sweetness of the tomatoes with herbs. It makes a wonderful brunch, lunch or dinner dish!


 Finally, top with the dressed tomato salad.

Food Lust People Love: This tomato salad topped baked spinach frittata is a delicious combination of richness from the eggs, ham and cheese and the sharp sweetness of the tomatoes with herbs. It makes a wonderful brunch, lunch or dinner dish!


Slice to serve. Enjoy!

Food Lust People Love: This tomato salad topped baked spinach frittata is a delicious combination of richness from the eggs, ham and cheese and the sharp sweetness of the tomatoes with herbs. It makes a wonderful brunch, lunch or dinner dish!

This month my Baking Blogger friends are sharing recipes with herbs. Check out the delicious recipes below! Many thanks to our group organizer and host, Sue of Palatable Pastime for all of her behind-the-scenes work.

Baking Bloggers is a friendly group of food bloggers who vote on a shared theme and then post recipes to fit that theme one the second Monday of each month. If you are a food blogger interested in joining in, inquire at our Baking Bloggers Facebook group. We'd be honored if you would join us in our baking adventures.


Pin this Tomato Salad Topped Baked Spinach Frittata! 

Food Lust People Love: This tomato salad topped baked spinach frittata is a delicious combination of richness from the eggs, ham and cheese and the sharp sweetness of the tomatoes with herbs. It makes a wonderful brunch, lunch or dinner dish!
 .

Wednesday, April 1, 2020

Easy Cornish Pasties #FoodieExtravaganza

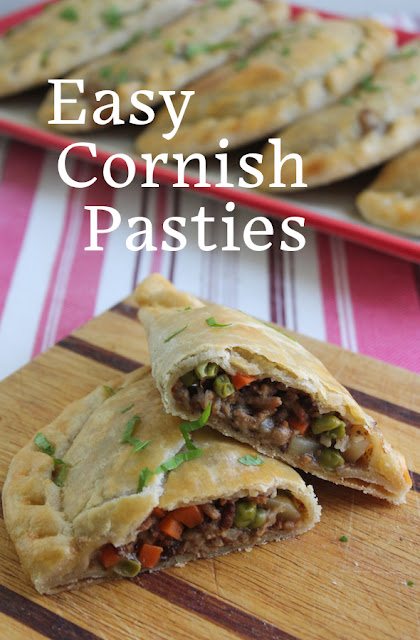
Made with ground beef instead of tough stewing beef, the filling for these easy Cornish pasties is ready much more quickly, which means you will be munching on these beauties in record time.

Made with ground beef instead of tough stewing beef, the filling for these easy Cornish pasties is ready much more quickly, which means you will be munching on these beauties in record time.

Let me start by saying that these are not traditional Cornish pasties. Those are made with stewing beef cut in small pieces, cooked long and slow until tender. After making ground lamb version of a Lancashire Hot Pot, it occurred to me that Cornish pasties could get the same treatment. Like ground lamb, ground beef cooks much more quickly since it’s tender already!

One other difference from classic Cornish pasties is the shortcrust I used. We prefer a thin flaky crust but that means that that these guys are challenging to eat by hand unless you cut them in half. That’s probably high treason in Cornwall but I think it’s worth it! Hey, I’d eat these with a knife and fork if need be. Traditionally, Cornish pasties were made from a sturdier dough so they could be taken to work by tin miners, fishermen and farmers. The crimped side crust was actually discarded! If you'd like to read more about them, this article in the Guardian is short but interesting.

Easy Cornish Pasties

The filling for my easy Cornish pastries is very similar to what I make for cottage pie, except for the Worcestershire sauce. If you double the recipes, you can even use it to stuffed baked potatoes.

Ingredients
For the shortcrust dough:
312g flour
140g shortening (I use Crisco.)
1 teaspoon salt
6-7 tablespoons ice water

For the filling:
1 medium onion, peeled and finely chopped
2 garlic cloves, peeled and minced
1 medium size potato, peeled and cut in cubes
1 medium carrot, diced to pea-size cubes
2 tablespoons olive oil
8 oz or 225g ground beef
2 tablespoons flour
2 cups or 480ml beef stock
fine sea salt to taste – depends on how salty your beef stock is!
freshly ground black pepper
1/2 cup or 70g frozen peas
chopped parsley to garnish

To bake the Cornish Pasties:
1 egg, beaten
1 tablespoon water
Method
First, make the shortcrust pastry: In medium bowl with fork, lightly stir together flour and salt
With pastry blender, cut in shortening until mixture resembles coarse crumbs.


Sprinkle in cold water, a tablespoon at a time, mixing lightly with a fork after each addition until pastry just holds together.


Shape the pastry into a ball then press it flat. Wrap it in cling film and refrigerate at least 30 minutes.


Soak the carrot and potato in cool water so they don’t discolor.

Heat the oil in a large pot. Pop the ground beef in and fry it until it’s browned, even crispy in places, if possible. Add a little more oil if need be. Break up the beef into little pieces as it cooks. 


Add in the onion and garlic and cook for a few more minutes until they soften. 


Drain and add potato and carrot fry for a couple of minutes.

Add flour stir well and pour the beef stock over, and a generous pinch of freshly ground black pepper and stir some more. 


Reduce the heat, partly cover and leave to simmer for about 15-20 minutes or until the carrot and potato are almost completely cooked, stirring occasionally.

When the filling is cooked, taste and add more salt and pepper if needed. I found my beef broth salty enough so I didn’t add any salt. Stir in the peas. 


Leave the filling to cool completely. I put mine in a bowl in the refrigerator so it would cool more quickly.

Preheat the oven to 350°F or 180C. Line a baking pan with baking parchment.

Separate the shortcrust pastry into six equal pieces. Roll each piece out into a circle of about 7 in or 19cm. Brush around the edges with water.


Put 1/6th of the filling on one half of the circle. 


Fold the pastie in a half and seal it by crimping the edge all the way around. 


Place the pasties on the lined baking pan and glaze them with the egg beaten with the water to loosen.


Bake them in your preheated the oven for about 30 minutes or until the outsides are golden and the insides are bubbling hot.

Made with ground beef instead of tough stewing beef, the filling for these easy Cornish pasties is ready much more quickly, which means you will be munching on these beauties in record time.


Cool them and enjoy warm or cold. I like them the best warmed, whether when just baked or after a short spell in an oven to rewarm. 

Made with ground beef instead of tough stewing beef, the filling for these easy Cornish pasties is ready much more quickly, which means you will be munching on these beauties in record time.


Enjoy!

This month my Foodie Extravaganza friends are sharing empanada recipes at the instigation of our host, Sue of Palatable Pastime. Sue was kind enough to allow us the latitude of sharing any empanada-shaped pastry so I chose these Cornish Pastries. Same shape, different filling.

Check out all the other lovely empanadas or empanada-inspired recipes we are sharing this month:


Foodie Extravaganza is where we celebrate obscure food holidays by cooking and baking together with the same ingredient or theme each month. Posting day is always the first Wednesday of each month. If you are a blogger and would like to join our group and blog along with us, come join our Facebook page Foodie Extravaganza. We would love to have you! If you're a spectator looking for delicious tid-bits check out our Foodie Extravaganza Pinterest Board!

Pin these Easy Cornish Pastries!

Made with ground beef instead of tough stewing beef, the filling for these easy Cornish pasties is ready much more quickly, which means you will be munching on these beauties in record time.
 .