Tuesday, November 13, 2018

Cranberry Lardy Cake #BreadBakers

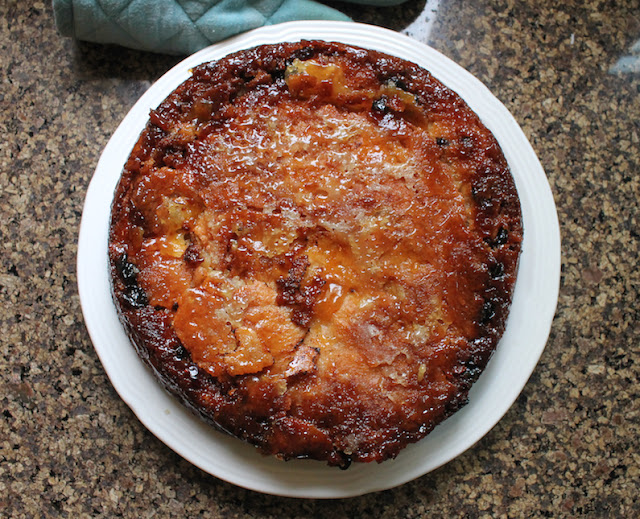
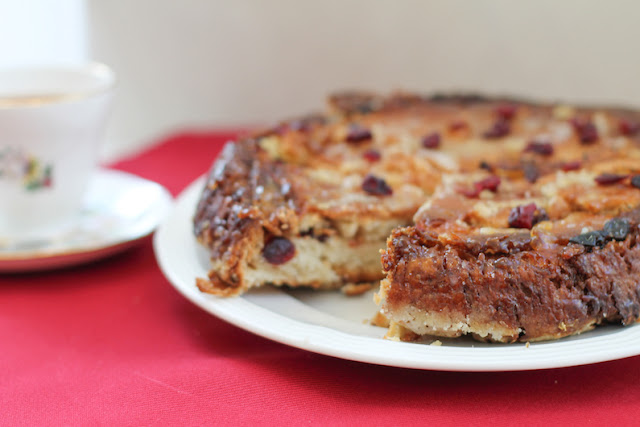
Traditionally, this British afternoon teacake is made with raisins, sultanas and/or currants. My cranberry lardy cake is studded with dried cranberries, but fear not, it is amply filled with the requisite lard and sugar, for a properly respectable British teatime treat.

Food Lust People Love: Traditionally, this British afternoon teacake is made with raisin, sultanas and/or currants. My cranberry lardy cake is studded with dried cranberries, but fear not, it is amply filled with the requisite lard and sugar, for a properly respectable teatime treat.


This month my Bread Bakers are baking up yeast cakes, a subject that required some research on my part. I came up with a list of possibilities, mostly from old English recipes, to be honest. Before the days of chemical rising agents, like baking powder, the most reliable ways to get a cake to rise was either to add eggs or yeast.

Lardy cake caught my fancy because, as previously mentioned here, I have a weakness for caramel. When baked up properly - that is with plenty of lard and sugar! - the bottom turns into a crunchy caramel. As the cake is flipped for serving, you end up with a gorgeous caramel top. Who can resist that?

Cranberry Lardy Cake

My recipe below is a combination of a couple I found on the internet from The Happy Foodie and Hobb House Bakery. Check out this YouTube video to watch one of the Baker Brothers make their version. That first link is actually the one that gave me the idea to add cranberries. The recipe called for crimson grapes, which I’d never heard of. Cranberries, on the other hand, I keep always on hand.

Ingredients
For the dough:
3/4 cup or 175ml warm water
1 teaspoon sugar
1/4 oz or 7g dried yeast
2 1/4 cups or 285g strong white bread flour plus extra for kneading
Scant 1/4 cup or 50g lard
Pinch flaky sea salt

For the lard and sugar filling:
1 cup or 225g caster (very fine) sugar, plus extra for the pan
1 cup or 200g lard, at room temperature
1/2 cup or 65g dried cranberries, plus extra for decorating, if desired

Method
Mix the yeast into the warm water with one teaspoon of the sugar. Set aside.

Measure the flour, salt and lard into a big bowl and use a pastry cutter to cut the lard into the flour.


When the yeast mixture has started to bubble up, pour it into the flour bowl and mix all the ingredients together.


If you are using an electric mixer with a bread hook, knead the dough for 10 minutes. If not, sprinkle a little flour onto a clean work surface and tip the dough out of the bowl onto it. Knead the dough for 15 minutes. Once you have a smooth and elastic dough, pop it back into the bowl and cover it with cling film.

Leave the bowl in a warm place for the dough to rise to twice its size or for 1 hour, whichever comes first.


Meanwhile make the lard and sugar mix by creaming them together in a mixer or with a wooden spoon.

Prepare your 8 in or 20cm round nonstick baking pan by coating it with 1/3 cup or 87g of the lard sugar mixture. Use a rubber spatula to spread it over the bottom and up the sides. Sprinkle an extra tablespoon of sugar over the bottom.


When it’s risen, gently press the air out of the dough and form it into a ball. Pop it on a well-floured work surface and use a rolling pin to roll it into a circle about 15 in or 38cm across.

Divide the remaining lard/sugar paste in half. Use a spoon to distribute one half over the dough circle. Use a rubber spatula to spread the paste over the dough, leaving a small margin of dough around the sides uncovered.

Starting on one side, fold the dough towards the middle. Continue until till all the sides are folded over. (See the first five photos below.) Again, this video shows the method so much better than words can explain.


Let the dough rest for a few minutes, then roll it out again to a 15 in or 38cm circle. Spoon the other half of the lard mixture over the dough circle. (Photo 6 above) Spread it with the rubber spatula. Now sprinkle on the cranberries.


Repeat the folding process till all of the sides have been folded in again. Place the dough in the prepared pan.


Cover loosely with cling film and leave the cranberry lardy cake to rest and rise for two hours. It doesn’t really rise very high but it does fill the pan.


When your two hours are almost up, preheat your oven to 375°F or 190°C.

Bake the lardy cake for 45 minutes, covering the top with foil if it starts to get too brown. Remove the pan from the oven and leave to cool for just a few minutes.

Leave it any longer and you may find that the caramel will stick to your pan, even it it’s nonstick. If this happens to you, use a blunt knife to ease it off the pan so the whole cake will come out in one piece.

Food Lust People Love: Traditionally, this British afternoon teacake is made with raisin, sultanas and/or currants. My cranberry lardy cake is studded with dried cranberries, but fear not, it is amply filled with the requisite lard and sugar, for a properly respectable teatime treat.
If necessary, return any pieces that stayed in the pan to the top of the cake. Or just eat them. I cannot tell you how wonderful this crunchy caramel is! It's the perfect topping for the yeast cake underneath.

Food Lust People Love: Traditionally, this British afternoon teacake is made with raisin, sultanas and/or currants. My cranberry lardy cake is studded with dried cranberries, but fear not, it is amply filled with the requisite lard and sugar, for a properly respectable teatime treat.


Sprinkle with tablespoon or two dried cranberries to decorate, if desired. Enjoy!

Food Lust People Love: Traditionally, this British afternoon teacake is made with raisin, sultanas and/or currants. My cranberry lardy cake is studded with dried cranberries, but fear not, it is amply filled with the requisite lard and sugar, for a properly respectable teatime treat.

Many thanks to this month's Bread Bakers host, Archana from The Mad Scientist Kitchen. Check out the other recipes our fellow bakers made for the yeasted cake challenge:

#BreadBakers is a group of bread loving bakers who get together once a month to bake bread with a common ingredient or theme. Follow our Pinterest board right here. Links are also updated each month on this home page.

We take turns hosting each month and choosing the theme/ingredient.

Pin it! 

Food Lust People Love: Traditionally, this British afternoon teacake is made with raisin, sultanas and/or currants. My cranberry lardy cake is studded with dried cranberries, but fear not, it is amply filled with the requisite lard and sugar, for a properly respectable teatime treat.
 .

Monday, November 12, 2018

Baked Cheese and Sausage Ziti #BakingBloggers

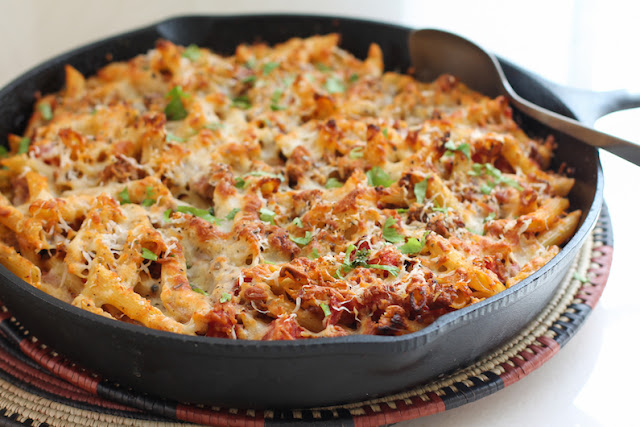
The perfect weeknight family meal or Sunday supper, this baked cheese and sausage ziti is quick to put together but full of flavor. Comfort food at its best.

Food Lust People Love: The perfect weeknight family meal or Sunday supper, this baked cheese and sausage ziti is quick to put together but full of flavor. Comfort food at its best.


For many years, nay, for my whole life, my mom has been singing the praises of cooking in cast iron. She has an enviable collection of cast iron pots of every size and shape, an amazing array.

When I was younger, she’d offer me a pot or two, but I couldn’t be bothered with what I thought were the difficulties of keeping cast iron clean. Plus, before I lived in Dubai, I simply didn’t have enough luggage allowance for all of my shopping, never mind bringing back a very heavy iron pot from Houston.

Finally, just a few years ago, Mom kindly offered again and I accepted the 13 1/4 inch (34cm) beauty you see in these photos. Let me tell you, friends, I use it All The Time. And I regret the years before when I didn’t say yes to the cast iron. It’s actually quite easy to keep clean and is more nonstick than my actual “nonstick” skillets. So just for the record, I want to say, my mother was right and I was wrong.

Baked Cheese and Sausage Ziti

And while I am admitting my errors, let me also say that this pasta is probably actually penne, not ziti. A little research after the fact revealed that while ziti can have ridges, most don’t. But who has ever heard of baked penne? So baked ziti it is. Either way, your family will be fighting over the crispy bits.

Ingredients
3 medium cloves garlic
1 medium onion, minced
2 tablespoons olive oil
1 1/2 lbs or 680g fresh hot Italian sausage, casings removed
2 (14.5 oz or 411g) cans diced tomatoes with basil, garlic and oregano
Salt and freshly ground black pepper
1 lb or 450g  uncooked penne or ziti
3/4 cup or 75g grated Parmesan cheese

For baking:
1/4 cup or 25g grated Parmesan
1 cup or 110g grated mozzarella

For garnish – finely chopped parsley (optional)

Method
Adjust oven rack to the center position and preheat the oven to 350°F or 180°C.

Cook the pasta according to the directions on the package, until just al dente. Scoop out a cup of the cooking water and set aside. Drain the pasta and return it to the warm pot you used for boiling it.

Mince the garlic and onions.

In a large iron skillet, add the olive oil, garlic and onion. Cook over a medium heat until the onion softens, being careful not to let the garlic burn.

Add the sausage meat and cook until it is browned, breaking the sausage into small pieces as you stir.


Add in the two cans of the seasoned diced tomatoes. Stir well and bring to a simmer. Cook for about 8-10 minutes.


Remove the pan from the stove and tip in the cooked pasta stirring well.

Stir in the Parmesan cheese and the cup of reserved pasta water. Taste the mixture and add salt if needed and a few generous grinds of black pepper from a pepper mill.


Sprinkle the mozzarella and additional Parmesan over the top and put the skillet in your preheated oven.


Bake for 30 minutes, covering the skillet with foil, if it begins to brown too quickly.


To serve, sprinkle with a little finely chopped parsley, if desired.

Enjoy!

Food Lust People Love: The perfect weeknight family meal or Sunday supper, this baked cheese and sausage ziti is quick to put together but full of flavor. Comfort food at its best.


This month my Baking Bloggers group is sharing cast iron pot recipes, both savory and sweet. Many thanks to our organizers, Sue of Palatable Pastime and Wendy of A Day in the Life on the Farm.


Baking Bloggers is a friendly group of food bloggers who vote on a shared theme and then post recipes to fit that theme one the second Monday of each month. If you are a food blogger interesting in joining in, inquire at our Baking Bloggers Facebook group. We'd be honored if you would join us in our baking adventures.


Pin it! 

Food Lust People Love: The perfect weeknight family meal or Sunday supper, this baked cheese and sausage ziti is quick to put together but full of flavor. Comfort food at its best.
 .

Wednesday, November 7, 2018

Hot and Sour Chicken Soup #FoodieExtravaganza

Hot and sour chicken soup is a restaurant favorite that is quick and easy to make at home. With bits of chicken breast and cubes of tofu, it’s high in protein with a comforting spicy and flavorful broth that will cure whatever ails you.

Food Lust People Love: Hot and sour chicken soup is a restaurant favorite that is quick and easy to make at home. With bits of chicken breast and cubes of tofu, it’s high in protein with a comforting spicy and flavorful broth that will cure whatever ails you.


Aside from its healing properties, hot and sour chicken soup also brings back fun and fond memories for me.

Many years ago, my sister lived near a Chinese buffet restaurant we adored. It had The Best pork ribs and Sichuan green beans, my favorite things to eat there, but everything else was pretty tasty as well.

When my eldest nephew was old enough to eat real food, my sister would scoop the little cubes of tofu out of the hot and sour soup for him, blow on them to cool them off, then set them on his plate. It was a lot of fun watching him trying to pincer grasp the tofu with his plump baby hands and get it to his mouth. Considering how soft and slippery tofu can be, he did a great job. Those were good times.

This month, my Foodie Extravaganza group is making chicken soup in honor of National Chicken Soup for the Soul Day on November 12th. Make sure to scroll down past my recipe to see the rest.


Hot and Sour Chicken Soup

This version of hot and sour soup is adapted from two separate recipes from Ken Hom’s Foolproof Chinese Cookery and Joanne Chang’s Flour, Too. Both of these wonderful recipes use pork. I have used boneless, skinless chicken breasts instead.

Ingredients
2 small boneless chicken breasts (about 9 oz or 250g by weight)
2 tablespoons canola or other light oil
1 garlic clove, smashed and minced
1 tablespoon minced fresh ginger
1 chilli pepper, minced
2 tablespoons sliced onion tops (white part only – save green for garnish)
5 cups or 1.2L chicken stock
7 oz or 200 grams tofu (bean curd), medium firm
3 1/2 oz or 100g shiitake mushrooms
Salt

For the chicken marinade:
1 teaspoon light soy sauce
1 teaspoon Shaoxing rice wine or substitute dry sherry
1 teaspoon sesame oil
1/2 teaspoon cornstarch
Pinch each of salt and sugar

For the egg mixture:
2 large eggs
2 teaspoons toasted sesame oil
Pinch salt

Just before serving:
1/4 cup or 60ml Chinese black (mature) vinegar
1 tablespoon light soy sauce
1 tablespoon dark soy sauce
1 tablespoon chili bean sauce
2 teaspoons toasted sesame oil

For garnish:
Chopped cilantro
Sliced chilli peppers
Sliced green onion tops
Slivered ginger

Method
Combine your marinade ingredients in a small bowl.


Slice your chicken breasts very thinly and add them to the marinade. Mix well and set aside.


In a measuring cup with a spout, whisk the eggs with the sesame oil and the pinch of salt. You can use a bowl but the spout will making pouring the egg into the soup much easier. In another small bowl, mix together the vinegar, light soy, the dark soy, the chili bean sauce and the sesame oil. Set aside.


Clean and finely slice the shiitake mushrooms. Cut the tofu (aka bean curd) into 1/2 in or 1 cm cubes.


In a deep saucepan, heat the canola oil over medium-high heat until hot. Add the garlic, ginger and green onions and cook for a minute or two, stirring constantly. Be careful not the let the garlic color.

Add the chicken and cook, stirring occasionally, for about 2 more minutes.


Add the stock and bring the soup to a simmer.

Add the tofu and mushrooms and bring the soup back to a simmer over medium-high heat.


Now add the egg mixture in a very slow, thin and steady stream. Use a chopstick or a fork to pull the cooked egg slowly into strands.

Turn the fire off under the soup and stir in the vinegar mixture.

Serve each bowl garnished with cilantro, green onion tops, sliced red chili peppers and slivered ginger, as desired.

Food Lust People Love: Hot and sour chicken soup is a restaurant favorite that is quick and easy to make at home. With bits of chicken breast and cubes of tofu, it’s high in protein with a comforting spicy and flavorful broth that will cure whatever ails you.

Enjoy! 

Food Lust People Love: Hot and sour chicken soup is a restaurant favorite that is quick and easy to make at home. With bits of chicken breast and cubes of tofu, it’s high in protein with a comforting spicy and flavorful broth that will cure whatever ails you.


How will you celebrate National Chicken Soup for the Soul Day? Try one of our delicious recipes!


Foodie Extravaganza celebrates obscure food holidays by posting delicious recipes your family will love. Posting day is always the first Wednesday of each month. If you are a blogger and would like to join our group and blog along with us, come join our Facebook page Foodie Extravaganza. We would love to have you! If you're a home cook looking for tasty recipes, check out our Foodie Extravaganza Pinterest Board!

 Pin it! 

Food Lust People Love: Hot and sour chicken soup is a restaurant favorite that is quick and easy to make at home. With bits of chicken breast and cubes of tofu, it’s high in protein with a comforting spicy and flavorful broth that will cure whatever ails you.
 .

Monday, October 29, 2018

Quick Blackberry Jam Muffins #MuffinMonday

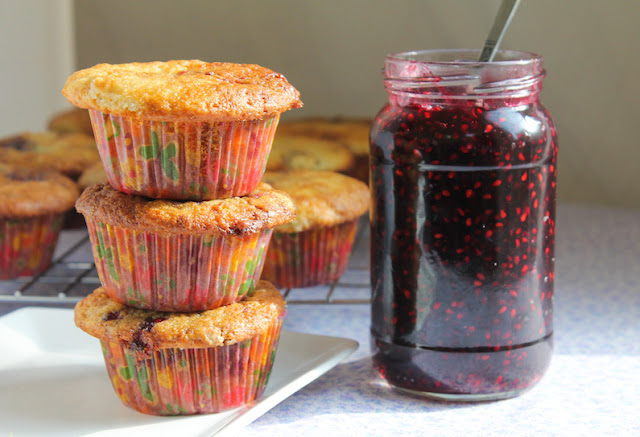
The best Blackberry Jam Muffins are made with small batch homemade quick jam folded into a fluffy batter. But, fear not, you can make yours with whatever good quality jam you have on hand.

Food Lust People Love: The best Blackberry Jam Muffins are made with small batch homemade quick jam folded into a fluffy batter. But, fear not, you can make yours with whatever good quality jam you have on hand.

I sometimes think that I was born in the wrong century, or perhaps later than I should have been in this one. I love to make jams, preserves and chutneys. Maybe it's because I don’t live in the early 1900s and have to do it. Like homework, it’s always more fun to do if it’s not your own assignment, amirite? I can hardly imagine either of my grandmothers putting up just one jar of jam or chowchow at a time. They are probably tsk-ing at me right now.

Dubai and the UAE in general have much more locally grown fresh produce available since I arrived six years ago, but except for dates, fruit is still flown in so it’s expensive. So much so that I cannot pass up produce when it is on sale, especially berries and summer fruit like peaches and nectarines.

This week it was blackberries. I cooked them down into a quick jam – no pectin, just lemon juice and sugar – then because it is Muffin Monday, I used one-third cup to make these lovely muffins. So good! And, the best part is that once the muffins are gone, we will still enjoy blackberries for weeks to come. If you'd like to make my quick blackberry jam, find that recipe here.

Quick Blackberry Jam Muffins

Combine my favorite easy quick bread breakfast muffin recipe with your favorite jam (or my quick blackberry jam) to make these delicious muffins for breakfast or snack time. I topped each with an extra blackberry before baking. As you can see from the photos, they sank, making a little tart surprise in the middle of each. Skip that step if you’d like.

Ingredients
2 cups or 250g all purpose flour
¾ cup or 150g sugar
2 teaspoons baking powder
½ teaspoon salt
1 cup or 240ml minus 2 tablespoons milk (*instructions below)
2 tablespoons lemon juice
1/3 cup or 78ml canola or other light oil
2 large eggs
1/3 cup or 78ml blackberry jam

12 whole blackberries to decorate – optional

Method
Preheat oven to 350°F or 180°C. Generously grease cups and top of 12-cup muffin pan or line it with paper muffin cups.

*Put your lemon juice in a measuring vessel and then add milk up to the 1 cup or 240ml mark. Set aside.

Whisk your flour, sugar, baking powder, baking soda and salt together in a large bowl.


In another bowl, whisk together your soured milk, oil and eggs.


All at once, add the wet ingredients to the dry. Gently fold just until dry ingredients are moistened. There may be little bits of flour showing and that's just fine. 


Spoon the blackberry jam on to the batter, then fold it in. You want ribbons of jam, not a homogenous batter.


Divide your batter relatively evenly between the 12 muffin cups.  Top each with a whole blackberry, if desired. As I mentioned above, they sunk. I was hoping for a decoration on top but instead got a little surprise inside. All good either way.


Bake the muffins for 20-25 minutes in your preheated oven, or until they are golden.

Remove the pan from the oven and let cool 10-15 minutes before removing muffins from the pan.

Food Lust People Love: The best Blackberry Jam Muffins are made with small batch homemade quick jam folded into a fluffy batter. But, fear not, you can make yours with whatever good quality jam you have on hand.


Enjoy!

Food Lust People Love: The best Blackberry Jam Muffins are made with small batch homemade quick jam folded into a fluffy batter. But, fear not, you can make yours with whatever good quality jam you have on hand.


Check out all of the wonderful muffins my Muffin Monday group has for you today!

Muffin Monday
#MuffinMonday is a group of muffin loving bakers who get together once a month to bake muffins. You can see all our of lovely muffins by following our Pinterest board. Updated links for all of our past events and more information about Muffin Monday, can be found on our home page.

Pin it! 

Food Lust People Love: The best Blackberry Jam Muffins are made with small batch homemade quick jam folded into a fluffy batter. But, fear not, you can make yours with whatever good quality jam you have on hand.
 .

Saturday, October 27, 2018

Quick Blackberry Jam

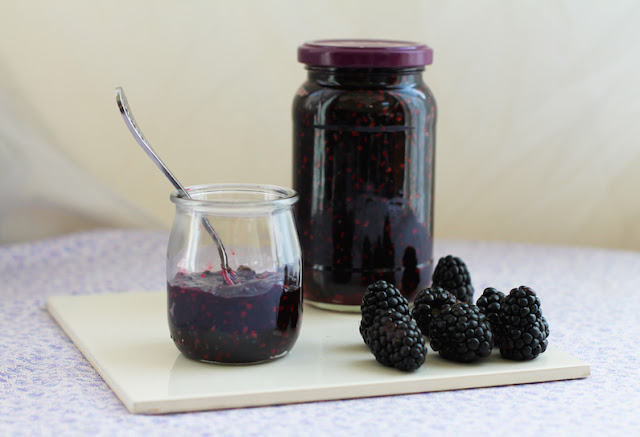
Quick blackberry jam is so easy that you can have homemade jam in less than 25 minutes. Seriously. That doesn’t count cooling time but those extra minutes will teach you patience, young grasshopper. Good things do come to those wait!

Food Lust People Love: Quick blackberry jam is so easy that you can have homemade jam in less than 25 minutes. Seriously. That doesn’t count cooling time but those extra minutes will teach you patience, young grasshopper. Good things do come to those wait!


If you’ve ever let jam making scare you, this is the recipe you’ll want to try. First, it only makes one jar, so no huge commitment. Second, it only has three ingredients. And finally, but probably most importantly, it’s quick, easy and delicious. And P.S. It's also great in muffins. Get the muffin recipe here.

Food Lust People Love: Quick blackberry jam is so easy that you can have homemade jam in less than 25 minutes. Seriously. That doesn’t count cooling time but those extra minutes will teach you patience, young grasshopper. Good things do come to those wait!


Quick Blackberry Jam

As I mention in my blackberry jam muffin post, I cannot resist berries on sale. This quick blackberry jam extends their shelf life in a most wonderful, easy way.

Ingredients - for one jar - 1 3/4 cups or 414ml
3 (6 oz or 170g) punnets large blackberries (mine were Driscoll's from Mexico)
2 cups or 400g granulated sugar
2 teaspoons fresh lemon juice
zest 1/2 lemon
1 1/2 teaspoons or 7g unsalted butter - optional

Method
In your kitchen sink, sterilize one 2-cup or 480ml jar by putting a teaspoon in it and then filling it with just boiled water. Fill its lid as well. Leave to cool while you get on with the jam. I pour the boiling water over my ladle and jar funnel too, just to make sure it’s all sterilized. Once it’s cooled enough to handle, pour the water out of the jar and lid and leave to dry.

Put the clean blackberries in a heavy bottomed pot along with the lemon zest. Mash them with a potato masher until completely pulverized, occasionally using a sharp knife to cut them off of the masher grid.


Add the sugar and lemon juice. Stir well.


Put the pot on the stove over a high heat, stirring frequently, until it comes to a rolling boil. Boil for five minutes, skimming off and discarding any scum that appears with a spoon. Do not walk away from the jam at any time.


Reduce the heat to medium high and cook at a slow boil for an additional 12-14 minutes or until the jam reduces by about one-third in volume, continuing to skim scum if it keeps coming out.


You really don’t need a thermometer for this quick jam but I like to watch the temperature rise. Supposedly for jam to set, it has to reach 220°F or 104°C. This quick jam did not but it set just fine.

Remove the pot from the stove and add the butter. Stir well till the butter has melted completely.


Using a clean ladle and funnel, transfer the quick jam to your jar. Screw the lid on tightly and turn the jar upside down. Leave to cool completely. Once cool, turn the jar upright and store in the refrigerator.


Enjoy!


Pin it! 

Food Lust People Love: Quick blackberry jam is so easy that you can have homemade jam in less than 25 minutes. Seriously. That doesn’t count cooling time but those extra minutes will teach you patience, young grasshopper. Good things do come to those wait!
 .