Monday, February 17, 2020

Sous Vide Chicken Crown Roast

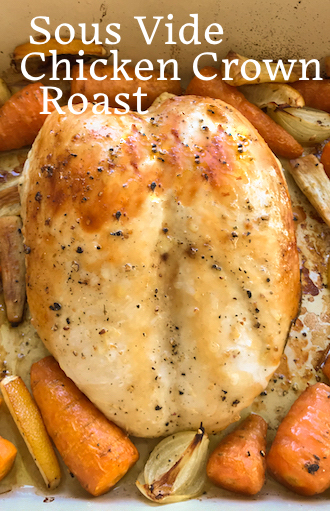
A bone-in chicken crown roasts to perfection after a sous vide of one hour and 45 minutes. Succulent and tender, it carves wonderfully into delectable slices. Serve with onions, carrots and/or parsnips for a complete meal.

Food Lust People Love: A bone-in chicken crown roasts to perfection after a 1 hour 45 minutes sous vide. Succulent and tender, it carves wonderfully into delectable slices. Serve with onions, carrots and/or parsnips for a complete meal.


I know that science is still trying to nail down whether meat cooked on the bone is tastier, but as for me, I am a believer. I have been known to butterfly and marinate legs of lamb to put them on a charcoal grill but that’s about the only time I willingly take a bone out before cooking.

If you’ve never searched, you might not be aware that sous vide recipes for poultry with bones still in are few and far between. Frankly, I couldn’t find one for a whole bird. Most poultry roast recipes call for removing the bones or at the very least butterflying the bird. I’m sure the reason is that it’s hard to keep a whole bird submerged, because of the air inside.

I solved that problem a couple of years ago when I wanted to roast two guinea fowl for Christmas. I stuffed them! It was a risky experiment that could have meant a terrible Christmas dinner but they turned out beautifully! I was so impressed that I’ve even used sous vide to cook a whole stuffed turkey. I cannot tell you how moist and tender the meat was, even the breast.

That’s why I was so excited when I found a chicken crown roast to further experiment on. It’s not a very common cut for chicken although many shops do sell turkey crowns around the holidays. Basically the crown is the whole breast, both sides, with the bones that support it underneath, sometimes with the ribs as well, sometimes without. It's a good place to start if you are scared of sous vide-ing a whole bird.

Sous Vide Bone-in Chicken Crown

Partially cooking the crown roast first by sous vide before roasting ensures that the meat is tender and juicy, yet covered by golden brown skin that people will fight over. To make a full meal of this beauty, you can add onions, carrots, parsnips and/or potatoes to the roasting pan. Or roast it alone if you have other side dishes in mind. It's one of our favorite family meals.

Ingredients
For sous vide:
1 chicken crown, bone in, skin on (about 1 1/2 lbs or 700g)
1 small lemon, sliced in thin wedges
Flakey sea salt
Freshly ground black pepper
Leaves from 1 large sprig rosemary
2-3 tablespoons butter

Optional for roasting:
2 tablespoons olive oil
3-4 small onions, peeled and quartered
1.1 lbs or 500g Chantenay carrots, topped, tailed and scrubbed clean
2-3 parsnips, peeled and cut into sticks
Sea salt
Freshly ground black pepper

Method 
Set up your sous vide machine to 145ºF / 62.8ºC in a large vessel filled with water up to the MAX line. Set the time for 1 hour and 45 minutes. (I use this Anova Sous Vide Precision Cooker. <Amazon affiliate link)

Liberally salt and pepper the chicken crown. Okay, this guy hasn't been salted and peppered yet but I wanted to show you what he looks like out of the bag.


Put it in a large sealable bag with the lemon wedges, rosemary and butter. Carefully submerge the bag in the heating water until all of the air inside has been pressed out to create a vacuum. Seal the bag.


Sous vide at 145°F/62.8ºC for 1 hour 45 minutes.

Remove the whole bag from the sous vide vessel and leave to cool still in the bag.

If you aren't roasting until later, refrigerate and increase the roasting time to compensate. You will be looking for an internal temperature of about 165°F or 75°C.

To finish, roast on 375°F or 190°C, fan assist, for about 40-45 minutes, accompanied by onions, carrots and/or parsnips drizzled with olive oil and seasoned with salt and pepper, if desired. Turn pan occasionally so the chicken crown browns evenly.

Cover with foil and leave to rest for 10 minutes. Carve to serve with pan juices.

Food Lust People Love: A bone-in chicken crown roasts to perfection after a 1 hour 45 minutes sous vide. Succulent and tender, it carves wonderfully into delectable slices. Serve with onions, carrots and/or parsnips for a complete meal.


Enjoy!

It’s Multicooker Monday again, that monthly post when we attempt to make more use of our slow cookers, Instant Pots, sous vide machines and air fryers and hopefully inspire you to use yours as well. Many thanks to our group founder and host, Sue of Palatable Pastime. Check out the other recipes we are sharing:

Tuesday, February 11, 2020

Pönnukökur aka Swedish Pancakes #BreadBakers

Thin, soft and golden, these lightly cardamom scented pönnukökur are a traditional teatime treat in Sweden. In their homeland, they are served simply: sprinkled with sugar then rolled up individually by each person around the table. You can push the boat out by adding lemon slices, fresh berries, jam and hazelnut spread to the add-on offerings.

Food Lust People Lust: Thin, soft and golden, these lightly cardamom scented pönnukökur are a traditional teatime treat in Sweden. In their homeland, they are served simply: sprinkled with sugar then rolled up individually by each person around the table. Push the boat out by adding lemon slices, fresh berries, jam and hazelnut spread to the add-on offerings.


I made these for the first time a few years back when we had an overnight guest and Swedish pancakes sounded like a great Sunday brunch dish. As I followed the instructions, it occurred to me that pönnukökur – literal translation: pancakes - were just Swedish crêpes. (For you language buffs, the singular “pancake” is pönnukaka.) The British also call crêpes pancakes so I don’t know why I was surprised.

The funny thing is, as I searched for the Swedish recipe again recently, pönnukökur amerískar kept popping up. You know, the fluffy kind we also call pancakes and serve in a stack with butter and syrup. It’s a mad, mad world.

Near as I can figure, the difference between the British pancakes/French crêpes and Swedish pönnukökur is the addition of ground cardamom and baking powder.

Pönnukökur aka Swedish Pancakes

This recipe has been adapted from several I found on various websites. Some call for melted butter, margarine or vegetable oil in place of the cream but I liked the richness of using cream. I lightly crushed cardamom pods, discarded the husks and ground the tiny seeds with a mortar and pestle. The fragrance and taste is fresher that store-bought ground cardamom. That said, use what you have. It’s all good.

Ingredients - for about 18 (6 in or 15cm) pancakes
1 3/4 cups or milk
1/2 cup or 120ml heavy cream
1 teaspoon vanilla extract
1 cup or 125g all-purpose flour
3 tablespoons sugar
1 teaspoon baking powder
1 teaspoon salt
1/2 teaspoon ground cardamom
2 large eggs

Method
Combine the milk, cream and vanilla. Add the dry ingredients and eggs.


Whisk until a smooth batter is created. Refrigerate for 1-2 hours. When the foam subsided, I ended up with a little more than 4 1/2 cups of batter.


Heat a frying pan and thinly grease it, or use a non-stick skillet. Ladle about 3-4 tablespoons of batter into the hot pan. Swirl the batter around until the whole bottom of the pan is covered with a thin layer of the batter. Cook on that side until the edges begin to brown slightly.


Loosen the sides and turn the pancake with a spatula. Cook the other side briefly, until you can shake the pan and the pancake slips around easily.

Food Lust People Lust: Thin, soft and golden, these lightly cardamom scented pönnukökur are a traditional teatime treat in Sweden. In their homeland, they are served simply: sprinkled with sugar then rolled up individually by each person around the table. Push the boat out by adding lemon slices, fresh berries, jam and hazelnut spread to the add-on offerings.


Slide the pancake on to a warm plate.

Continue the process until all of the pancakes are cooked, stacking them on top of each other, lightly covered with a bit of foil to keep them warm. Or if the hungry hordes are standing by waiting, employ two small pans on your stove and serve the pancakes directly.

You can also cover the stack with cling film and rewarm the pancakes in a microwave.

The most traditional Swedish way to eat these is with just a sprinkle of sugar but we like a squeeze of lemon too. (Some Swedish sites also suggested one alternative is a spoonful of rhubarb jam.)

Food Lust People Lust: Thin, soft and golden, these lightly cardamom scented pönnukökur are a traditional teatime treat in Sweden. In their homeland, they are served simply: sprinkled with sugar then rolled up individually by each person around the table. Push the boat out by adding lemon slices, fresh berries, jam and hazelnut spread to the add-on offerings.
These can also be enjoyed with hazelnut spread, jam or fruit and whipped cream, which means they make a great dessert as well as a good breakfast or teatime snack.

Food Lust People Lust: Thin, soft and golden, these lightly cardamom scented pönnukökur are a traditional teatime treat in Sweden. In their homeland, they are served simply: sprinkled with sugar then rolled up individually by each person around the table. Push the boat out by adding lemon slices, fresh berries, jam and hazelnut spread to the add-on offerings.


Enjoy!

This month my Bread Baker friends are sharing Scandinavian recipes from the countries of Sweden, Norway and Denmark. Many thanks to our host, Felice of All That's Left Are The Crumbs for this fun theme! Check out the recipes below:

#BreadBakers is a group of bread loving bakers who get together once a month to bake bread with a common ingredient or theme. You can see all our lovely bread by following our Pinterest board right here. Links are also updated after each event on the #BreadBakers home page. We take turns hosting each month and choosing the theme/ingredient.
BreadBakers

Pin these Pönnukökur aka Swedish Pancakes!

Food Lust People Lust: Thin, soft and golden, these lightly cardamom scented pönnukökur are a traditional teatime treat in Sweden. In their homeland, they are served simply: sprinkled with sugar then rolled up individually by each person around the table. Push the boat out by adding lemon slices, fresh berries, jam and hazelnut spread to the add-on offerings.
.

Monday, February 10, 2020

Apricot Pistachio Cake #BakingBloggers

Sweet chewy dried apricots and flavorful roasted pistachios combine with lots of creamy yogurt and butter to create one of the richness cakes you can imagine. A hint of cardamom in the batter is echoed again in the orange-cardamom syrup to finish the cake with a Middle Eastern flair.

Food Lust People Love: Sweet chewy dried apricots and flavorful roasted pistachios combine with lots of creamy yogurt and butter to create one of the richness cakes you can imagine. A hint of cardamom in the batter is echoed again in the orange-cardamom syrup to finish the cake with a Middle Eastern flair.


Apricots and pistachios are two of my favorite ingredients both singly and together. If you feel the same, you will like my Apricot Upside Down butter Bundt and my pomegranate pistachio muffins. My favorite joint venture of the two (before this cake!) is a gorgeous baked Camembert topped with pistachios and dried apricots. It's the easiest, tastiest appetizer you'll ever make.

Besides making me do the happy dance, since apricots and pistachios are popular in Middle Eastern desserts this cake fits our Blogging Bakers theme for this month. Make sure you scroll to the bottom to see the other sweet and savory recipes we are sharing.

Apricot Pistachio Cake

This recipe is adapted from one by the talented Anita Schecter on The Spruce Eats. If you love Middle Eastern recipes of all kinds, you should visit Anita, who I am pleased to call my friend. She also shares wonderful recipes of all sorts (so many great cocktails!) on her personal website.

Ingredients
For the Cake:
1 1/2 cups or 190g all-purpose flour
1 1/2 teaspoons baking powder
1 teaspoon baking soda
1 teaspoon salt
1/4 teaspoon ground cardamom
1 1/2 cups or 300g sugar
1 cup or 226g unsalted butter, at room temperature
4 large eggs, at room temperature
1 cup or 245g Greek yogurt
2 teaspoon vanilla extract
6 oz or 170g roasted, unsalted pistachios
6 oz or 170g dried apricots

For the syrup:
1/2 cup or 50g sugar
2 tablespoons orange juice (or water)
1/4 teaspoon ground cardamom
Pinch of salt

Optional for serving:
Greek-style plain, unsweetened yogurt

Method
Preheat the oven to 350°F or 180°C and prepare a 11x15 inch or 28x38cm pan by buttering and flouring it or lining it with baking parchment. If you are lining it, put a couple of dabs of butter on the pan to help the parchment stay in place.

Roughly chop about 1/4 of the pistachios and set aside a couple of spoonsful for sprinkling on the cake when it’s done. Put the rest into a food processor and pulse until coarsely ground, occasionally scraping the sides with a rubber spatula. Do not over process. We don’t want pistachio butter.


In a large mixing bowl, whisk together your flour, baking powder, baking soda, and salt.


Add in the ground and chopped pistachios and whisk again.


Chop the apricots into small pieces and set aside a couple of spoonsful for decoration. Add the balance of the apricots to the dry ingredients. Use your hands to separate the sticky pieces and make sure they are completely coated in the flour mixture.


Using a hand or stand mixer, beat together the butter and sugar until they become fluffy and light yellow. Beat in the eggs one at a time, then beat in the yogurt and vanilla.


Add the dry ingredients into the wet and beat until well combined. Spoon the thick batter into your prepared pan and spread it evenly to the side and into the corners with a spatula.


Bake for 30 to 35 minutes or until a toothpick comes out clean.


Meanwhile make the syrup by warming the sugar, juice and salt in a small pot over a low flame. Spoon it over the cake while it is still warm.

Sprinkle on the reserved chopped pistachios and apricots.

Food Lust People Love: Sweet chewy dried apricots and flavorful roasted pistachios combine with lots of creamy yogurt and butter to create one of the richness cakes you can imagine. A hint of cardamom in the batter is echoed again in the orange-cardamom syrup to finish the cake with a Middle Eastern flair.


Leave to cool. If you have lined the pan with baking parchment, you can use the sides to remove the cake from the pan. If not, cut into squares to serve directly from the pan.

Food Lust People Love: Sweet chewy dried apricots and flavorful roasted pistachios combine with lots of creamy yogurt and butter to create one of the richness cakes you can imagine. A hint of cardamom in the batter is echoed again in the orange-cardamom syrup to finish the cake with a Middle Eastern flair.


Serve with a dollop of yogurt, if desired.

Food Lust People Love: Sweet chewy dried apricots and flavorful roasted pistachios combine with lots of creamy yogurt and butter to create one of the richness cakes you can imagine. A hint of cardamom in the batter is echoed again in the orange-cardamom syrup to finish the cake with a Middle Eastern flair.


Enjoy!

This month my Baking Bloggers are sharing Middle Eastern recipes. Many thanks to our doyenne and host, Sue of Palatable Pastime. Check out the other recipes below:

Baking Bloggers is a friendly group of food bloggers who vote on a shared theme and then post recipes to fit that theme one the second Monday of each month. If you are a food blogger interested in joining in, inquire at our Baking Bloggers Facebook group. We'd be honored if you would join us in our baking adventures.


Pin this Apricot Pistachio Cake! 

Food Lust People Love: Sweet chewy dried apricots and flavorful roasted pistachios combine with lots of creamy yogurt and butter to create one of the richness cakes you can imagine. A hint of cardamom in the batter is echoed again in the orange-cardamom syrup to finish the cake with a Middle Eastern flair.
 .

Wednesday, February 5, 2020

Baked Duck Eggs #FoodieExtravaganza

Creamy and so dip-in-able, baked duck eggs are easy to make and a delight to eat. Pass the toast soldiers, please!

Food Lust People Love: Creamy and so dip-in-able, baked duck eggs are easy to make and a delight to eat. Pass the toast soldiers, please! This is a delicious way to prepare breakfast for a crowd! If you don’t have duck eggs, chicken eggs can be substituted. Just adjust the cooking time downwards by a couple of minutes because smaller eggs will take less time to cook.
I love duck eggs! First of all, their yolks are much bigger than a regular chicken egg and everyone knows that the best part of any egg is the yolk. It’s where most of the flavor resides, not to mention a lion’s share of the nutrients and protein. The white part of a duck egg, or albumen to give it its correct name, is clear and bright, without the slight yellow tinge found in chicken eggs.

Varying in color depending on the breed, duck eggshells are a bit thicker and sturdier than chicken eggs. I suggest cracking them into a small bowl rather than straight into the ramekins to make sure you don’t get any hard shell in your dish.

Duck eggs can be challenging to find in normal US grocery stores but if you are fortunate enough to have farmers’ markets in your area, I’ve found them to be a reliable source. My local Whole Foods also carries duck eggs so if you have one nearby, you might want to check there. They are more expensive than chicken eggs, but still affordable as a main course for breakfast.

When I do come across them, baking is my favorite way to serve them. With just a little cream and butter, the delicious duck egg shines, definitely the star of your breakfast or brunch.

Baked Duck Eggs

This is an easy and delicious way to prepare breakfast for a crowd! If you don’t have duck eggs, chicken eggs can be substituted. Just adjust the cooking time downwards by a couple of minutes because smaller eggs will take less time to cook.

Ingredients per person
1-2 teaspoons butter
2 tablespoons heavy cream
1 duck egg
salt
black pepper

For serving:
Hot buttered toast

Equipment: 4-5 in or 10-12cm shallow ramekins

Method
Set a rack in the middle of your oven. Preheat the oven to 375°F or 190°C. Boil a kettle or pot of water then turn it off.

Generously butter the inside of the ramekins. Add in the cream with a pinch of salt and a couple of grinds of black pepper.  Crack your eggs one at a time, into a small bowl, transferring each to a ramekin.

Food Lust People Love: Creamy and so dip-in-able, baked duck eggs are easy to make and a delight to eat. Pass the toast soldiers, please! This is a delicious way to prepare breakfast for a crowd! If you don’t have duck eggs, chicken eggs can be substituted. Just adjust the cooking time downwards by a couple of minutes because smaller eggs will take less time to cook.


My second egg surprised me by having double yolks of different colors. How does that even happen?!


Sprinkle the eggs with just a touch more salt and pepper.

Food Lust People Love: Creamy and so dip-in-able, baked duck eggs are easy to make and a delight to eat. Pass the toast soldiers, please! This is a delicious way to prepare breakfast for a crowd! If you don’t have duck eggs, chicken eggs can be substituted. Just adjust the cooking time downwards by a couple of minutes because smaller eggs will take less time to cook.


Place all the ramekins in a high-sided baking pan. Once the oven has preheated, put the pan in the oven and carefully pour in the hot water till it comes halfway up the ramekins.

Close the oven door and bake for 12-15 minutes or until the eggs are just set but the yolks are still runny. Start testing at 12 minutes by gently jiggling the pan. The whites should be firm but the yolks should wiggle slightly. If the yolks move too much, keep baking and testing.

This is a matter of preference and some may like their yolks softer or harder. For me, the joy is dipping my toast into a very soft yolk.

Carefully remove the pan from the oven and then remove the ramekins from the pan. Serve with toast for dipping.

Food Lust People Love: Creamy and so dip-in-able, baked duck eggs are easy to make and a delight to eat. Pass the toast soldiers, please! This is a delicious way to prepare breakfast for a crowd! If you don’t have duck eggs, chicken eggs can be substituted. Just adjust the cooking time downwards by a couple of minutes because smaller eggs will take less time to cook.


Enjoy!

This month my Foodie Extravaganza friends are sharing breakfast recipes in celebration of National Breakfast Month. Check them out below. Many thanks to our host, Sue of Palatable Pastime.
Foodie Extravaganza is where we celebrate obscure food holidays by cooking and baking together with the same ingredient or theme each month.

Posting day is always the first Wednesday of each month. If you are a blogger and would like to join our group and blog along with us, come join our Facebook page Foodie Extravaganza. We would love to have you! If you're a spectator looking for delicious tid-bits check out our Foodie Extravaganza Pinterest Board!

Pin these Baked Duck Eggs!

Food Lust People Love: Creamy and so dip-in-able, baked duck eggs are easy to make and a delight to eat. Pass the toast soldiers, please! This is a delicious way to prepare breakfast for a crowd! If you don’t have duck eggs, chicken eggs can be substituted. Just adjust the cooking time downwards by a couple of minutes because smaller eggs will take less time to cook.
 .

Monday, January 27, 2020

Sprouted Spelt Date Muffins #MuffinMonday

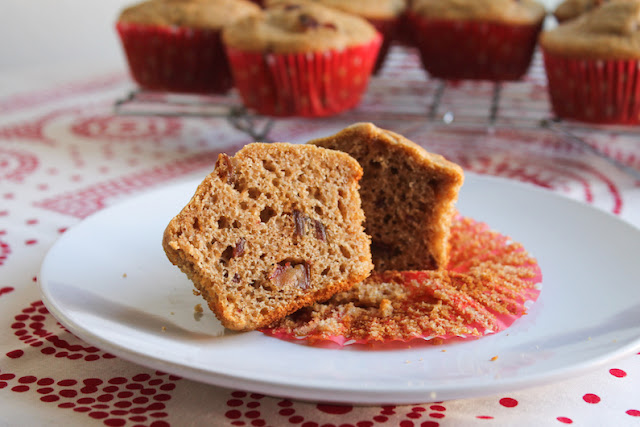
Sprouted spelt date muffins pair the nuttiness of spelt with the natural sweetness of dates. These are the perfect breakfast or snack any time of the day.

Food Lust People Love: Sprouted spelt date muffins pair the nuttiness of spelt with the natural sweetness of dates. These are the perfect breakfast or snack any time of the day.


If you saw the yeasted round loaf I baked with sprouted spelt a couple of weeks back, you already know that it was a new ingredient for me. What I didn’t tell you was how hard it was to find here in the fourth most populous city of the United States. I assumed it would be easy.

Houston has become well-known lately as a foodie destination. Don’t believe me? Check out this article on GQ, for one. And David Chang called it no less than his favorite food city on his Netflix show Ugly Delicious. From the specialty stores that carry imported ingredients from Asia, the Middle East, and both Eastern and Western Europe, not to mention the many grocery store chains vying for my food dollar, I thought I could get anything here.

Turns out that sprouted flours are easy to find online, not so easy to buy in a Houston shop. I finally found a five-pound bag in Sprouts. Five pounds! Fortunately, we love the bread it makes. Expect to find more sprouted spelt recipes in the coming months. Meanwhile, start with something easy, like muffins.

Sprouted Spelt Date Muffins

I adapted this recipe from one on the King Arthur website. The weight they list for 2 1/4 cups of flour did not reflect my own measurements, which you will find below. I really cannot explain the discrepancy but I can tell you that I weighed my sprouted spelt and that exactly how much I used to make these muffins.

Ingredients
1/2 cup, firmly packed, or 113g stoned dates
2 cups or 240g sprouted spelt flour
1/4 cup or 50g brown sugar
1 tablespoon baking powder
1/2 teaspoon salt
1 cup or 240ml milk
2 large eggs
1/4 cup or 60ml canola or other light oil

Method
Preheat your oven to 350°F or 180°C. Grease and flour a 12-cup muffin tin, or line it with paper or silicone baking cups.

Chop the dates roughly and set aside some pieces for adding to the top of the muffins.

Whisk all the dry ingredients in a mixing bowl then add in the dates.

Stir well and use your fingers separate the sticky date pieces until they are all well coated with flour.

In another mixing bowl, whisk together the milk, eggs and oil.

Fold the wet ingredients into the dry ones until they are just combined. Do not over mix.


Fill the muffin cups two-thirds full. Top with the reserved chopped dates.


Bake in your preheated oven for 20 to 25 minutes, or until they are golden brown.

Cool in the pan for a few minutes then remove the muffins and cool on a wire rack.

Food Lust People Love: Sprouted spelt date muffins pair the nuttiness of spelt with the natural sweetness of dates. These are the perfect breakfast or snack any time of the day.


Enjoy!

Food Lust People Love: Sprouted spelt date muffins pair the nuttiness of spelt with the natural sweetness of dates. These are the perfect breakfast or snack any time of the day.


Check out the first lovely muffins of 2020 my Muffin Monday friends are sharing today!

Muffin Monday
#MuffinMonday is a group of muffin loving bakers who get together once a month to bake muffins. You can see all of our lovely muffins by following our Pinterest board. Updated links for all of our past events and more information about Muffin Monday can be found on our home page.

Pin these sprouted spelt date muffins! 

Food Lust People Love: Sprouted spelt date muffins pair the nuttiness of spelt with the natural sweetness of dates. These are the perfect breakfast or snack any time of the day.
.

Monday, January 20, 2020

Quick Corn Chowder - in an Instant Pot

This quick corn chowder is creamy and rich. It’s made with cream, cream cheese and plenty of sharp cheddar, not to mention tender red potatoes and crispy bacon. You can enjoy this savory warming soup in fewer than 30 minutes because instead of a long, slow simmer, it’s cooked under pressure in an Instant Pot.

Food Lust People Love: This quick corn chowder is creamy and rich. It’s made with cream, cream cheese and plenty of sharp cheddar, not to mention tender red potatoes and crispy bacon. You can enjoy this savory warming soup in fewer than 30 minutes because instead of a long, slow simmer, it’s cooked under pressure in an Instant Pot.


Way back in 2016, I ordered an Instant Pot from Amazon. We were only in the States for a few weeks and, much to my chagrin, I never got around to trying it out before we headed home to Dubai. It never even made it out of the box. Of course, the Instant Pot couldn’t come with because it’s 110V and Dubai runs on 220V.

Since then I’ve traveled back and forth from overseas to Houston, only managing to get organized enough to make one recipe in the Instant Pot. It was delicious - a carrot snack cake, but still. Only one in almost four years of holidays with the Instant Pot. Sad, right?

That’s why I’ve joined a new bloggers group called Multicooker Monday where we will be sharing recipes using Instant Pots, slow cookers, sous vide precision cookers and even air fryers. This is our inaugural post. I hope this is the motivation I need to use the darn Instant Pot more. Make sure to scroll down to the bottom to see what everyone else has made today.

Quick Corn Chowder

If you don’t have an Instant Pot, this recipe can also be made using a traditional pressure cooker, or go old school and slow simmer the ingredients until the corn is tender and the potatoes are cooked through, before adding the cheeses, cream and milk in a stovetop soup pot. My recipe has been adapted from one on Taste of Home.

Ingredients
3 thick cut slices smoked bacon (about 6 oz or 170g)
1 medium onion, chopped
3 garlic cloves, minced
3 1/2 cups or 830ml chicken stock
3 cups or 16 oz or 450g fresh or frozen corn
4 medium (or 8 small) red potatoes
1/2 teaspoon freshly ground black pepper
1/2 teaspoon sugar
1/4 teaspoon ground cayenne
4 oz or 113g sharp cheddar cheese, grated, plus extra for garnish, if desired
2 tablespoons cornstarch
4 oz or 113g cream cheese
1/2 cup or 120ml heavy whipping cream
1/2 cup or 120ml milk
Salt to taste
To garnish: green onion tops, chopped

Method
If you are using medium sized red potatoes, peel them and cut them into 1/2-inch or 1cm cubes. If you are using the baby red potatoes just cut them in half. Put the potatoes in a bowl with cool tap water and set them aside.

Cut bacon slices in small pieces and put them in the Instant Pot in as close to a single layer as you can manage.


Press the Sauté button and adjust to high heat. Cook the bacon bits scooting them around with a wooden spoon or silicone spatula to make sure they are all starting to crisp up. Keep stirring and frying until they reach your desired crispness, about 7-8 minutes.


Scoop the bacon bits out with a slotted spoon and put them on a paper towel to absorb the grease. Pour the bacon grease out into a heatproof measuring cup and then put 2 tablespoons of it back into the Instant Pot. (Save the rest of the bacon fat in a clean jar in your refrigerator for use in another recipe.)

With the Instant Pot still on sauté, add in the chopped onion and minced garlic. Cook for several minutes, stirring often, or until the onion is translucent.


Add in the chicken stock, corn, red potatoes, the two ground peppers and the sugar.


Lock the lid on your Instant Pot and make sure the vent is closed. The original instructions say to select manual setting; adjust the pressure to high and set the time for 15 minutes. I have one of the older Instant Pots so the instructions are a little different for mine. I select Soup, then adjust to high and set the time. Yours may differ as well so consult your owner’s manual.

When the cooking time is up, quick-release the pressure according to the manufacturer's directions.

Combine the grated cheddar with the cornstarch and mix well to coat. This is a great way to ensure that you don't create any lumps when adding the cornstarch to the soup.

Once again, select the sauté setting on your Instant Pot and adjust for low heat. Pour the cream and milk into the chowder. Stir well. Add the cream cheese cut in cubes. (Most of it sunk immediately!)


Add in the cornstarch-coated cheese and stir well.


Cook, stirring constantly, until the chowder thickens slightly and the cream cheese is completely melted, about 6-8 minutes. Taste for salt and add a little, if needed. Since chicken stock and cheese can both be quite salty, I often find that no additional salt is necessary for my taste. You do you.

Add in the crispy bacon, keeping back a little for garnish. Serve each bowl sprinkled with green onion tops, the reserved bacon, and if desired, (DO IT!) additional grated cheese.

Food Lust People Love: This quick corn chowder is creamy and rich. It’s made with cream, cream cheese and plenty of sharp cheddar, not to mention tender red potatoes and crispy bacon. You can enjoy this savory warming soup in fewer than 30 minutes because instead of a long, slow simmer, it’s cooked under pressure in an Instant Pot.


Enjoy!

Super big thanks to Sue of Palatable Pastime for creating the multicooker group and hosting our inaugural event. I am looking forward to using my Instant Pot more. Check out the other multicooker recipes below!

Pin this Quick Corn Chowder!

Food Lust People Love: This quick corn chowder is creamy and rich. It’s made with cream, cream cheese and plenty of sharp cheddar, not to mention tender red potatoes and crispy bacon. You can enjoy this savory warming soup in fewer than 30 minutes because instead of a long, slow simmer, it’s cooked under pressure in an Instant Pot.
 .