Thursday, July 16, 2020

Sourdough Chocolate Bundt Cake #BundtBakers

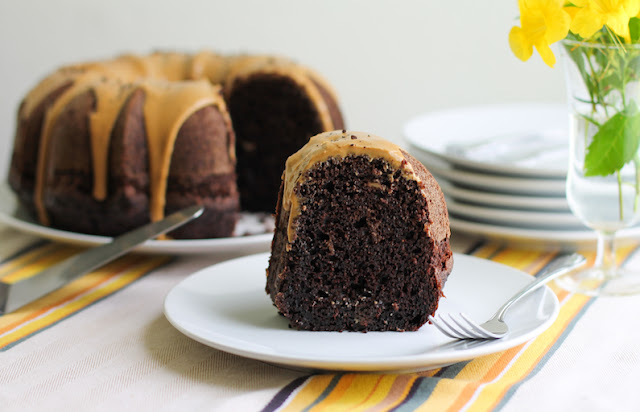
The sourdough starter isn’t an obvious flavor in this sourdough chocolate Bundt cake but the moisture it adds makes this the most tender and light – yet so rich! – chocolate cake I’ve ever tasted.

Food Lust People Love: The sourdough starter isn’t an obvious flavor in this sourdough chocolate Bundt cake but the moisture it adds makes this the most tender and light – yet so rich! – chocolate cake I’ve ever tasted.


A couple of years back when I was still living in Dubai, I succumbed to the lure of the sourdough starter. I had just gotten it up and running when a family emergency called me out of the country. I tried to revive it when I arrived back home but, frankly, I had lost the enthusiasm.

Like almost everyone else who has been in lockdown, I thought housebound pandemic mode would be the perfect time to try again, especially when I found instructions on the King Arthur Flour website on how to maintain a tiny starter with fewer discards.

That said, I am often still looking for uses for sourdough discard. Again the King Arthur Flour website came through. I can highly recommend their sourdough crumpets made entirely of discard, a little sugar, salt and baking soda, and their chocolate cake, which I’ve adapted from this recipe.

Sourdough Chocolate Bundt Cake

Sourdough in a cake was a revelation! As they say on the KA website, you don’t taste any sourness, just deep rich chocolate. I added a simple coffee glaze that was absolutely perfect poured on top and sprinkled on a few espresso granules for a lovely contrast in color.

Ingredients
For the cake batter:
1 cup or 227g sourdough starter, ripe (fed) or discard
1 cup or 240ml milk (Do not use skim milk!)
2 cups or 250g unbleached all-purpose flour, plus extra for the pan
1 tablespoon butter (for preparing the pan)
1 1/2 cups or 300g granulated sugar
1 cup or 240ml vegetable oil
2 teaspoons vanilla extract
1/2 cup or 60g Dutch process cocoa powder
1 1/2 teaspoons baking soda
1 teaspoon salt
1 teaspoon baking powder
1 teaspoon instant espresso granules
2 large eggs

For the coffee glaze:
1 tablespoon hot water
2 teaspoons instant espresso granules
1 cup or 125g icing sugar
3-4 teaspoons heavy cream

Optional for decorating: instant espresso granules

Method
In a large bowl, mix together the sourdough starter, milk, and flour. Cover with cling film and leave to rest at room temperature for 2 to 3 hours. It will rise ever so slightly and maybe get a few bubbles.


Preheat the oven to 350°F or 180°C and prepare a 12-cup Bundt pan by greasing it with the butter and flouring it thoroughly.

In a separate bowl, beat together the sugar, oil, vanilla, salt, baking soda, cocoa and espresso powder. I used my stand mixer for this but you could just use a whisk as well. The sugar won't dissolve so it's going to be grainy. All good.


Scrape down the bowl with a rubber spatula and add the eggs one at a time, beating well and scraping the bowl down again after each addition.


Pour the chocolate mixture into the mixing bowl with the starter mixture.

Use a rubber spatula to fold the chocolate into the starter mixture until well combined.


Pour the batter into your prepared pan.


Bake the cake for 45-50 minutes, until a wooden skewer inserted into the center comes out clean. If you are a instant read thermometer using person, (and I highly recommend you become one if you are not) the ideal internal temperature is 210°F or 99°C.


Remove the cake from the oven, and set it on a rack to cool for about 10 minutes, then use a toothpick to loosen the sides and middle and invert the Bundt onto the wire rack. Leave it to cool completely before glazing.


To make the coffee glaze, dissolve the espresso granules in the hot water then sift your icing sugar into the same bowl. Stir until completely smooth, adding the cream a teaspoon at a time till you are happy with the consistency. I like it quite thick but still pourable. Spoon the glaze over the top of the Bundt.


If desired, sprinkle on some of the espresso granules quickly so they will stick before the glaze surface dries.

Food Lust People Love: The sourdough starter isn’t an obvious flavor in this sourdough chocolate Bundt cake but the moisture it adds makes this the most tender and light – yet so rich! – chocolate cake I’ve ever tasted.


Cut in slices to serve.

Food Lust People Love: The sourdough starter isn’t an obvious flavor in this sourdough chocolate Bundt cake but the moisture it adds makes this the most tender and light – yet so rich! – chocolate cake I’ve ever tasted.


Enjoy!

This month my Bundt Bakers are feeling the freedom! Our host Sue of Palatable Pastime chose a very expansive theme: Bake whatever Bundt cake you want and I quote: "Any kind will  do - as long as you think it is delicious!" I am grateful for such an inclusive theme and Sue's behind the scenes work. Check out the wide variety of Bundt cakes we’ve baked for you, guaranteed to be delicious!
BundtBakers

#BundtBakers is a group of Bundt loving bakers who get together once a month to bake Bundts with a common ingredient or theme. You can see all of our lovely Bundts by following our Pinterest board. We take turns hosting each month and choosing the theme/ingredient. Updated links for all of our past events and more information about BundtBakers can be found on our home page.

Pin this Sourdough Chocolate Bundt Cake!

Food Lust People Love: The sourdough starter isn’t an obvious flavor in this sourdough chocolate Bundt cake but the moisture it adds makes this the most tender and light – yet so rich! – chocolate cake I’ve ever tasted.
 .

Tuesday, July 14, 2020

Cheddar Herb Scones #BreadBakers

These fluffy cheddar herb scones have the most wonderful flavor, not just from the cheese and herbs but also from the yeast used as the rising agent.

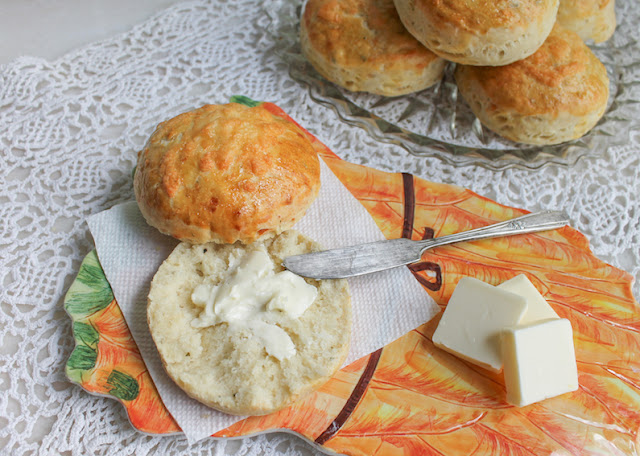
Food Lust People Love: These fluffy cheddar herb scones have the most wonderful flavor, not just from the cheese and herbs but also from the yeast used as the rising agent. The cheese and herbs are subtle in these scones but that just makes them more versatile. My family ate a few for breakfast but I also served them with pork and bacon patties as a sort of alternative burger for dinner. Delicious!


Most scones, at least in my experience, are raised with baking powder and/or baking soda but this month our Bread Bakers host, Sue of Palatable Pastime challenged us to bake them (or their American counterpart, biscuits) with yeast instead.

I’m here to tell you that yeast can make a lovely light scone as well and almost as quickly, with just one 30-minute rise of the dough before baking. The cheese and herbs are subtle in these scones but that just makes them more versatile.

Cheddar Herb Scones

My recipe is adapted from one on Kitchen Stories. My family ate a few for breakfast but I also served them with pork and bacon patties as a sort of alternative burger for dinner. Delicious!

Ingredients
2 teaspoons dry active yeast
2 teaspoons sugar
1 cup or 240ml warm water
2 cups or 250g bread flour
2 cups or 250g all-purpose flour
1 teaspoon sea salt
Black pepper
1 teaspoon minced fresh thyme
1 teaspoon minced fresh oregano
2 tablespoons olive oil, plus a little extra for the bowl
3 1/2 oz or 100g extra sharp cheddar cheese, plus extra for topping, if desired
1 egg, lightly beaten

Method
Grate your cheese and set aside.

In a small bowl or measuring cup, mix the yeast and sugar into the warm water. It should get nice and bubbly if your yeast is healthy.


Sift the flours and salt into a large mixing bowl. Add in a few generous grinds of black pepper, the grated cheddar, and herbs and mix well.


Add the olive oil to the yeast mixture then add the wet mixture to the dry ingredient bowl.


Stir with a wooden spoon until it’s too stiff to stir. Tip the shaggy dough out onto a clean surface and knead until all the ingredients come together in a tidy ball.


Put a little olive oil in the bowl and turn the dough ball over to coat. Cover the bowl with plastic wrap and let it proof for 30 minutes, in a warm dark place.

When your dough is almost through proofing, preheat the oven to 400°F or 200°C and prepare your baking pan by lining it with baking parchment or a silicone liner.

Turn out the dough onto a lightly dusted work surface lightly knead. Pat it into a disc that is about 1 in or 2.5 cm thick. Use a floured cookie or biscuit cutter to cut the dough into 3 inch or 7.6cm circles. Depending on the thickness of your dough, you should get seven or eight scones.


Transfer the dough circles to your lined baking pan. Brush with the beaten egg.


Sprinkle on a little cheddar, if desired.


Bake for 15-20 minutes in the preheated oven or until golden brown and well risen. Remove from the oven and serve with butter while still warm.

Food Lust People Love: These fluffy cheddar herb scones have the most wonderful flavor, not just from the cheese and herbs but also from the yeast used as the rising agent. The cheese and herbs are subtle in these scones but that just makes them more versatile. My family ate a few for breakfast but I also served them with pork and bacon patties as a sort of alternative burger for dinner. Delicious!


Enjoy!

If you are a fan of scones or biscuits, this is the Bread Baker recipe list for you! Many thanks to Sue from Palatable Pastime for hosting this month!

#BreadBakers is a group of bread loving bakers who get together once a month to bake bread with a common ingredient or theme. Follow our Pinterest board right here. Links are also updated each month on this home page. We take turns hosting each month and choosing the theme/ingredient.
BreadBakers

Pin these Cheddar Herb Scones! 

Food Lust People Love: These fluffy cheddar herb scones have the most wonderful flavor, not just from the cheese and herbs but also from the yeast used as the rising agent. The cheese and herbs are subtle in these scones but that just makes them more versatile. My family ate a few for breakfast but I also served them with pork and bacon patties as a sort of alternative burger for dinner. Delicious!
 .

Monday, July 13, 2020

Shortbread Peach Jam Squares

Make Shortbread Peach Jam Squares by surrounding bright sweet peach jam with crumbly buttery shortbread and baking it all to golden perfection!

Food Lust People Love: Make Shortbread Peach Jam Squares by surrounding bright sweet peach jam with crumbly buttery shortbread and baking it all to golden perfection!


When sweet peaches are in season, I can’t help myself; I have to make peach jam. While we also eat plenty and I freeze some, jam seems like the best way to make sure we can enjoy the flavorful juicy peaches for months to come.

Is it just me or does anyone else get an inordinate amount of satisfaction from seeing rows of homemade jams, chutneys and preserves in the pantry?

I get a little giddy as my stock grows although I also like to give some away. I have one rule though, if possible, wash my jars and give them back once they are empty! You’ll be much more likely to be a future recipient if you do.

Shortbread Peach Jam Squares

This recipe is adapted from one on Tasty for blackberry jam squares. As long as it’s nice and thick, you can use your favorite jam. I popped one cup of my homemade peach jam on the scale and it weighed 290g. I’ve added the correct measure below, for those of you who weigh ingredients.

Ingredients
2/3 cup or 158g butter, plus extra for greasing pan
1/8 cup or 25g sugar
1/8 cup or 25g dark brown sugar
1 large egg
1 teaspoon vanilla extract
2 1/2 cups or 312g plain flour
2 teaspoons baking powder
1/4 teaspoon salt
1 1/4 cups or 363g peach jam

Method
Preheat the oven to 350˚F or 180˚C and prepare an 9x9 in or 23x23cm pan by greasing it lightly and lining it with baking parchment.

Note: If you don’t mind cutting the squares in your pan, you can skip the baking parchment step but I find that I end up damaging my pan if I can’t remove the baked goods before cutting. The parchment makes lifting out easy.

Melt two tablespoons of the butter and set aside to cool.

In a bowl, beat together the rest of the butter and the two sugars until fluffy.

Add in the egg, melted butter, and vanilla extract and beat again.

Sift 2 cups or 250g of the flour, baking powder and salt into the bowl. Mix with a wooden spoon until combined.

Bring the mixture together using your clean hands to make a dough and divide it into two equal pieces.

Use your clean hands to spread out half of the dough in the baking pan. Prick the dough with a fork to prevent bubbles from forming while baking.

Spread the peach jam on top.


Mix in the remaining flour into the dough and use a fork to make a knobbly crumble.

Sprinkle the crumble on top of the jam.


Bake for 20 minutes, until golden brown on top.

Leave to cool completely then lift it out with the parchment paper. Cut into squares.

Food Lust People Love: Make Shortbread Peach Jam Squares by surrounding bright sweet peach jam with crumbly buttery shortbread and baking it all to golden perfection!


Enjoy!

Food Lust People Love: Make Shortbread Peach Jam Squares by surrounding bright sweet peach jam with crumbly buttery shortbread and baking it all to golden perfection!


This month my fellow Baking Bloggers are featuring peaches in all of our recipes, some savory, some sweet! Many thanks to our host, Sue of Palatable Pastime for all her behind-the-scenes work. Check out all the peachy deliciousness below:
Baking Bloggers is a friendly group of food bloggers who vote on a shared theme and then post recipes to fit that theme one the second Monday of each month. If you are a food blogger interested in joining in, inquire at our Baking Bloggers Facebook group. We'd be honored if you would join us in our baking adventures.

Pin these Shortbread Peach Jam Squares!

Food Lust People Love: Make Shortbread Peach Jam Squares by surrounding bright sweet peach jam with crumbly buttery shortbread and baking it all to golden perfection!
 .


Monday, June 29, 2020

Chocolate Banana Mini Muffins #MuffinMonday

The bananas are very subtle in these chocolate banana mini muffins. What they don’t add in flavor though, they make up for in texture. These little guys are soft, tender and light. And oh, so chocolatey, with both cocoa and chocolate chips.

Food Lust People Love: The bananas are very subtle in these chocolate banana mini muffins. What they don’t add in flavor though, they make up for in texture. These little guys are soft, tender and light. And oh, so chocolatey, with both cocoa and chocolate chips. Even if you aren’t typically a fan of bananas, I encourage you to give these muffins a try.


There are advantages and disadvantages to cooking and blogging as a hobby during this pandemic. The good part is that I can keep the family well fed and happy with home-cooked meals and treats. The bad part is that now I can’t have friends and extended family coming over for meals and that means leftovers that might get wasted.

I’m here to tell you that I’ve found a solution! About a week ago, I posted a notice on the neighborhood social site NextDoor, saying:

“Paying it forward with baked goods. Hi, neighbors! I am an avid baker with a food blog. The fun for me is creating recipes which my family and friends enjoy but because my mom has various autoimmune issues, we've been trying to stay to ourselves these past few months. This means that I have more baked goods than we can eat from time to time. I'd love to share with people in the neighborhood who could use a treat. Please pm me if you know someone in our neighborhood that would appreciate it and/or deserves it, with their name and address. I will drop fresh cookies, cake or muffins, etc. off whenever I bake, right on their front porch. Bonus points if you tell me why you think they need/deserve a treat and I'll try to get around to everyone in time. (I'll add a note saying which neighbor nominated them to receive baked goods. Please say if you don't want me to mention you by name and I'll just say, "a neighbor.") Please let me know if there are any dietary restrictions as well. Many thanks in advance!”

So far, I have dropped off treats to two very deserving neighbors: shortbread peach jam squares and these mini muffins. I am baking some super rich brownies today for a third!

Chocolate Banana Mini Muffins

Even if you aren’t typically a fan of bananas, I encourage you to give these muffins a try. They don’t really taste very much like banana but they are completely delicious. This recipe is adapted from one at All Recipes.

Ingredients 
1 1/2 cups or 187g all-purpose flour
1/2 cup, firmly packed, or 100g dark brown sugar
1/4 cup or 30g unsweetened cocoa powder
1 1/2 teaspoons baking powder
1/2 teaspoon baking soda
1/2 teaspoon salt
2 large ripe bananas (about 1 cup or 250g)
1/2 cup or 120ml canola or other light oil
1 egg
1/4 cup or 61g Greek yogurt
1/4 cup or 45g semisweet chocolate chips

Method
Preheat the oven to 375°F or 190°C. Prepare your 24-cup mini muffin pan by greasing it or line it with paper liners.

Mash your bananas with a fork.

Whisk the mashed bananas, oil, egg and yogurt together in a mixing bowl.


Lightly whisk the flour, sugar, cocoa, baking powder, baking soda, and salt together in another mixing bowl to combine.


Add the chocolate chips to the dry ingredients bowl, using the tip below.

Tip: Tired of your chocolate chips falling to the bottom of your muffins? Try this trick: drizzle just the tiniest bit of the oil onto the chocolate chips and stir until they are shiny. Add these to the dry ingredients and stir well to coat.


Fold the wet ingredients into flour mixture until just moistened.


Divide batter among the muffin cups. I love my little scoop for this job but if you don’t have one, a spoon will do.


Bake the muffins in your preheated oven until a toothpick inserted into the center comes out clean, about 12-15 minutes.

Food Lust People Love: The bananas are very subtle in these chocolate banana mini muffins. What they don’t add in flavor though, they make up for in texture. These little guys are soft, tender and light. And oh, so chocolatey, with both cocoa and chocolate chips. Even if you aren’t typically a fan of bananas, I encourage you to give these muffins a try.
Cool in the pan for a few minutes then remove the muffins from the pan and continue to cool on a wire rack.

Enjoy!

Food Lust People Love: The bananas are very subtle in these chocolate banana mini muffins. What they don’t add in flavor though, they make up for in texture. These little guys are soft, tender and light. And oh, so chocolatey, with both cocoa and chocolate chips. Even if you aren’t typically a fan of bananas, I encourage you to give these muffins a try.


Check out all of the great muffins my Muffin Monday friends are sharing today!
Muffin Monday

#MuffinMonday is a group of muffin loving bakers who get together once a month to bake muffins. You can see all of our lovely muffins by following our Pinterest board. Updated links for all of our past events and more information about Muffin Monday can be found on our home page.


Pin these Chocolate Banana Mini Muffins!

Food Lust People Love: The bananas are very subtle in these chocolate banana mini muffins. What they don’t add in flavor though, they make up for in texture. These little guys are soft, tender and light. And oh, so chocolatey, with both cocoa and chocolate chips. Even if you aren’t typically a fan of bananas, I encourage you to give these muffins a try.
 .

Friday, June 19, 2020

Bay Scallop Shrimp Biryani #FishFridayFoodies

This Bay Scallop Shrimp Biryani is a fragrant dish of well-seasoned seafood quickly seared till golden then mixed with long-grained basmati rice. It’s one of our favorite one-pot meals!

Food Lust People Love: This Bay Scallop Shrimp Biryani is a fragrant dish of well-seasoned seafood quickly seared till golden then mixed with long-grained basmati rice. It’s one of our favorite one-pot meals! I’ve adapted this recipe from the shrimp biryani in "At Home with Madhur Jaffrey."


We love biryani but I must confess that it’s not a dish I make very often, primarily because, aside from egg biryani, my favorite kind is made with lamb. Lamb biryani means cooking the meat first, long and slow, in which case I’m probably just going to make lamb curry or lamb stew and serve them with white rice.

It’s just occurring to me that maybe I need to try a lamb biryani in my Instant Pot. I still think it would take longer than this relatively quick bay scallop shrimp biryani.

Bay Scallop Shrimp Biryani

If you are using frozen shrimp and scallops in this recipe, make sure to thaw and drain well before you begin. Since we want to get a good sear with color on them, I’d even suggest patting them dry with a paper towel before seasoning. I’ve adapted this recipe from the shrimp biryani in At Home with Madhur Jaffrey.

Ingredients
2 cups or 385g long-grained basmati rice
1 lb or 450g bay scallops
1 lb or 450g medium raw shrimp, peeled and cleaned
1 small bunch fresh cilantro
5-6 medium garlic cloves, minced
2 teaspoons ground cumin
1 teaspoon ground turmeric
3/4 teaspoon cayenne pepper
Fine sea salt and freshly ground black pepper
3 tablespoons canola oil or other light oil
2 tablespoons fresh lemon juice
2 2/3 cups or 630ml store-bought or homemade shrimp or fish stock
4 cardamom pods
3 inch or 7.5cm stick cinnamon

Optional to serve:
Fried onions – can be purchased at most Asian markets

Method
Discard any hard stems from the cilantro and then mince the tender stems finely. Chop the leaves roughly and set aside a small handful for garnish at the end.

Rinse and strain the rice with cool cold water until the liquid that comes off the rice is clear. When done, drain the rice. I have a special tool for this that I bought when I lived in Brazil, where it got use daily. It’s called, no surprise, a “lava arroz” which means, wash rice.

You can use a colander or strainer, if the holes are small enough. Finally soak the rinsed rice in more cool water for 30 minutes.

Meanwhile, in a medium-sized bowl, combine the scallops and shrimp with the minced fine cilantro stems, garlic, cumin, turmeric, cayenne, 1/2 teaspoon salt, and a generous few grinds of black pepper. Toss well. Set bowl aside for 5 minutes.


Heat large non-stick skillet over a high heat. Add a small drizzle of the oil and then about a quarter of the shrimp and scallops and sear them quickly. You are looking for a little brown color so avoid stirring for the first minute or so. Check for color with a pair of tongs.

Just starting to brown! 


Cook another minute and tip them into a bowl. Continue with the rest of the shrimp and scallops until all are seared and in the bowl. Add in the lemon juice and the bigger pile of chopped cilantro.


Mix well.

Add 2 tablespoons oil to your skillet. (You will see that I changed pans here. This is because I don’t have a tight-fitting lid for my non-stick skillet. If you do, you can continue in the same pan. I did deglaze my original pan with a little of the stock so I wouldn’t lose the brown bits left behind there.)

Give the cardamom pods a slight bash with your pestle or the flat side of a knife. You just want to crack them open a little. Add the cinnamon to the pan along with the cardamom pods. Fry over a medium heat for a couple of minutes.

Pour the stock into the pan and turn the heat up. Assuming you’ve used the same pan, use a wooden spoon to dislodge any brown bits on the pan.

When the liquid comes to a boil, add the rice and 1/2 teaspoon salt.

Stir well, and then cover the pan tightly, reduce the heat to your lowest simmer, and cook for 25 minutes.

Turn off the heat and leave the pan to rest covered for 10 minutes. Remove the lid of the pan. You can discard the cinnamon stick and the cardamom or leave them in. Up to you.


Distribute the scallops and shrimp over the top of the rice and scrape in any juices that have accumulated in the bowl. Cover and set aside for another minute or two.


Stir the mixture gently.  Sprinkle with the reserved cilantro leaves and some crunchy fried onions.

Food Lust People Love: This Bay Scallop Shrimp Biryani is a fragrant dish of well-seasoned seafood quickly seared till golden then mixed with long-grained basmati rice. It’s one of our favorite one-pot meals! I’ve adapted this recipe from the shrimp biryani in "At Home with Madhur Jaffrey."


Enjoy!

Food Lust People Love: This Bay Scallop Shrimp Biryani is a fragrant dish of well-seasoned seafood quickly seared till golden then mixed with long-grained basmati rice. It’s one of our favorite one-pot meals! I’ve adapted this recipe from the shrimp biryani in "At Home with Madhur Jaffrey."

Check out the other lovely biryanis my fellow Fish Friday Foodies are sharing today. Many thanks to our host, Sneha of Sneha's Recipe and our group leader Wendy of A Day in the Life on the Farm.

Would you like to join Fish Friday Foodies? We post and share new seafood/fish recipes on the third Friday of the month. To join our group please email Wendy at wendyklik1517 (at) gmail.com. Visit our Facebook page and Pinterest page for more wonderful fish and seafood recipe ideas.


Pin this Bay Scallop Shrimp Biryani!

Food Lust People Love: This Bay Scallop Shrimp Biryani is a fragrant dish of well-seasoned seafood quickly seared till golden then mixed with long-grained basmati rice. It’s one of our favorite one-pot meals! I’ve adapted this recipe from the shrimp biryani in "At Home with Madhur Jaffrey."
 .