Tuesday, August 11, 2020

Pain de Mie aka Pullman Loaf #BreadBakers

Pain de Mie is the sandwich bread of my childhood dreams, soft inside with very little crust. It makes great toast, grilled cheese sandwiches and it’s perfect for those little finger sandwiches we love to eat at bridal showers and parties.


This is a loaf I’ve been wanting to make for the longest time but I struggled with spending the money for a pan I might not use that often. My fellow Bread Baker Karen came to the rescue by proposing a theme of sandwich bread for this month’s challenge. Now I had a good excuse! And also a forward plan for at least one further use.

When we lived in Brazil, one of my favorite brunch dishes was something they called torta salgada or savory pie. It started with a loaf of sandwich bread that was cut lengthwise instead of in the usual square slices. You could buy it like that in the grocery store, that’s how common torta salgada was!

The long bread slices were stacked one upon the other like a layer cake but filled in between with chicken salad, ham, cheese, tuna salad, salami or sometimes even a combination of fillings. Then the whole thing was topped or covered in softened cream cheese, just like a cake, and decorated with veggies or, my personal favorite, matchstick potatoes. It was chilled then cut slices to serve. Now with my Pullman loaf pan, I’ll be able to make my own torta salgada.

Why is it called a Pullman Loaf? 
According Wikipedia: "The name "Pullman" was derived from its use in the kitchens of the Pullman railway cars. Although the Pullman Company is credited with inventing the lidded baking pans used to create the square loaves, square tin pans existed long before the railroad company. European bread makers began using the pans in the early 18th century to minimize crust. However, George Pullman chose the loaf for use on his railcars for efficiency reasons. Three Pullman loaves occupied the same space as two standard round-topped loaves, thus maximizing the use of space in the small Pullman kitchen."

This type of bread is sold in France as pain (bread) de mie (the soft crumb inside.)

Pain de Mie aka Pullman Loaf 

This recipe is adapted from one on the King Arthur Flour website. I didn’t have potato flour, so I substituted cornstarch, a KAF recommended alternative that came with the caveat that some flavor in the bread would be lacking. To add that flavor back in, I used potato water (water in which washed, unpeeled, cubed potatoes had been boiled till tender) instead the plain lukewarm water in the KAF recipe. I have to tell you that this loaf is wonderful so I don't think I'd make it any other way.

Ingredients
1 cup or 240ml lukewarm potato water
2 teaspoons active dry yeast
3 tablespoons or 37g sugar
4 3/4 cups or 567g unbleached all-purpose flour
2/3 cup or 156ml milk, warmed slightly
6 tablespoons or 85g butter, softened at room temperature
1/4 cup or 28g non-fat dry milk
3 tablespoons or 20g cornstarch
2 1/4 teaspoons salt
2-3 teaspoons canola or other light oil for oiling the dough bowl and the baking pan

Method
Add the yeast and one tablespoon of the sugar to the lukewarm potato water. Set aside for five minutes. It should start to get foamy as the yeast is activated.


In a large mixing bowl or the bowl of your stand mixer, whisk together the flour, dry milk, cornstarch and salt. Make a well in the middle and add in the yeast mixture, milk and butter and mix well.


Knead — using your hands or the stand mixer - to form a smooth, soft dough. This dough is very sticky so if you do have one, I suggest at least starting with the stand mixer and the bread hook.

Transfer the dough to a lightly greased bowl. Cover the bowl with a damp cloth and set it somewhere warm to rise for about 1 1/2 hours.


Use a little oil to lightly grease a 13" pain de mie or Pullman pan, including the inside of the lid.

When the first rise time is up, sightly grease a clean work surface and tip the dough out, pressing it gently into a large rectangle.


Fold in one third from the back and then fold in one third from the front, giving you a long tube.


Now fold each side in to the middle to make a fat log.

Ease the log into your pan, seam sides down and press the dough down gently to fill your pan.


Cover the pan with lightly greased cling film, and allow the dough to rise until the top of the middle is just below the lip of the pan, 45 minutes to 1 hour, depending on the warmth of your kitchen.

Towards the end of the rising time, preheat the oven to 350°F or 180°C.

Remove the cling film.


Place the cover on the pan. Bake the bread for 25 minutes in your preheated oven. Remove the pan from the oven. Carefully remove the lid taking care not to burn yourself.

Return the bread to the oven and bake for an additional 20 minutes, or until it tests done; a digital thermometer inserted into the center will register 190°F.

Remove the bread from the oven, and turn it out of the pan onto a rack.


Cool completely before slicing to serve.

Food Lust People Love: Pain de Mie is the sandwich bread of my childhood dreams, soft inside with very little crust. It makes great toast, grilled cheese sandwiches and it’s perfect for those little finger sandwiches we love to eat at bridal showers and parties.

Enjoy!


This month our Bread Bakers theme is Sandwich Bread.  Many thanks to our host Karen of Karen's Kitchen Stories. Check out all the lovely recipes we are sharing today


#BreadBakers is a group of bread loving bakers who get together once a month to bake bread with a common ingredient or theme. You can see all our lovely bread by following our Pinterest board right here. Links are also updated after each event on the #BreadBakers home page. We take turns hosting each month and choosing the theme/ingredient.

Pin this Pain de Mie - Pullman Loaf!

Food Lust People Love: Pain de Mie is the sandwich bread of my childhood dreams, soft inside with very little crust. It makes great toast, grilled cheese sandwiches and it’s perfect for those little finger sandwiches we love to eat at bridal showers and parties.
 .

Monday, August 10, 2020

Pissaladière - Bacon Onion Anchovy Olive Tart

This pissaladière or, to give it a much more descriptive name in English, Bacon Onion Anchovy Olive Tart is baked with a non-traditional sourdough crust. The bacon, anchovies and olives are beautifully salty, perfect atop the sweet onions. A square or two of pissaladière makes a great appetizer or anytime snack. If you don’t have time for all the rising and resting time necessary, feel free to substitute your favorite pizza dough instead.

Food Lust People Love: This pissaladière or, to give it a much more descriptive name in English, Bacon Onion Anchovy Olive Tart is baked with a non-traditional sourdough crust. The bacon, anchovies and olives are beautifully salty, perfect atop the sweet onions. A square or two of pissaladière makes a great appetizer or anytime snack. If you don’t have time for all the rising and resting time necessary, feel free to substitute your favorite pizza dough instead.


Pissaladière is originally a traditional Liguria dish that made its way over to southeastern France and found a new home. Such a firm home that I was convinced that it was all French when we lived in Paris. Pissaladière was initially made with a spiced anchovy paste called pissalat but recipes commonly found on the web these days use whole anchovies instead and occasionally introduce another non-original topping, lardons, which are small pieces of smoked bacon.

The base can be made either a yeast dough or with a nod to the French influence, sometimes a pastry crust or even puff pastry. In the past, I’ve made round pissaladières for family dinners but in bakeries all across France it is sold as a popular snack cut into squares, so this time I decided to go rectangular.

I will tell you that it is excellent with a glass of something bright and sparkling or even a cold beer.

Pissaladière - Bacon Onion Anchovy Olive Tart

This recipe was adapted from one on Journal Des Femmes, for the toppings that is. The crust for the bottom was adapted from the recipe for focaccia integrale from James Morton’s new cookbook, Super Sourdough, which is AH-MAZING. < affiliate link. Take your sourdough starter out of the fridge at least 8–14 hours before you want to bake. If it hasn’t been fed recently, give it a feed when you take it out. As I mentioned above though, you can also substitute your favorite pizza dough if you aren’t into sourdough but it won’t be the same!

Ingredients
For the base:
5 1/3 oz (by weight, not fl oz) or 150g rye or wholemeal (wholewheat) sourdough starter
3 1/3 cups or 425g strong white (bread) flour
1 1/2 scant teaspoons or 8g table salt
1 1/2 cups or 350g tepid-warm water (about 77°F or 25°C)
1/2 cup or 100g good-quality extra virgin olive oil, plus extra for oiling and drizzling

For the toppings:
1/4 teaspoon salt
2.2 lbs or 1 kg onions
6 tablespoons olive oil
several sprigs fresh thyme
1 can (2 oz or 56g) anchovy fillets, salt cured, in olive oil
20 black oil cured olives (about 60g whole)
1/2 cup or 60g bacon crumbles

Method
James Morton’s sourdough focaccia requires a lot of rising time so you’ll either want to start super early in the day or take his recommendation to leave it overnight in the refrigerator for the second rise. That way you can bake whenever you are ready the next day, simply taking the dough out with enough time for it to come to room temperature again and finish rising before topping and baking.

Let’s get started. In a large bowl, weigh your flour and salt, mixing them both together well. Pour in your sourdough starter along with the tepid water. Mix everything until you have a very wet dough.


You can use a wooden spoon or stiff spatula but a friend recently gave me a Danish whisk and it is a great tool for this! (Am I the only one who had never heard of this fabulous tool?)


Cover the bowl with a damp cloth and let the dough rest for about 20–30 minutes.

Scrape the dough out onto a clean surface with NO FLOUR. We don’t want to add more flour to this very soft dough. A scraper comes in very handy here.


Knead your dough with the slap and fold method. This is a different focaccia recipe (and mine never got that firm) but you can watch James knead it here with the slap and fold method.

Slap and fold for about 5 minutes and as soon as it feels smooth, add your oil. Mix this until completely combined and you’ve got a very soft, shiny dough. Again the Danish whisk came in very handy here. I simply scooped the dough and oil and let it drop from the whisk repeatedly until the oil was mixed in.


Cover your bowl again with the damp cloth and leave in a relatively warm place for about 4 hours.

Peel the onions and cut them in half. Remove the hard core at the end and cut them into 1/4 in or 1/2 cm thick slices. Place them in a casserole dish with 5 tablespoons of olive oil, 3 tablespoons of water and the salt.


Cover and cook for 40 minutes over a low fire, stirring occasionally.

At the end of cooking, remove the cover and continue to cook until almost all of the liquid has evaporated, but without allowing the onions to brown. You will be amazed at how much they will cook down and how sweet the onions become, almost jammy.


Meanwhile, pit your olives by hitting them with the flat side of a large knife and pulling the pits out. Cut them into halves.


Drain the can of anchovy fillets and pop them on a saucer. This will make it easier to separate them. I like to use the point of a toothpick to ease them away from each other till they are single file on the plate. I also like to cut the thicker ones in half lengthwise to spread the saltiness more evenly around the pissaladière.


After the 4-hour rise, oil a 12 x 16in or 30 x 40cm baking pan and then add a little oil on top of your proven dough.

Scrape the dough with your well-oiled hands into the well-oiled pan, easing the dough out to the edges, trying very hard not to pop its lovely air bubbles.


Now fold your dough in half, and then fold your new, longer dough in half again. My dough was so soft that it just oozed back larger before I could take a photo of it looking a quarter of its original size.


Add more oil if it’s sticking, and gently push your dough out into the corners of the baking pan.

Stick your pan inside a plastic bag and leave to prove for 2–3 more hours at room temperature.

Alternatively, you can retard this prove overnight by putting the bag covered dough in the refrigerator overnight or for up to 24 hours until your bread is ready to bake. If you do prove overnight, like I do, make sure to take the dough out a good hour before you want to bake so it can come to room temperature again and reach its full rise.

Before topping!


Preheat your oven to 480ºF or 250ºC at least 30–40 minutes before you expect to bake your bread.  James is a big advocate of baking stones so if you have one, put it on the middle rack of your oven to heat up, along with an iron skillet on the bottom to which you’ll add water for steam.

Just before it’s ready to bake, remove the dough pan from the plastic bag and add the toppings gently so as not to deflate all of the bubbles, starting with the onions, then adding the bacon crumbles and finally the anchovies and olives.


Put your baking pan on the stone, if using, or middle shelf and add one cup or 240ml of water to the skillet on the bottom. Close the oven quickly and turn the temperature down to 430°F or 220°C. Bake for 20 minutes then open the oven door briefly to allow any steam to escape and continue baking for a further 15-20 minutes or until the edges are a lovely golden brown color.

Remove your pissaladière from the oven and leave to cool for about 15 minutes before adding the sprigs of thyme and another drizzle of olive oil, if desired.

Food Lust People Love: This pissaladière or, to give it a much more descriptive name in English, Bacon Onion Anchovy Olive Tart is baked with a non-traditional sourdough crust. The bacon, anchovies and olives are beautifully salty, perfect atop the sweet onions. A square or two of pissaladière makes a great appetizer or anytime snack. If you don’t have time for all the rising and resting time necessary, feel free to substitute your favorite pizza dough instead.


Cut into squares to serve.

Food Lust People Love: This pissaladière or, to give it a much more descriptive name in English, Bacon Onion Anchovy Olive Tart is baked with a non-traditional sourdough crust. The bacon, anchovies and olives are beautifully salty, perfect atop the sweet onions. A square or two of pissaladière makes a great appetizer or anytime snack. If you don’t have time for all the rising and resting time necessary, feel free to substitute your favorite pizza dough instead.


Enjoy!

This month my Baking Blogger friends are all sharing French recipes at the instigation of our fabulous host and organizer, Sue of Palatable Pastime. Check out all the great bakes below:

Baking Bloggers is a friendly group of food bloggers who vote on a shared theme and then post recipes to fit that theme one the second Monday of each month. If you are a food blogger interested in joining in, inquire at our Baking Bloggers Facebook group. We'd be honored if you would join us in our baking adventures.


Pin this Pissaladière!

Food Lust People Love: This pissaladière or, to give it a much more descriptive name in English, Bacon Onion Anchovy Olive Tart is baked with a non-traditional sourdough crust. The bacon, anchovies and olives are beautifully salty, perfect atop the sweet onions. A square or two of pissaladière makes a great appetizer or anytime snack. If you don’t have time for all the rising and resting time necessary, feel free to substitute your favorite pizza dough instead.
 .

Monday, July 27, 2020

Cranberry Orange Pistachio (Vegan) Muffins #MuffinMonday

These Cranberry Orange Pistachio Vegan Muffins tick all the right boxes, tender flavorful crumb, sticky fruit, crunchy nuts. They are a wonderful treat for all the family, even the vegans among you since they are dairy-free and eggless.

Food Lust People Love: These Cranberry Orange Pistachio Vegan Muffins tick all the right boxes, tender flavorful crumb, sticky fruit, crunchy nuts. They are a wonderful treat for all the family, even the vegans among you since they are dairy-free and eggless.


The thing I love most about these muffins is that despite being vegan-friendly, they don’t have any weird ingredients like ground flax or chia seed, commercial egg replacer or silken tofu. Aside from the non-dairy yogurt, they are made with normal things that most people have on hand already.

I made these muffins as another thank you to one my neighbors for being awesome. The current recipient is a wonderful person who takes great care of her special needs rescue dogs as well as being kind and compassionate to the humans living near her. One neighbor said, “She lives on our block.  She is an angel. Cares about people almost as much as her pups - a wonderful person.” Three others called her their hero but this was my favorite accolade: “I've often thought that when I go to the "rainbow bridge" (hopefully) I wish to come back as one of her pups.”

Fortunately in the shower of compliments, someone also thought to mention that our honoree is vegan. I’d have felt terrible to find out later that she couldn’t eat what I’d baked for her!

Cranberry Orange Pistachio (Vegan) Muffins

Due to an Instacart order that went awry, I just happened to have a container of So Delicious dairy free coconut milk vanilla yogurt in my refrigerator. Use your favorite vanilla yogurt. You can also substitute plain non-dairy yogurt and add 2 teaspoons vanilla extract instead.  This recipe is adapted from one on A Virtual Vegan.

Ingredients
Zest 1 orange
1/2 cup or 120ml orange juice
1 cup or 120g dried cranberries, plus few more for decoration, if desired
1/2 cup or 70g roasted, unsalted pistachio nuts
2 cups or 250g all purpose unbleached flour
1/2 cup or 100g sugar
|2 1/2 teaspoons baking powder
1/2 teaspoon baking soda
1/4 teaspoon salt
1/2 cup or 120ml canola or other light oil
1 cup or 240ml non-dairy vanilla yogurt

Method
Put the cranberries in a small bowl and cover with the orange juice. Leave to soak for at least 30 minutes but you can even do this step the day before. If you do, pop the bowl in the refrigerator overnight. I like to warm the orange juice for about 30 seconds in the microwave because it seems to soften the cranberries more.


When you are ready to continue, preheat your oven to 350°F or 180°C and prepare your 12-cup muffin pan by lining it with paper muffin cups or silicone liners.

Chop the pistachios roughly and separate out a small handful for sprinkling on top of the muffins before baking.

In a large mixing bowl, whisk together the flour, sugar, baking powder, baking soda, salt and orange zest.


Drain any orange juice that hasn’t been absorbed by the cranberries into another mixing bowl. (I left mine to soak overnight so the cranberries had turned the orange juice a lovely shade of red.) Add in the oil and non-dairy vanilla yogurt and whisk well to combine.


Tip the drained cranberries into the flour bowl and stir well to coat them. Use a fork or your clean hands, if necessary, to separate them if they are clumping together.


Pour the wet ingredients into the dry and fold till almost combined. There should still be some flour showing.


Add in the bigger pile of chopped pistachios and fold to distribute them well throughout the batter.


Divide the batter between the cups in your prepared muffin pan. Top with a sprinkle of the reserved chopped pistachios and one more dried cranberry, if desired.

Food Lust People Love: These Cranberry Orange Pistachio Vegan Muffins tick all the right boxes, tender flavorful crumb, sticky fruit, crunchy nuts. They are a wonderful treat for all the family, even the vegans among you since they are dairy-free and eggless.


Bake in the preheated oven for 20-25 minutes or until well risen and golden. Remove from the oven and cool for a few minutes in the pan, then remove the muffins and place on a wire rack to cool

Food Lust People Love: These Cranberry Orange Pistachio Vegan Muffins tick all the right boxes, tender flavorful crumb, sticky fruit, crunchy nuts. They are a wonderful treat for all the family, even the vegans among you since they are dairy-free and eggless.


Enjoy!

Food Lust People Love: These Cranberry Orange Pistachio Vegan Muffins tick all the right boxes, tender flavorful crumb, sticky fruit, crunchy nuts. They are a wonderful treat for all the family, even the vegans among you since they are dairy-free and eggless.


Happy Muffin Monday! Check out all of the lovely muffins we've baked for you this month:

Muffin Monday

#MuffinMonday is a group of muffin loving bakers who get together once a month to bake muffins. You can see all of our lovely muffins by following our Pinterest board. Updated links for all of our past events and more information about Muffin Monday can be found on our home page.

Pin these Cranberry Orange Pistachio (Vegan) Muffins!

Food Lust People Love: These Cranberry Orange Pistachio Vegan Muffins tick all the right boxes, tender flavorful crumb, sticky fruit, crunchy nuts. They are a wonderful treat for all the family, even the vegans among you since they are dairy-free and eggless.
 .

Friday, July 17, 2020

Charcoal Grilled Soy Ginger Salmon #FishFridayFoodies

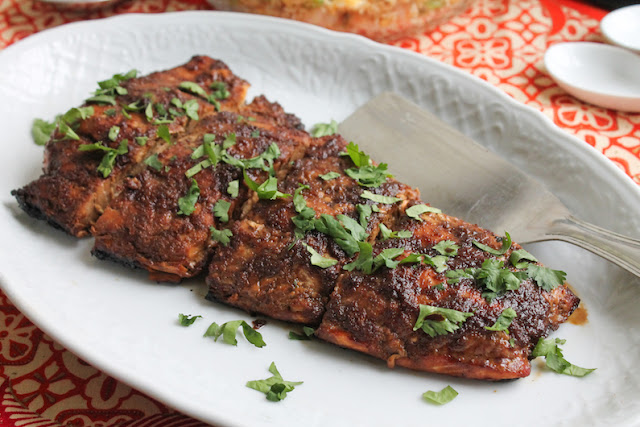
This charcoal grilled soy ginger salmon is bursting with flavor from the sticky roasted marinade but what really makes the salmon divine is the smokiness from the hot charcoal.

Food Lust People Love: This charcoal grilled soy ginger salmon is bursting with flavor from the sticky roasted marinade but what really makes the salmon divine is the smokiness from the hot charcoal.


I know a lot of people swear by their gas grills. I’m even related to some. Certainly, you can make grill marks with a gas grill and you can even throw in some wood chips as long as they are in a box or covered with foil. But in our humble opinion, you just aren’t going to match the taste of meat, seafood or even vegetables grilled over coal.

We feel so strongly about this that we actually own two Weber grills, a big one and a small one. Which one we use depends on how many people we are feeding. My husband hates to waste charcoal. He’s usually the one in charge of the grill and he has the whole process down to a fine art.

If you are a fan of seafood on the grill, you might also enjoy my piri-piri grilled whole baby grouper, my spicy Balinese grilled fish or my stuffed fresh sardines wrapped in parma ham then grilled.

Charcoal Grilled Soy Ginger Salmon

Depending on how widely spaced the bars on your grill are, you may need an additional grate to lay on top to keep your fish from falling through the gaps. I bought one on Amazon < affiliate link – which is non-stick and works wonderfully. You could also simply lay the fish on a piece of heavy-duty foil.

Ingredients (to serve 4)
3 cloves garlic, peeled
1 thumb-sized piece fresh ginger, peeled (about 1 tablespoon grated)
1/4 cup or 60ml soy sauce
3 tablespoons sweet soy sauce
1 tablespoon good quality Shaoxing (Chinese rice wine)
1 tablespoon sesame oil
1 1/4 lb or 567g wild salmon fillet, skin on

For garnish:
Chopped cilantro

Method
Grate the ginger and garlic into a small bowl.

Add in the rest of the marinade ingredients and stir well. Set aside.


Cut your salmon fillet into four portions but DO NOT cut through the skin below. We want what appears to be one whole piece so the skin will help hold it together as it cooks but we also want to be able to spoon marinade between the portions.

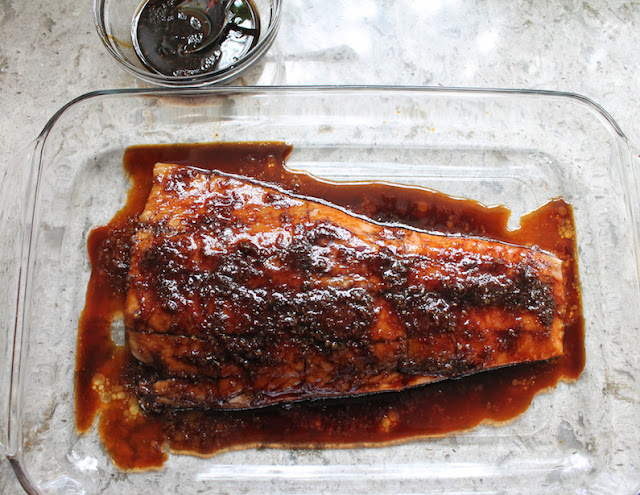
Place the fish in a shallow dish and spoon the marinade over it and between the pieces, reserving perhaps a third for basting when it’s grilling.

Food Lust People Love: This charcoal grilled soy ginger salmon is bursting with flavor from the sticky roasted marinade but what really makes the salmon divine is the smokiness from the hot charcoal.


Cover with cling film and refrigerate until ready to cook but at least 30 minutes.

Light a good size pile of briquettes in your grill. They are ready for cooking when the outsides are mostly grey with a red core, about 20 minutes.

Spread the coals around evenly.  The goal is a medium-hot fire.

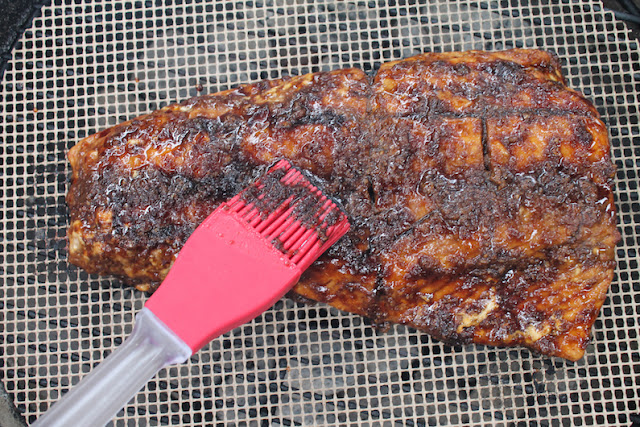
Put your grate on the grill, if needed, then lay the salmon on top, skin side down.

Food Lust People Love: This charcoal grilled soy ginger salmon is bursting with flavor from the sticky roasted marinade but what really makes the salmon divine is the smokiness from the hot charcoal.
Put the lid on, with vents partially open, and cook for about 8-12 minutes until the salmon is just barely cooked through, according to the thickness of the fish or to your liking. Baste halfway through with the reserved marinade.

Food Lust People Love: This charcoal grilled soy ginger salmon is bursting with flavor from the sticky roasted marinade but what really makes the salmon divine is the smokiness from the hot charcoal.
With wild salmon, the kind I normally cook, you want to err on the side of undercooked vs overcooked because it is lean and can dry out. Farm-raised salmon will take a bit longer.

The FDA recommends cooking salmon to an internal temperature of 145°F or 63°C. If you have an instant read thermometer, stick it in the thickest part of the fillet for the most accurate reading. Get it up just past 130°F or 54°C and it will reach optimum temperature while it rests in foil.

Remove from the grill and rest, wrapped loosely with foil for 10 minutes.

Food Lust People Love: This charcoal grilled soy ginger salmon is bursting with flavor from the sticky roasted marinade but what really makes the salmon divine is the smokiness from the hot charcoal.


Garnish with some chopped cilantro, if desired, and serve.

Food Lust People Love: This charcoal grilled soy ginger salmon is bursting with flavor from the sticky roasted marinade but what really makes the salmon divine is the smokiness from the hot charcoal.


Enjoy!


This month my Fish Friday Foodies friends are cooking seafood outdoors at the instigation of our host and group leader, Wendy of A Day in the Life on the Farm. Check out all the great recipes below:


Are you a food blogger who would you like to join Fish Friday Foodies? We post and share new seafood/fish recipes on the third Friday of the month. To join our group please email Wendy at wendyklik1517 (at) gmail.com. Visit our Facebook page and Pinterest page for more wonderful fish and seafood recipe ideas.


Pin this Charcoal Grilled Soy Ginger Salmon! 

Food Lust People Love: This charcoal grilled soy ginger salmon is bursting with flavor from the sticky roasted marinade but what really makes the salmon divine is the smokiness from the hot charcoal.
 .